Transparent GIF in Adobe Illustrator is done as follows. Go to menu File > Save for Web & Devices (Alt+Ctrl+Shift+S). In the window that opens, in the Optimized file format field, you must first go to the tab image size(image size). The fact is that the entire page gets into the optimization window by default, and this is usually not necessary. Therefore, in the Image Size tab, deselect the checkbox Clip to Artboard(Crop to fit page) and click the Apply button.
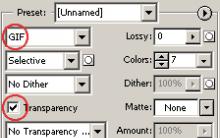
Then, in the format selection list, select GIF and check the Transparency checkbox.

After that, we will determine which colors will be transparent. All colors present in the image are contained in the tab color table(Color Chart) and are displayed as colored squares. Select a tool from the toolbar on the left side of the window eyedropper(pipette).

Colors can be defined in two ways. The easiest way is to specify the color with an eyedropper directly on the image - after that the color will be highlighted on the color table with a dark stroke. Well, if you know exactly which color should be transparent, you can select it directly on the color table by clicking the corresponding colored box. And in the first and second cases, if you need to select several colors, you need to work with the Shift (or Ctrl) key pressed. After choosing a color, you need to instruct the program to make it transparent. To do this, click on the icon Maps selected colors to Transparent(Add selected colors to transparency). In the figure, this button is circled, and the red color is set to transparent. A transparent area will appear on the image, and the square on the color table will change its appearance - part of it will become a white triangle. To cancel the selected color, you need to select it in the Color Table, and then click the Maps selected colors to Transparent icon again.
A few words about the method of setting transparency. The dropdown menu is responsible for it. Specify Transparency Dither Algorithm, in Russian - Transparency simulation algorithm (fig. below). There are four choices: No Transparency Dither - no algorithm, Diffusion Transparency Dither - diffuse algorithm, Pattern Transparency Dither - pattern-based algorithm and Noise Transparency Dither - noise-based algorithm. In the diffuse algorithm mode, the slider becomes active Amount(Amount) that allows you to change the diffusion value. What to apply in practice? Depending on the purpose and image. I don't use this option and always leave the default - No Transparency Dither.

Press Save - transparent GIF is ready. The work was done in Adobe Illustrator version CS4 (v.14), but all actions and keyboard shortcuts are relevant for the earlier version CS3 (v. 13).
Now let's complicate the task a bit - let's make an animated Flash banner. Of course, it is not necessary to talk about a full-fledged Flash animation in this case - there are specialized packages for this. But you can also use Illustrator to create a simple, amateur video.
There are no special tools and interface tools, such as a timeline, that are typical for animation development programs, in Adobe Illustrator. But there is one subtlety - layers can be used as frames.
Create a banner with only text.
- Group the symbols with the command Object › Group(Object › Group).
- The next task is to make contour objects out of font characters, otherwise the correct formation of layers will not work. To do this, select a group and select Type › Create outlines(Font › Trace).
- After that open the palette menu Layers(Layers) by clicking on the button in the form of an arrow on the palette (Fig. 8.11).
Rice. 8.11. Layers palette menu
We are interested in the command in this menu Release to Layer (Sequence)(Convert to Layers (Sequentially)) which translates each individual object onto a new layer. Please note that when applying the command, the group must be selected group, not a layer Layer 1.
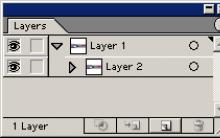
What the palette should look like Layers(Layers) after execution Release to Layer (Sequence)(Convert to Layers (Sequential)), shown in fig. 8.12.

Rice. 8.12. The Layers palette after Release to Layer (Sequence)
This completes the preparation, you can save using Save for Web(Save for Web) to SWF. SWF is the main graphics format based on Flash technologies. It would be more accurate to say that this is the Flash format (Fig. 8.13).
Probably, today all users are more or less familiar with Flash. It is currently the most common animation format on the Internet and is used to build the vast majority of multimedia web pages.
Of course, even a tenth of the capabilities of Flash are not implemented in Adobe Illustrator, because the program is not designed for this. However, in it you can make either a static picture or a simple animation.

Rice. 8.13. Optimization settings for SWF format
There are the following settings.
- Read Only(Only reading). If you check the box, the file will be written in such a way that it can no longer be opened for editing in any program. This, on the one hand, reduces the size of the files, and on the other hand, protects your copyrights.
- Setting labeled 1. Parameter specifying the type of saving - image or animation.
- If you choose the option AI File to SWF File(Illustrator file to SWF file), the image will be saved as a static image exactly like what you see on the screen when working in Illustrator.
- Layers to SWF Frames(Layers to SWF Frames) allows you to animate existing layers, which will be rendered as frames. We need to choose this option.
- Curve Quality(Quality of curves). Accuracy of curves repeating the curves file of the original image. Decreasing this setting significantly reduces the quality, especially in the area of small details, but reduces the file size. For our case, the optimal value is "7".
- frame rate(Frame delay). Frame rate and, as a result, animation speed. For the effect to be correct, set no more than 4 frames per second.
- loop(To repeat). Play animation multiple times. Suitable for animations where a repeating loop is important. The banner belongs to this type.
Adobe Illustrator and After Effects
Import and simple animation
Hello. Today we are reviewing a simple animation in After Effects.Resources: Adobe Illustrator CC
Adobe After Effects CC
Let's start by drawing in Illustrator.
We draw
1) Draw a yellow Rectangle as a background
Figure 1 - Rectangle
2) Draw a Circle and fill it with a gradient
Let's work on the circle a bit:
- remove the lower point on the contour, we get an arc;
- draw a straight line, closing the bottom of the arc, we get a semicircle

Figure 2 - 1) draw circle; 2) gradient; 3) delete point
3) Draw a Rectangle and make a copy of it
- one gray rectangle;
- another dark gray rectangle
4) Draw a Triangle from an asterisk by setting the number of rays - 3

Figure 3 - 1) rect light; 2) rect dark; 3) triangle
5) Draw a cat with Pen and simple shapes 
Figure 4 - 1) head; 2) neck; 3) body; 4) leg; 5) tail
And now the most MAIN moment
Let's distribute the pictures into layers (what will be animated - on a separate layer) like this: 
Figure 5 - all pics (red mark important layers)
Everything, now we save.
Let's see the save settings

Figure 6 - Save
And now the next stage. CloseAdobe Illustrator and open After Effects.
Import into After Effects
File - Import - File - select our saved file Illustrator.
Let's choose to import layers from Illustrator, if we put footage, we will get an image with merged layers, but we don't need this.
Figure 7 - Import As Composition
All imported.
Now let's see what we have. Double click on composition
, what would open and we would see the layers (if everything was done correctly, there will be several layers). We get this, see picture

Figure 8 - Open composition
And now what we are here today for - Animation.
Animation in
after effects
Set the pivot point at the arrow at the top of it with the Pan Behind Tool (shortcut - Y). Just take a point and move it where you want. As a result, it will look like this..
Figure 9 - Pan tool and Layers
That's it, now let's move on to layers for animation.
We need an Arrow layer and a Head_cat.
Let's start with arrow.
Expand the list, find and click on the clock. So we put the first point at zero second. In total, the animation will last 2 seconds.
So, these are the settings you need to make (we will put 3 points in total)
| Second | 0 | 1 | 2 |
| +66 | - 70 | +66 |

Figure 10 - Rotation arrow
Now let's animate the cat's head.
Expand head_cat and find Position.
There will be 4 points.
It will change only the last coordinate without touching the rest.
| Second | 0.1 | 0.17 | 1.12 | 2.0 |
| Position | 689.3 | 729.3 | 729.3 | 689.3 |

Figure 11 - Position head
So, the principle of animation was like this. The arrow swings from side to side, as soon as it approaches the kitten, he pulls his head into himself, lingers in this position for a bit, and then returns it to its place.
The final stage
Production
You need to create a finished product from your work.
Go to the menu - Add to Render Queue
The Render panel opens and in the Output Module (two clicks) select the output format. I took *.mov

Figure 12 - Render
Click on the RENDER button and get the result (don't forget to specify the path).
That's all.
Recently, various kinds of animation of SVG (Scalable Vector Graphics) graphics on websites and applications have become very popular. This is due to the fact that all the latest browsers already support this format. Here's info on browser support for SVG.
This article describes the simplest example of animating an SVG vector using the lightweight Jquery plugin Lazy Line Painter.
sourceTo complete and fully understand this task, basic knowledge of HTML, CSS, Jquery is desirable, but not necessary if you just want to animate SVG) Let's get started!
And so the steps we need to follow:
- Create the correct file structure
- Download and connect the plugin
- Draw a Cool Line Art in Adobe Illustrator
- Convert our picture to Lazy Line Converter
- Paste the resulting code into main.js
- Add some CSS to taste
1. Create the correct file structure
The Initializr service will help us with this, where you need to select the parameters as in the picture below.
![]()
- Classic H5BP (HTML5 Boiler Plate)
- No Template
- Just HTML5 Shiv
- minified
- .IE Classes
- Chrome frame
- Then click Download it!
2. Download and connect the plugin
![]()
Since initializr comes with the latest Jquery library, from the archive that we need to download from the Lazy Line Painter project repository, only 2 files need to be transferred to our project. The first one is ‘jquery.lazylinepainter-1.1.min.js’ (plugin version may differ) it is located in the root of the resulting folder. The second one is example/js/vendor/raphael-min.js.
![]()
These 2 files are placed in the js folder. And we include them in our index.html before main.js like this:
3. Draw a cool outline picture in Adobe Illustrator
- Draw our outline picture in Illustrator (the easiest way to do this is with the Pen Tool)
- It is necessary that the contours of our drawing do not close, because for our effect we need a beginning and an end
- Should not have fills
- The maximum file size is 1000×1000 px, 40kb
- Let's crop to the borders of the object Object>Artboards>Fit To Artboards Bounds
- Save as SVG (standard save settings are fine)
For example, you can use the icons in the attachment.
![]()
4. Convert our picture to Lazy Line Converter
Just drag and drop your icon into the box below.
The thickness, color of the outline and animation speed can be changed in the code itself that will appear after the conversion!
![]()
5. Paste the resulting code into main.js
Now just paste the resulting code into an empty main.js file
Parameters:
strokeWidth — outline thickness
strokeColor - outline color
You can also change the drawing speed of each vector by changing the value of the duration parameter (default 600)
6. Add some CSS to taste
Remove paragraph from index.html
hello world! This is HTML5 Boilerplate.
And instead of it we insert a block in which our animation will take place
then add some CSS to the main.css file for a nicer look:
Body ( background:#F3B71C; ) #icons ( position: fixed; top:50%; left:50%; margin: -300px 0 0 -400px; )
save all files.
Now just open index.html in a modern browser and enjoy the effect.
P.S. when running on a local machine, the start of the animation may be delayed by a few seconds.
Hello everyone! Today I will try to make a description of the features of the program Adobe Illustrator, comparing it with the capabilities of the flush. This will not be a global analysis of the bone program, but rather a description of some of the interesting features that I discovered in this program. I collected information piece by piece as I studied it in order to put it all in one post. I must admit right away that I am not a super-experienced illustrator user, only for the last six months I have been using it in drawing (before that, I drew everything in flash). Many complain that the illustrator is complex, not always intuitive. To some extent, I agree that after the flash, this program is difficult. But the main thing here is not to quit, but to continue studying. And after a couple of weeks, the thought arises, how did I manage without it before!
So, what I liked about illustrator, and what I found for myself that is not in flash.
1. I'll start with the simplest, but at the same time necessary. Try to arrange objects in a circle in flash. Previously was Deco Tool, but it was removed, apparently considered unnecessary. We decided that it would be more fun to do it by hand. Illustrator has this function: Effect - Distort&Transform - Transform.

Everything is fast and simple, we set the values (distance between objects, number of copies) ourselves in the settings.
2. Zigzag
Even more simple, but nevertheless useful thing. It would seem a trifle, but in flash you have to draw by hand, in illustrator this is a matter of seconds.

3. Deformation of objects (Warp)
There is nothing like this in Flash. In the example below, I showed only 2 ways to deform simple shapes (Effect - Warp - Arc / Fish). In fact, there are 15 of them in the latest version of the program.

4. Automatic rounding of corners (Round Corners)
It can be done manually: on a graphical object, when selected in a corner (in all corners), a white dot and a rounded line sign appear. Drag the mouse, adjust to your taste.

But this only applies to shapes, with a pencil line a little differently - apply the rounding effect ( Effect - Stylize - Round Corners). At the output we get the same result.

5. Roughen
The effect is applied to simple shapes ( Effect-Distort&Transform-Roughen). As a result, we get something resembling low-poly 3D models. I think it's cool :) And most importantly - very simple.

6 Pucker&Bloat(Pull in and Inflate)
An example in the picture below:

7. Form extension (Offset Path)
In the flash there is a function Expand Fill (fill extension), it does not work with pencil lines at all, unlike illustrator.

8. Brushes (Art Brush, Pattern Brush, Scatter Brush)
See the picture below for examples:


9.Texture Brush (Texture Brushes)
There are also many texture brushes in illustrator that I wrote about and how they appeared in the new version of flash - . It has been noticed that the use of brushes in Adobe Animate is terribly slow. That's it:(
10. I'm not sure if this is a trick, but I want to focus on a brush with a funny name blobBrush. Located on the toolbar, a very nice brush to use. It has a bunch of settings, I like it more than usual. It’s hard to explain its benefits in words, it’s better to try it once.

10.Split to Grid
Another useful feature is the Split to Grid (Object-Path-Split to Grid) function. It allows you to cut the form into equal segments. What does this remind us of? That's right - windows in a high-rise building. As for me, a cool thing for drawing, for example, urban landscapes;)

Another useful tool introduced in illustrator, probably since its first release. With it, you can create, for example, wood textures:

12. Move (right - Transform - Move)
Offset an object by a given distance. If desired, you can immediately create a copy that will be placed at the desired distance from the selected object horizontally / or vertically. In an earlier version of flash, there was a plugin that performed this function. Unfortunately, I don't remember its name.

It is very convenient to create seamless patterns in illustrator ( Object-Pattern-Make). I remember how I frantically excelled in flash with the creation of . In the illustrator version of CC 2015, everything is automated, a bunch of settings will help you create a pattern in dozens of variations, with just a few graphic elements at hand. In earlier versions of the program, everything had to be done manually, as in flash so far.

(Note - the pattern can be made a vector editable object using the parse function ( Object-Expand Appearance).
14. Object Mosaic (Mosaic)
Create a color palette based on an existing image. Import the picture you like into the illustration (Open), then Object - Create Object Mosaic. In the settings, we specify the division frequency in height and width.
And at the output we get:

15.Blend (Mixing)
Used to create gradients. You can create step-by-step transitions, as, for example, in the picture. I can't say that I use it often, but it might come in handy for someone. It seems to me that it can be used in creating simple background pictures.

The tool can also be used to clone objects. We place two objects at a distance from each other and apply Blend Options, select the number of steps (the number of cloned objects).

16. Build Shape Tool. A very handy thing for working with primitives. In a flash, as it seemed to me, it is less convenient.
Holding Alt and clicking on the selected segments - delete the segments. If we simply drag the mouse over several selected areas - connections.

Addition - a tool that helps to automatically cut, connect, etc. selected forms. As for me, it is not very convenient, I use it more often Buildshapetool.

(artboards)

18.Custom Tool Panel
The ability to create your own toolbar, discarding unnecessary ones, and select only those that you use.
In flash, artboards, namely scenes ( Scene 1,2,3..) are located separately and you need to switch between them (Shift + F2). In illustrator, they can all be positioned before your eyes. It is convenient when you make several versions of the same drawing, so that all options are in front of your eyes for comparison.
19. Isometric with Graphic Styles
And the last thing is the creation of isometry without using 1 click (or rather, 3 clicks, because we have 3 sides;) using graphic styles ( Graphic Styles). How this is done, I will write next time.

What illustrator has in common with flash is the ability to save an object to a symbol (symbol) and this symbol can also be transferred to flash without problems (open an .ai file in flash, by Import - Import to stage).
The symbol in illustrator has the same properties as in flash.
And in the end, I’ll write what in illustrator, in my opinion, is inferior to flash. Yes, yes, and there is. And this is the fill tool ( paint bucket). No matter how hard I try to get used to it in illa, it is more convenient in flash.
If my notes have become useful for you or if you want to add something on your own - wellcome in the comments! Good luck to all;)



Net framework not lower than 3.5. Installing or updating, fixing bugs. Installation via Windows Update
Which antivirus to choose for windows phone?
Rollback Android: how to return the old version of the firmware?
Windows won't boot after installing updates
Windows won't boot after installing updates