Very often a situation arises when a computer or laptop starts to work unstable after installing a particular program, as well as after being infected with a virus. In this case, a very useful function that will return the state of the computer to a few days ago, thereby canceling unwanted changes in the system. This feature of Windows is called System Restore. How it works and how to use it, we will tell you in this article.
Restoring Windows to a Previous State
This option is really very useful. It can always be used after the computer has become unstable after making certain changes, such as installing a program or updating a driver.
But there are two conditions that must be met in order to successfully use Windows System Restore:
- The restore option itself must be activated;
- There must be a restore point with a rollback date that satisfies you.
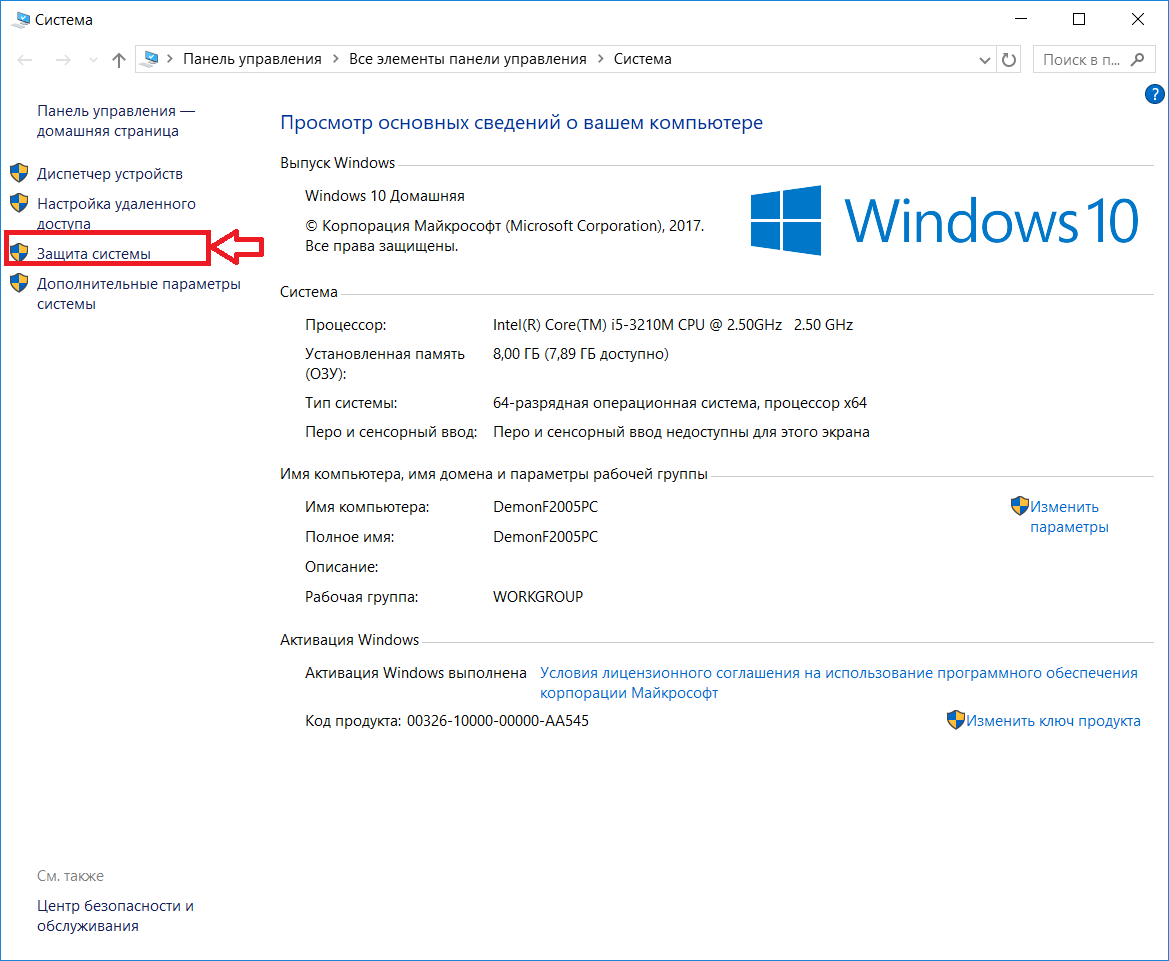
In order to check if the recovery option is activated on your computer, you need to do the following:
Right-click on the "Computer" icon on the desktop or in the "Start" menu and select "Properties" from the menu that opens.
System protection
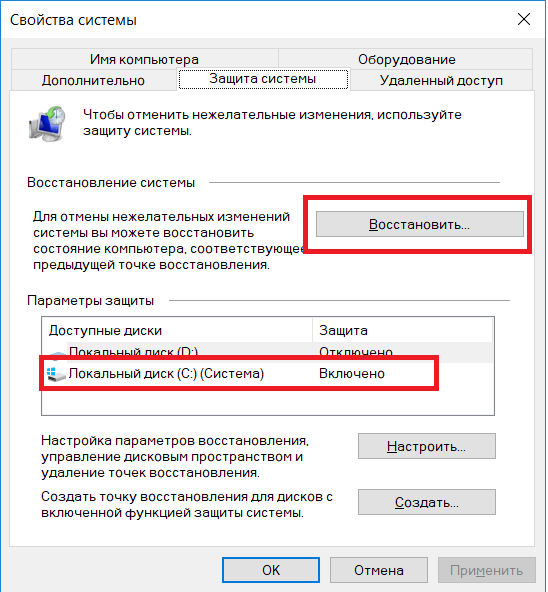
In the window that opens, opposite drive C should be "Enabled". This means that the recovery on the system drive is activated.
Checking the activation of the recovery function
As already mentioned above, the second point is the presence of a restore point, the date of which suits you. Well, let's say you want to roll back to the state of the computer that was yesterday, and the nearest point is only a week ago. In this case, you must understand that if you use this restore point, then everything that happened to the computer over the past week (installation of programs, setting up services and services) will be canceled.
To see the list of available restore points, you need to click the "Restore" button in the same "System Protection" window.
If at the bottom there is a checkbox "Display all restore points", then you need to check it.
If there is a point in this list that suits you by date, then to restore the computer to this date, you need to select the point in the list with a single left mouse click and click "Next", agreeing with all the proposals of the recovery master.

Selecting a restore point
After that, the computer will be restarted and returned to those few days ago.
Good afternoon!. Not so long ago, we took apart a clean installation of Windows 10 1803 and upgrading to it from previous versions. Unfortunately, innovations and updates may not always please the end user and do not always work without failures and complaints. In such situations, the average user may want to return the previous version of Windows 10 and stay on it until the future. Today we will look at the procedure and return methods, so that nothing breaks for you.
What is a rollback?

We see another window with a mockery from Microsoft:
Thanks for testing this build. We'll install the next preview build run when it's available. It sounds like a threat.
Let's start the rollback procedure for Windows 10. Your system will go into reboot to return the previous version.

You will get a black screen where you will see that a previous version of Windows is being restored. After a few reboots, you will get the old system. In my case, this is Windows 10 Pro 1709. Now I think you understand the fastest method on how to return the previous version after updating, but as I wrote above, it is not the only one, let's move on to the second.

2 Method to downgrade Windows 10
In this method, Microsoft suggests using the system recovery tools that you can find either on the installation media or use the built-in ones. To get into them, do this.
Clamp and don't release the Shift button , right-click on the start button, from the context menu select "Shut down or log off the system - Restart". But here the trick is that the reboot will be performed followed by the download of recovery and diagnostic utilities, which will help you easily return the previous version of Windows 10.


You will see the "Select actions" window, in which you need to select the "Troubleshooting" item. We get into the "Diagnostics" window, it consists of two items:
- Return the computer to its original state. You will be able to keep or delete your files and then reinstall Windows.
- Extra options
We are interested in the item "Advanced options"

Well, we are trying to return the previous version, through the appropriate item.

The "Revert to the previous version of Windows 10" window will open, select the user account, if you forgot the password, then this is unfortunate.

Specify a password and click continue.

You will be reminded again that all your files will be saved, we say let's go and start the return to the previous version of windows 10.

Preparations for the rollback procedure will begin, after which the wizard will need to be restarted. As you can see, returning the system to a previous version of Windows 10 is a very simple matter, unless you just missed the point in 10 days. As soon as

As you can see, the procedure itself is very simple, the main thing is never to rush to install new versions, it is always better to wait at least a couple of weeks, thanks to this you will be able not to get into a bad situation and avoid losing your data or the system itself..
Sooner or later, there comes a time when, for some reason, you need to return an earlier version of the firmware on your Android device. These reasons can be very different: from software failures and errors to dissatisfaction with some unofficial assembly of the operating system. In any case, you need to be fully equipped and know how to undo the changes made to the software.
Possible problems after updating Android
Not to say that the Android upgrade will completely ruin the life of the owner of the device, but it is guaranteed to deliver minutes of headache.
After updating from the desktop, some shortcuts periodically disappear, and programs along with them.
In other cases, after modifying the system, the user discovers new, completely optional programs that cannot be removed.
Options for returning the old firmware
backup
There are many applications that are designed to back up your Android gadget data, all of them have their own advantages and disadvantages. But we will look at the example of one of the first and most versatile backup and recovery programs - Titanium Backup.
Titanium Backup
To begin with, let's figure out why you need to use special software at all, because Android natively has backup capabilities. For example, when you change your phone or after a hard reset to the factory settings, just log into your Google account and your contact data will be restored. However, do not forget that all applications and games, Wi-Fi and other network settings, system settings, etc. are lost in this case. And this is a very significant problem if dozens of those same applications are installed - since it can take an unacceptably long time to restore.
So, to create a backup, we need Root rights on the device and the Titanium Backup program itself. Root rights are needed to gain access to system files and folders that store settings and data of interest to us. Next, install the program Titanium Backup. Do not forget to allow installation of applications from "Unknown sources". After the first launch, Titanium Backup will ask for superuser rights, we give them and we can remember the decision. Do not rush to click everything in a row - the program is quite powerful, and with full access to the system, an inexperienced user can mess things up. Adhere to the principle: "never use functions unless you are sure what they do."
To create a backup, you will need a memory card installed in the appropriate slot with enough free space, since the backup will be made on it. On the main working screen of Titanium Backup, select the "Backups" tab. Press the "Menu" button of the phone and select "Processing" at the bottom of the screen. In the menu that opens, select the item "Back up all user software and system data", click "Start" opposite it. The program will prompt you to select all applications for backup. We are interested in a complete copy of the system, so we do not change anything. After that, we start the process of creating a backup. The process may take a different amount of time, depending on the number of programs installed. Now in the "TitaniumBackup" folder on your memory card you can see a large number of backup files, it is advisable to copy them to a computer or other device - you never know, suddenly the microSD card will fail. It is also possible to set up automatic backups in the "Schedules" menu.
When the time comes and you need to restore the contents of your Android device, there are several ways to do it. First, you can restore both applications and settings. Through the "Processing" menu item, go to the "Recovery" section and click "Restore all software with data." You can also restore only individual applications - then in the "Backups" section, select specific applications and click "Restore". Do not forget that sometimes you need to reboot the device before the changes take effect. In any case, Titanium Backup offers a huge number of options for creating and restoring backups, so you can always restore your Android gadget to its original state. If you need to restore a complete copy of the operating system, that is, firmware, then you need to use the alternative recovery menu ClockworkMod Recovery or similar.
Other ways to roll back
Reset in menu
The path to the treasured option depends on the type and model of your device:
- phones on Android version 2.3: Settings > Privacy >
- phones on Android version 4: Settings > Device memory > Reset to factory settings;
- tablets on Android version 4: Settings > Backup & reset > Reset settings.
hard reset
We go to the menu "Android system recovery" (). First you need to turn off your smartphone or tablet, and then use the key combination, which again differs depending on the device manufacturer:
- more or less universal option - simultaneously hold down the power and volume down buttons;
- Samsung - simultaneously hold down the power and volume up buttons;
- Sony Ericsson - simultaneously hold down the power, volume down and camera buttons;
- Huawei - simultaneously hold down the power, volume down and volume up buttons;
- LG - simultaneously hold down the power, volume down and home screen buttons for more than 10 seconds. Release the power button after the LG logo lights up on the screen, hold the rest until you go to the recovery screen;
- HTC (most interesting) - hold down the volume down key, then briefly press the power button. When you see the recovery menu on the screen, you can temporarily leave the volume down button alone. Find the item "Clear storage", select it by pressing the power button and confirm the action by clicking on the volume down.
For more confident navigation through the “Android system recovery” menu, it would be useful to recall the purpose of the buttons: highlight is to move through the menu, and select is to select a menu item.
We get to the line "wipe data / factory reset" and select this item. Then in the new menu we find the sub-item for confirming the action and select it.
Both with a hard and with a more light reset option, a reboot will occur, after which your device will wake up with standard factory settings.
Video: How to restore firmware on Android
As you can see, the process of returning to the old version of Android is not as scary as many people think. Follow our instructions and do not forget to make backups.
Often, along with updates, a number of problems also come to users. For example, when updating a browser from Yandex, you may experience launch difficulties or other errors. In order not to take drastic measures, some decide to return the old Yandex browser by deleting the new version. However, in the browser settings, you can only get rid of the updated browser interface, and not the entire version. So is there a way to revert to an old but stable version of the web browser?
So, if you are planning to remove the Yandex browser update, then we have two news for you: good and bad. The good news is that it can still be done. And the second - most likely, not all users will succeed.
Switching to the old interface
Perhaps you just don't like the look of the updated Yandex.Browser? In such a case, you can always turn it off in the settings. The rest of the browser will continue to work as before. You can do it like this:
Click on the button " Menu" and go to " Settings»;

Immediately we see the button " Disable new interface"and click on it;

In a new browser tab, you will see a notification that the interface has been turned off.
OS Recovery
This method is the main one when trying to return the old version of the browser. And if you have system restore turned on, and also have a suitable restore point, then this way you can return the old version of the browser.
Before starting a system restore, be sure to check which programs are affected by the restore and, if necessary, save the necessary files. However, you don't have to worry about the various files you downloaded to your computer or created manually (for example, folders or Word documents), as they will remain untouched.
Downloading an old version of the browser
Alternatively, you can uninstall the new version of the browser and then install the old version. If it is not so difficult to remove the browser, it will be much more difficult to find the old version. Of course, there are sites on the Internet where you can download old versions of the browser, but it is often in such files that attackers like to add malicious files or even viruses. Unfortunately, Yandex itself does not provide links to archived versions of the browser, as, for example, Opera does. We will not recommend any third-party resources for security reasons, but if you are confident in your abilities, you can independently find past versions of Yandex.Browser on the web.
As for removing the browser: for this, we recommend removing the browser not in the classic way through "Add or Remove Programs", but with special utilities for completely removing programs from the computer. In this way, you can correctly install the browser from scratch. By the way, we have already talked about this method on our website.
These are the ways you can restore the old version of the browser. You can also always contact Yandex technical support for browser recovery.
In some cases, you may need to restore your Windows 7 computer to a previous installation of Windows. This article will guide you through the steps to manually revert your PC to a previous version of Windows.
Note. To do this, you must use the command prompt to enter certain commands to rename and move folders between different versions of Windows.
To resolve this issue, follow the steps listed below to restore a previous version of Windows by using the Windows.OLD folder on your computer.
Advice: It may be easier to follow the steps if you print the article first.
Step 1: Determine if the Windows.old folder exists and if there is sufficient free space on the Windows hard drive
Determine if the Windows.old folder is less than the free space available for local drive (C:) in step 1.2.Note If the Windows.old folder is twice the size of the free space available for local drive (C:), you may not be able to restore a previous version of Windows.
Step 2: Start the Windows Recovery Environment
- Insert the Windows 7 installation disc into the drive and restart your computer.
- Press the key when prompted to restart the system from disk.
- In the window " Windows installation» select language, time, currency, keyboard input method or other input method and press the button Further.
- In the window " Windows installation» click Repair your computer.
- In the window, select the version of the Windows 7 operating system that you want to restore and click the button Further.
- In the window System Recovery Options select Command line.
Step 3: Move the Windows 7 Folders to the New Win7 Folder
NoteWhen you receive this message, continue to the next step in this section and enter the command in the next step.
Move Windows Win7\Windows
Move "Program Files" "Win7\Program Files"
Move Users Win7\Users
Attrib -h -s -r ProgramData
Move ProgramData Win7\ProgramData
Rd "Documents and Settings"
Step 4: Copy or move the contents of the Windows.old folder
Note When you follow the instructions below and type one or more commands at the command prompt and press ENTER, you may receive the following message:The system cannot find the specified file.
If this message appears, continue to the next step in this section and enter the next step command.
Type the following commands, pressing ENTER after each command:
move /y c:\Windows.old\Windows c:\
move /y "c:\Windows.old\Program Files" c:\
move /y c:\Windows.old\ProgramData c:\
move /y c:\Windows.old\Users c:\
move /y "c:\Windows.old\Documents and Settings" c:\
Step 5: Restore the boot sector to a previous Windows installation
Type one of the following commands at the command prompt, as appropriate for your situation.Note In the following commands D: Represents DVDs. If the DVD drive on your computer is represented by a different letter, such as E: , use that letter in the command.
- If the previous installation of Windows is Windows Server 2003, Windows XP, or Microsoft Windows 2000
D:\boot\bootsect/nt52 c:
- If the previous installation of Windows is Windows Vista
Type the following command, and then press ENTER:
D:\boot\bootsect/nt60 c:
Step 6: Restore the Boot.ini file to a previous installation of Windows, Windows XP, or Windows 2000
Note Only if the previous installation was Windows XP or Windows 2000, follow these steps.Type the following commands, pressing ENTER after each command.
Users who have upgraded to Windows 10 through an upgrade have the option to revert to the previous operating system.
Process so-called. Rollback is simple and can be done with just a few mouse clicks.
Windows 10 rollback conditions
Just like with the update, there is no need to perform a classic reinstall - just follow a few steps to roll back Windows 10.
During the system update, the Windows.old directory is created, into which the data of the current system is copied and which acts as a backup copy.
Thirty days after installation, this directory will be deleted automatically by the system. .
Removing the Windows.old directory implies the impossibility of rolling back.
Note! The ability to roll back to Windows 7 or 8 is valid only for 30 calendar days after the upgrade and provided that the user has not deleted Windows.old.
Before proceeding with the return process, we recommend that you back up all important data to any available external drive or storage service.
How to roll back Windows 10 to Windows 8.1/7
The sequence of actions when rolling back to Windows 7 is no different from the sequence of actions for the eighth version. The current system will automatically install the OS version that was installed earlier.
So let's get started:
Step 1. Go to the "Start" menu, "Settings" submenu.
Step 2 In the "Settings" menu, go to the "Update and security" submenu.

Step 3 In the "Recovery" submenu, select the "Return to Windows X" item, where X is the version of the operating system that was before the update. In our case, this is Windows 7. Click "Start".

Step 4 We select the reason due to which the rollback is performed, describe the essence of the situation in the “Tell me more” field and click “Next”.

If you've upgraded to Windows 10 and found it doesn't work for you, or if you're experiencing other issues, the most common of which are related to graphics card drivers and other hardware at this point in time, you can go back and roll back from Windows 10. This can be done in several ways.
After the update, all the files of your old operating system are stored in the Windows.old folder, which sometimes had to be deleted manually before, but this time it will be automatically deleted after a month (that is, if you updated more than a month ago, you won’t be able to delete Windows 10) . Also, the system has a function for rollback after the update, easy to use for any novice user.
Please note that if you deleted the above folder manually, then the method described below to return to Windows 8.1 or 7 will not work. A possible course of action in this case, if there is a manufacturer's recovery image, is to start resetting the computer (other options are described in the last section of the instructions).
Rollback from Windows 10 to the previous OS
To use the feature, click on the notification icon on the right side of the taskbar and click "All Settings".

In the settings window that opens, select "Update and security" and then "Recovery".

The last step is to click on the "Get Started" button in the "Return to Windows 8.1" or "Return to Windows 7" section. At the same time, you will be asked to specify the reason for the rollback (choose any), after which Windows 10 will be deleted, and you will return to your previous version of the OS, with all programs and user files (that is, this is not a reset to the manufacturer's recovery image).

Some users who decide to remove Windows 10 and return Windows 7 or 8 are faced with the situation that despite the presence of the Windows.old folder, the rollback still does not occur - sometimes there is simply no necessary item in the Settings, sometimes for some reason errors occur during rollback.
In this case, you can try the Neosmart Windows 10 Rollback Utility, built on the basis of their Easy Recovery product. The utility is a bootable ISO image (200 MB), when you boot from it (after writing it to a disk or USB flash drive) you will see a recovery menu in which:

You can burn the image to a disc with any disc burning program, and to create a bootable USB flash drive, the developer offers his own Easy USB Creator Lite utility, available on their website. neosmart.net/UsbCreator/ however, in the VirusTotal utility it gives two warnings (which, in general, is not terrible, usually in such quantities - false positives). However, if you are afraid, then you can burn the image to a USB flash drive or (in the latter case, select the field for Grub4DOS images).
Also, when using the utility, it creates a backup copy of the current Windows 10 system. So, if something goes wrong, you can use it to return “everything as it was”.
You can download Windows 10 Rollback Utility from the official page https://neosmart.net/Win10Rollback/ (when downloading, you are asked to enter your e-mail and name, but there is no verification).
Manual reinstallation of Windows 10 on Windows 7 and 8 (or 8.1)
If none of the methods helped you, and less than 30 days have passed since upgrading to Windows 10, then you can do the following:
- Perform a factory reset with automatic reinstallation of Windows 7 and Windows 8 if you have a hidden recovery image on your computer or laptop. More details: (also suitable for branded PCs and monoblocks with a preinstalled OS).
- Perform a clean installation of the system yourself if you know its key or it is in UEFI (for devices with 8 and higher). You can view the “wired” key in UEFI (BIOS) using the ShowKeyPlus program in the OEM-key section (I wrote more in the article). At the same time, if you need to download the original Windows image in the desired edition for reinstallation (Home, Professional, For one language, etc.), then you can do it like this:.
In general, I would recommend staying on Windows 10 - of course, the system is not perfect, but clearly better than 8 on the day it was released. And to solve certain problems that may arise at this stage, you should look for options on the Internet, and at the same time go to the official websites of computer and equipment manufacturers to find drivers for Windows 10.
The release of a new operating system is always accompanied by a lot of problems. This may be a lack of compatibility with drivers for computer components or certain applications. Some users simply did not like the Windows 10 operating system due to its new design and the presence of a lot of changes in terms of functionality compared to previous versions of the software. If the new operating system from Microsoft did not suit the user of the computer in terms of functionality, there are several ways to return from Windows 10 to Windows 7 or Windows 8. This can be done using standard system tools and using third-party applications.
How to restore Windows 7 or Windows 8 after installing Windows 10 using system tools
 When installing a new version of the operating system, it prudently remains on the computer, which you can use if you want to return the previous version of Windows. However, it is saved only in the situation when the operating system was updated without formatting the hard drive.
To use the Windows.Old folder to restore Windows 7 or 8 after upgrading to Windows 10, you need to do the following:

Attention: If during the upgrade the Windows.Old folder was damaged and did not save backup information for restoring the operating system, this menu item may not be available.
With the method of rolling back from Windows 10 to earlier versions of the operating system described above, the user gets the opportunity to save all his programs, as well as existing files, when restoring.
In a situation where it was not possible to recover in this way (due to the absence of an item in the menu or for another reason), we recommend trying system recovery using third-party software, which is described below in the instructions.
Rolling back a system from Windows 10 to Windows 7 or Windows 8 using third-party software
 When the operating system settings do not contain a restore point to a previous version of Windows, but the Windows.Old folder is saved, you can use specialized utilities that in some cases can solve the problem. The most famous program that allows you to restore Windows 7 or Windows 8 after installing Windows 10 is Neosmart Windows 10 Rollback Utility. It weighs just over 200 megabytes and is an image that needs to be burned to a CD/DVD or flash drive to create recovery media.
The easiest way is to write the Neosmart Windows 10 Rollback Utility program using a special utility, also developed by Neosmart, called USB Creator. All the programs mentioned above are available on the official website of the developers in free trial versions, which will be enough to return from Windows 10 to the version of the operating system saved in Windows.Old. Please note that you can also use other applications for recording or flash drives, for example, the well-known UltraISO program.
When the utility is written, you can start the recovery procedure. To do this, go into the BIOS and set the boot process from the media on which the utility is recorded. After that, restart your computer and select Automated Repair on the first screen that opens. Next, you will see all the systems that you can return to. To start the recovery process, click on Roll Back.

Attention: The Neosmart Windows 10 Rollback Utility automatically saves the current version of Windows 10 during system rollback in case there are problems with the installation.
How to return Windows 7 or Windows 8 after installing Windows 10 with a full format
If you completely removed the previous version of the operating system from your computer and installed Windows 10 on a blank hard drive, you can try to restore Windows 7 or Windows 8 using the saved system tools or license keys.
On laptops, there is almost always a separate partition on the hard drive, which is the system one, and the system recovery image is stored on it. Depending on the laptop or computer model, this tool may work differently, but it allows you to install the version of the operating system that was originally on the hard drive.

The second way to restore Windows 7 or Windows 8 is to download a system image from the Internet. On the Microsoft website, you can download an image of any version of Windows. Next, you need to burn it to a USB flash drive or DVD and install it. A problem during the installation process will arise with the lack of a license key, but if you are using a laptop or computer on which Windows was originally installed, then you can get the necessary ones in advance.
Note that Microsoft is giving users 30 days to downgrade Windows 10 with an OEM key. After 30 days, it ceases to be valid and is "attached" to Windows 10.


Wargame: Red Dragon not starting?
Sad escobar "The face of the judicial system of Ukraine"
ROME Total War - how to unlock all factions?
How to turn off the TalkBack feature?
Overview of alternative firmware HTC Desire A8181 Bravo How to install the firmware file for HTC Desire