And so, you have a pleasant evening at the computer - play, chat, surf the net, and Windows quickly executes your commands. All perfectly! Idyll! However, do not think that this will always be the case. Know: the insidious Windows is preparing a trick for you. She is just waiting for the moment when some urgent business overtakes you in order to ... show you a fig. More precisely - do not boot.
Windows boot failure is an ordinary phenomenon, but according to the law of meanness, it usually happens when a computer is really needed. So that the situation does not take you by surprise, it is important to prepare for it in advance. Let's talk about what to do if Windows 10 does not load, why this happens and what each user should have in order to solve this problem as quickly as possible.
Why is it not loading
The reasons for the unloadability of the "dozens" are software and hardware. Software related to the removal (damage) of boot and system files and / or registry keys responsible for starting. They are usually to blame for:- Installing another operating system on another partition of the drive (the new OS replaces the bootloader with the old one).
- Experiments with disk partitions - compression, merging, splitting, formatting, and more. A typical error, which is just a consequence of this, is "" (the system loader is compressed).

- Unskilled editing by hands of the system registry.
- The use of various "cleaners-tweakers" to speed up and decorate the system, which "accidentally" change the registry keys responsible for starting, patch files, etc.
- Incorrectly inserted Windows updates or turning off the PC during the installation of updates.
- Viruses and antiviruses. Don't be surprised, the latter can do just as much harm as the former if used thoughtlessly. It's like swallowing pills indiscriminately, hoping that among them will be the right one.
- Faulty hardware drivers. Loading in such cases is usually interrupted by a blue screen of death, sometimes indicating the name of the driver that caused the problem.
- "Clumsy" applications in autorun. In this case, the failure occurs at the later stages of loading - shortly before the appearance of the desktop.
Hardware reasons for not starting Windows 10:
- Changing the order of polling bootable media in the BIOS (the computer looks for the Windows bootloader not on the system disk, but, for example, on flash drives).
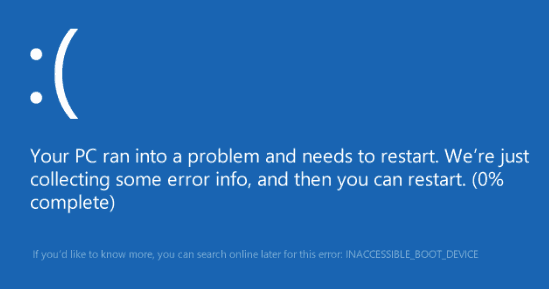
- Connecting the drive to the wrong port on the motherboard on which it worked before - if the failure occurred after removing and reinstalling the hard drive in the computer. Manifested by the error INACCESSIBLE_BOOT_DEVICE on the blue screen of death.
- Faulty or bad connection of the system drive. Often manifested by the message "" (system loader unavailable) on a black screen. Sometimes - stops, restarts, BSoDs at any stage of loading.

- RAM failure. As with disk problems, it manifests itself with reboots and blue screens at any stage of startup.
- Failure of video subsystem elements. Windows may boot, but you won't see it because the screen will remain black. Sometimes the fact that the system has booted up can only be recognized by a characteristic sound.
- Other hardware problems such as motherboard, peripherals, etc.
Better prepare for the worst
Since 80-90% of cases of non-starting Windows 10 are due to software failures, today's article is devoted to methods of dealing with them.So, in order to restore the normal start of Windows, the computer must be loaded into the recovery environment. If you have previously used Windows 7, then you know that this very environment is installed on disk along with the main system. And in order to enter it, you need to open the menu of additional boot methods (by pressing F8 after turning on the computer) and go to the section " Troubleshooting».
The top ten also has a recovery environment, but since its boot time has significantly decreased compared to Windows 7, the interval when you can call the boot menu has also become much shorter. The chance to have time to press the desired key at this time (more precisely, the combination of F8 and Shift) remained only in one case: if the system is installed on an MBR standard hard disk and the fast start option is disabled in the power settings of the PC or laptop. If the system is on an SSD or GPT hard drive, you will need bootable media.
For emergency recovery of Windows 10, it is optimal to keep its official distribution on a DVD or flash drive, and the same bit depth as installed on a PC. As an alternative, you can use the boot utility package MS DaRT 10 (Microsoft Diagnostic and Recovery Toolset for Windows 10 ).
Distributions of MS DaRT (in the past they were called "ERD Commander") are officially distributed only by paid subscription, but they are easy to find on the net. For example, on torrent trackers. Windows 10 images are available for download from the Microsoft website.
As an example, I will use the home release of the “tens”, recorded on a bootable USB flash drive, since it has everything you need.
Booting into the Windows 10 Recovery Environment
In the event of a download blockage, the “ten”, as a rule, tries to recover itself. When she succeeds, the user does not receive any notifications, it just takes longer to start the computer than usual. If it fails, a message may appear on the screen, as in the screenshot below, but more often it will just be “Malevich's square” with or without a cursor, or a blue screen of death with a sad emoticon.
The failure option shown in the screenshot can be considered relatively favorable. Clicking, " Extra options» you will be taken to the recovery environment installed on your hard drive, and you will not have to boot into it from external media. But we will consider a more severe case, when the system does not show any signs of life.
Connect the media to your computer, reboot, and make it the first boot device.
The window that you will see first after booting from a USB flash drive (DVD) will prompt you to select the system language. If Russian is selected, click " Further».

Next, you will be prompted to proceed to install or restore Windows. Click " System Restore».

On the screen " Choice of action» click « Troubleshooting". Here you are right there.

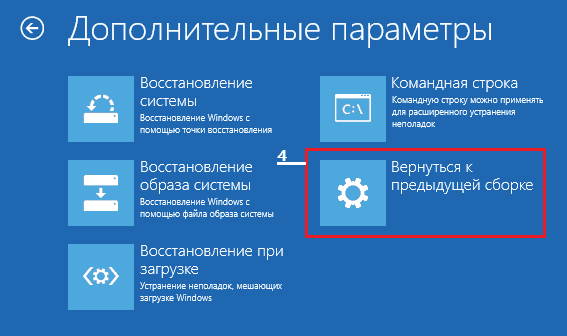
tens launch recovery options
In the recovery options section (screen " Extra options”), there are 5 subsections:- System Restore. Selecting this option launches the standard Windows utility rstrui.exe, the purpose of which is to roll back the system to one of the saved checkpoints.
- Restoring a system image. Launches the Windows Deployment Wizard from a native OS backup.
- Boot recovery. Fixes errors in boot files and partitions.
- Command line. Allows you to run various system utilities.
- Revert to a previous build. Rolls back to a previously installed OS version if it has been upgraded to Windows 10.
Rollback to checkpoint
Reverting to a newly created checkpoint is the best first aid for all kinds of system failures, including when you don't know the cause.
Clicking on the first item launches, most likely, the recovery utility you already know. It is enough to select the date and time for which you want to rollback, and follow the instructions on the screen.

To use this option, you must have at least one saved checkpoint and a properly functioning system restore function. If the latter was disabled before the failure, skip this step and try other methods.
Boot recovery
This option effectively helps in case of damage or deletion of boot files, for example, when installing an additional OS on a different disk partition after Windows 10. As well as in case of accidental formatting or other manipulations with the System Reserved partition.
Command line
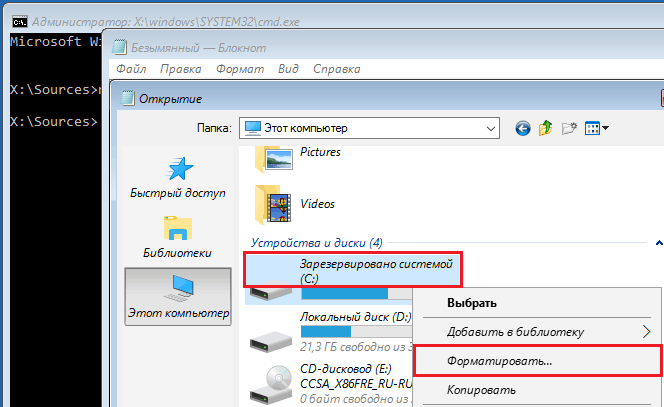
The command line itself doesn't restore anything, but it gives you the ability to run other tools. So, with its help, we can open Windows Explorer to see the location of the installation (partition letters in the recovery environment and during normal system boot usually do not match), run the system file error fixer, registry editor and bootloader recovery utilities.
If the rollback to the checkpoint and auto-recovery at startup (the first and second options) did not give the desired result, the console utility often helps to increase the load of the "dozens" BCDBoot. It recreates the hidden "System Reserved" partition and copies the boot files from the Windows directory to it.
For BCDBoot to work correctly, you must specify the location of the Windows folder on your hard drive. To find out, you can use the utility diskpart, but I think it's more convenient to do this through the explorer.
So, to get into the explorer, open the command line and run notepad in it ( notepad).

While in notepad, go to the menu " File”, choose “ Open' and go to the folder ' This computer". Next, let's go through the partitions of the disk and determine which of them contains the system directory. In my example, this is drive D.

Then we return to the command line and execute the instruction:
BCDboot D:\Windows

Please note that your path to the system folder may be different.
In 80% of cases, this is enough for the "ten" to be able to start normally. But in about 20% of cases, the command does not work correctly - it does not restore all boot files. To help the utility a little, before executing the instructions on the command line, you need to format the reserved boot partition (in my example, drive C) in FAT32. This can also be done using diskpart, but I find it more convenient to use File Explorer.
The following two console commands recreate the boot records for the entire drive (MBR) and the system partition (VBR). They are used to solve problems with starting Windows on MBR disks.
Execute the commands one after the other in this order:
bootrec /fixmbr
bootrec /fixboot
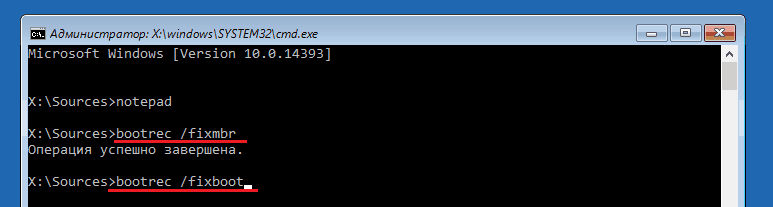
If you accidentally execute them on a GPT disk, nothing bad will happen.
In some cases, startup problems arise due to damage not to boot, but to the main system files, for example, after a virus attack. As you may know, there is a special utility for fixing them in Windows. Sfc.exe. So, thanks to the command line, it can also be run in the recovery environment.
The command to find and fix errors in protected system files in the recovery environment looks like this:
sfc /scannow /offbootdir=D:\ /offwindir=D:\

Parameter offbootdir defines the location of the main boot partition (in my example, as you remember, this is drive D), and offwindir– path to the system folder.
Using the command line, you can also fix registry errors on an unbootable system. But, unlike the previous instructions, this requires certain experience and qualifications, because the user needs to know exactly what to correct and how the erroneous entries should look normal.
I will not dwell on registry errors that cause Windows 10 to fail to boot, as this is the topic of a separate large article. I will describe only the method of launching the editor regedit.exe in the recovery environment and open the registry files in it so that you have the opportunity to fix the errors that you know about.
So, to start the editor, we write the word on the command line regedit and press Enter.
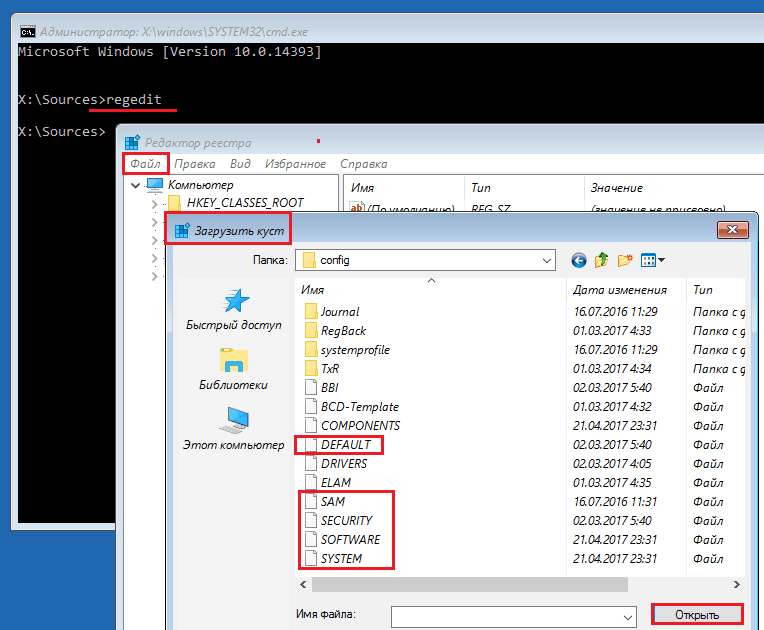
You will see that some kind of registry is already present in the utility window that opens, but not the one you need. Before us is our own recovery environment registry, and we are interested in the main system.
To load Windows 10 registry files into RegEdit, select the section in the left half of the editor window HKEY_LOCAL_MACHINE or HKEY_USERS, open the menu File” and click the item “ Download hive».
In the explorer window that opens after that, go to the folder D:\Windows\System32\Config(your drive letter may be different) and select the desired file.
Files without an extension in the \System32\Config folder are the components (bushes) of the Windows 10 registry. The main ones are circled.
Give the hive any friendly name (it will be temporary until you unload it) and click OK.

Next, open the section into which we loaded the bush, and here it is in front of us, available for editing. In my example, this is the registry file software, which I temporarily renamed to soft_win_10.

After making edits, go back to the editor menu " File» and press « Unload bush».
Revert to a previous build
When reverting to a previously installed build, the user's personal files will remain intact, but everything done after the upgrade will be reverted.
Restoring a system image
Restoring an image from a backup helps to restore the system to working capacity in case of any problems, but the problem is that almost no one creates these images.If you are an exception to the rule and a happy owner of a relatively fresh backup, select the item marked in the screenshot in the list of options,

tell the recovery program where to store the image and follow its instructions.

All data of an inoperable OS will be replaced with healthy copies from the archive. If it contains user files, this will also affect them.
Happy recovery!
Every other Tuesday, Microsoft releases a new batch of updates for its operating systems, which are installed on all computers through the Windows Update service (updates are obtained from Windows Update servers), internal WSUS, or manually using . In most cases, updates fix a specific vulnerability or problem (bug) in Windows or other products. However, in some cases, new updates can cause various problems in the system (due to inadequate testing, engineering errors, incompatibility with hardware, etc.), and the installed update must be removed. This is easy to do (see article). But what to do if, after installing the update, the system does not boot, displaying a blue screen of death (BSOD)? In this article, we will consider just such a case: how to remove problematic updates in Windows 10/8/7 if the system does not boot.
First of all, check if the system boots in one of the safe modes (enough 3 times in a row interrupt the system boot with the power off button).
Advice. If the computer stopped booting after updating the build of Windows 10 with the error "", you need to use the system recovery method from the link.
If Windows does not boot after a crooked update and in safe mode, you need to boot from any available disk or flash drive: it can be like the Windows recovery environment (), Windows installation disk, ERD (aka) or another boot disk.
Note. Windows 10 and 8, in case the system does not boot, the recovery environment with the command line should automatically boot.
In our case, I will boot the computer from the Windows 10 x64 installation disc.
Advice. Any installation disk is suitable for booting (the main condition is compliance with the OS bit depth), taking into account compatibility. So the Windows 10 installation image can be used to restore Windows 7, but vice versa will not work, because. older OS versions may not support all commands and options.
On the second screen with an invitation to start the installation, you need to click the button Repair Computer or press the keyboard shortcut Shift+F10.

In the first case choose Troubleshoot -> Command Prompt(Command line).

In the command prompt window that opens, you need to determine the drive letter that is assigned to your system partition with Windows (it may not be the C:\ drive).
Issue the command: DISKPART
Display a list of partitions in the system: list volume

End the diskpart session with the command: exit
In our example, you can see that the system drive is assigned a letter D:\.
Let's list the packages installed on the system that is located on the specified drive:

If you know which particular update (KB) caused the problem, you can use its number as a filter:
DISM /Image:D:\ /Get-Packages /format:table | find "4056887"
Or you can filter the list by installation date:
DISM /Image:D:\ /Get-Packages /format:table | find "18.01.2018"
Note. If the list of updates is very large, and you don’t know exactly which of the latest updates caused the BSOD, you can download their complete list to a text file and open it with notepad (you can use the search in it).
DISM /Image:D:\ /Get-Packages /format:table > d:\updates.txt
Notepad d:\updates.txt
Now you need to copy the ID of the problematic package to the clipboard (highlight the package name on the command line and press Enter to paste the text - just right-click).
You can remove the update using the following command:
DISM /Image:D:\ /Remove-Package /PackageName:Package_for_KB4056887~31bf3856ad364e35~amd64~~10.0.1.0

If you're not sure which particular update caused the problem, uninstall all recently installed packages one by one (with a reboot and system check).
After removing the "updates" curve, try booting Windows normally. The system should boot normally
If you have an MSDaRT recovery disc, uninstalling updates is even easier. It will be enough to boot from the MSDaRT disk (the bit depth must match), select Diagnostics -> Microsoft Diagnostics and Recovery Toolset. In the list of utilities, select Hotfix Uninstall(Remove fixes).

Just highlight which updates you want to remove and click Further.
Windows 10 is an imperfect system and problems are common in it, especially when installing updates. There are a lot of errors and ways to solve them. First of all, it all depends on at what stage the problem arose and whether it was accompanied by a code. We will consider all possible cases.
Computer stuck during update
If the computer freezes while updating Windows 10, you need to find the cause of the problem and fix it. To do this, you need to interrupt the system update.
First you need to make sure that the computer is really frozen. If nothing changes at all for 15 minutes or some actions are repeated cyclically for the third time, the computer can be considered frozen.
How to abort an update
If the update has begun to install, most likely you will not be able to simply restart the computer and return it to normal: each reboot will retry the installation. This problem does not always occur, but very often. If you encounter it, you must first interrupt the system update, and only then eliminate the cause of the problem:
- Restart your computer in one of the following ways:
- press the reset button;
- hold down the power button for 5 seconds to turn off the computer, and then turn it on;
- turn off the computer from the network and turn it on again.
- When you turn it on, immediately press the F8 key.
- Click on the "Safe Mode with Command Prompt" option on the system boot option selection screen.
Select "Safe Mode with Command Prompt"
- Open the start menu after the system starts, type cmd and open Command Prompt as administrator.
Open "Command Prompt" as administrator after system startup
- Enter the following commands in sequence:

- Restart your computer. The system will start up normally.
- After fixing the cause of the problem, enter the same commands, but replace the word "stop" with "start".
How to eliminate the cause of the freeze
There can be many reasons for getting stuck on receiving updates. In most cases, you will see an error code message after 15 minutes of inactivity. What to do in such cases is described at the end of the article. However, it happens that no message appears, and the computer continues endless attempts. We will consider the most popular cases of these.
Stuck at the stage "Getting updates"
If you've been seeing the "Getting Updates" screen with no progress for about 15 minutes, don't wait any longer. This error is caused by a service conflict. All you have to do is disable Windows Automatic Updates and start checking for updates manually.
- Press the key combination Ctrl + Shift + Esc. If the "Task Manager" opens in a simplified view, click "Details".
If "Task Manager" opens in a simplified view, click "More"
- Go to the "Services" tab and click on the "Open Services" button.
Click on the "Open Services" button
- Find the Windows Update service and open it.
Open the Windows Update service
- Select the startup type "Disabled", click on the "Stop" button if it is active, and confirm the changes made. After that, the updates should install without problems.
Select the startup type "Disabled" and click on the "Stop" button
Video: How to disable the Windows Update service
Stuck at 30 - 39%
If you are upgrading from Windows 7, 8, or 8.1, this step will download the updates.
Russia is big, and there are almost no Microsot servers in it. In this regard, the download speed of some packages is very slow. You may have to wait up to 24 hours for the entire update to download.
The first step is to run the Update Center diagnostics to exclude an attempt to download packages from a non-working server. To do this, press the key combination Win + R, enter the command msdt / id WindowsUpdateDiagnostic and click OK.
Press the key combination Win + R, enter the command msdt / id WindowsUpdateDiagnostic and click "OK"
Also try updating your current version of Windows (without upgrading to Windows 10). When finished, try running the Windows 10 upgrade again.
If that doesn't work, you have 2 options:
- put the update at night and wait until it ends;
- use an alternative update method, for example, download the Windows 10 image (from the official website or torrent) and update from it.
Video: what to do with an endless upgrade to Windows 10
Stuck at 44%
Update 1511 had a similar bug for some time. It is caused by a conflict with the memory card. The bug in this service pack has been fixed for a long time, but if you somehow encountered it, you have 2 options:
- remove the SD card from the computer;
- Update via Windows Update.
If this does not help you, free up 20 GB of free disk space with the system.
Computer freezes after update
As is the case with problems during the upgrade process, most likely you will see one of the code errors, the solution to which is described below. But this does not always happen. In any case, the first thing you need to do is get out of the hung state. You can do this in the same way as when freezing during the update process: press F8 when turning on the computer and select "Safe Mode with Command Prompt".
If you did not see the error code, try all the following methods in turn.
Getting information about an error
Before fixing the problem, it is worth trying to find out a little information about the error that has occurred:
- Open the Control Panel. You can find it by searching in the start menu.
Open the "Control Panel" via the "Start" menu
- Select the "Small Icons" view method and open the "Administration" section.
Open the "Administration" section
- Open Event Viewer.
Open Event Viewer
- In the left pane, expand the Windows Logs category and open the System log.
- In the list that opens, you will find all system errors. They will have a red icon. Pay attention to the column "Event ID". With it, you can find out the error code and use the individual method for eliminating it, which is described in the table below.
Errors will have a red icon
Video: Event Viewer and Windows Logs
Resolving conflicts
The most common cause of freezing is incorrect transfer of Start menu settings and Windows Search service from a previous version of Windows. The result of such an error is a conflict with key system services, which prevents the system from starting.
- Open the start menu, type "services" and open the found utility.
Open the Services utility
- In the window that opens, find the Windows Search service and open it.
Open the Windows Search service
- Select the startup type as "Disabled" and click the "Stop" button if it is active. Then click "OK".
Disable the Windows Search service
- Open "Registry Editor". It can be found by searching for "regedit" in the Start menu.
Open the "Registry Editor" via the "Start" menu
- Copy the path HKEY_LOCAL_MACHINE\SYSTEM\ControlSet001\Services\AppXSvc into the address bar and press Enter.
Go to HKEY_LOCAL_MACHINE\SYSTEM\ControlSet001\Services\AppXSvc
- On the right side of the window, open the Start or Start option.
Open the Start option
- Set the value to "4" and click "OK".
Set the value to "4" and click "OK"
- Try restarting your computer in normal mode. Perhaps the steps you have taken will help you.
User change
Start menu settings and Windows Search services are the most common causes of conflicts, but there may be others. There is not enough time or energy to search and fix every possible problem. It would be more intelligent to reset all changes, and the easiest way to do this is by creating a new user.
- Go to the Options window. This can be done through the key combination Win + I or the gear in the Start menu.
Go to the "Options" window
- Open the "Accounts" section.
Open the "Accounts" section
- Open the "Family and other people" tab and click on the "Add user ..." button.
Click on the "Add User..." button
- Click on the "I have no data..." button.
Click on the button "I have no data..."
- Click the "Add User..." button.
Click on the inscription "Add user ..."
- Enter a name for the new account and confirm its creation.
Enter a name for the new account and confirm its creation
- Click on the created account and click the "Change account type" button.
Click the "Change Account Type" button
- Select the type "Administrator" and click "OK".
Select the type "Administrator" and click "OK"
- Try restarting your computer in normal mode. If everything is fine, you will see a selection of accounts.
Video: How to create an administrator account in Windows 10
Removing an update
If changing the account does not help, you will have to roll back the updates. After that, you can try to update the system again.
- Go to "Control Panel" and open "Uninstall a program".
Open "Uninstall a program" in "Control Panel"
- In the left part of the window, click on the inscription "View installed updates".
Click on "View installed updates"
- Based on the date, remove the latest installed updates.
Remove the latest installed updates
Video: How to uninstall an update in Windows 10
System Restore
This is an extreme way to solve the problem. It is equivalent to a complete system reinstall.
- Press the Win + I key combination to open the Settings window and open the Update and Security section.
Call the "Settings" window and open the "Update and Security" section
- Go to the "Recovery" tab and click "Start".
Go to the "Recovery" tab and click "Start"
- In the next window, select "Keep my files" and do whatever the system asks you to do.
Video: how to reset Windows 10 to system settings
Black screen problem
The problem of the black screen is worth highlighting separately. If the display does not show anything, then this does not mean that your computer is frozen. Press Alt + F4 and then Enter. Now there are 2 scenarios:
- if the computer does not turn off, wait half an hour to exclude a protracted update, and proceed with system recovery, as described above;
- if the computer turns off, you have a problem playing the picture. Do all of the following in order.
Switching between monitors
The most common reason for this problem is the incorrect definition of the main monitor. If you have a TV connected, the system can set it as the main one even before it downloads the necessary drivers for it to work. Even if there is only one monitor, try this method. Before downloading all the necessary drivers, errors can be very strange.
- If you have multiple monitors connected, disable all but the main one and try restarting your computer.
- Press the key combination Win + P, then the down arrow key and Enter. This is switching between monitors.
Disabling fast startup
Accelerated startup implies the delayed inclusion of some system components and the neglect of preliminary analysis. This can cause an "invisible" monitor.
- Reboot your computer in safe mode (press F8 while turning it on).
Restart your computer in safe mode
- Open the "Control Panel" and go to the "System and Security" category.
Open the "Control Panel" and go to the "System and Security" category
- Click on the "Setting the functions of the power buttons" button.
Click on the button "Setting the functions of the power buttons"
- Click on the inscription "Changing settings ...", uncheck the quick launch and confirm the changes made.
Click on the inscription "Change settings ...", uncheck the quick launch and confirm the changes
- Try restarting your computer in normal mode.
Video: How to disable fast startup in Windows 10
Resetting an incorrect video card driver
Maybe Windows 10 or you installed the wrong driver. There can be many variations of errors with a video card driver. You need to try several ways to install it: with the removal of the old driver, manually and automatically.
- Reboot your computer in safe mode (how to do this was described above), open the "Control Panel" and go to the "Hardware and Sound" section.
Open Control Panel and go to Hardware and Sound
- Click on the inscription "Device Manager".
Click on the inscription "Device Manager"
- Open the "Display adapters" group, right-click on your video card and go to its properties.
Right click on the video card and go to its properties
- In the "Diver" tab, click on the "Rollback" button. This is driver removal. Try restarting your computer in normal mode and check the result.
In the "Diver" tab, click on the "Rollback" button
- Install the driver again. Open "Device Manager" again, right-click on the video card and select "Update Driver". The graphics card may be in the "Other devices" group.
Right-click on the graphics card and select "Update Driver"
- First of all, try the automatic driver update. If the update is not found or the error occurs again, download the driver from the manufacturer's website and use the manual installation.
Try the automatic driver update first.
- With manual installation, you just need to specify the path to the folder with the driver. The checkbox for "Include subfolders" should be active.
With manual installation, you just need to specify the path to the folder with the driver
Video: How to update your graphics card driver in Windows 10
Errors with code, their causes and solutions
Here we list all the errors with the code that are associated with the Windows 10 update. Most of them are solved quite simply and do not need detailed instructions. An extreme way, which is not mentioned in the table, is a complete reinstallation of Windows 10. If all else fails, use it and install the latest version right away to avoid a problematic update.
Instead of "0x" in the error code, "WindowsUpdate_" may be written.
Table: Update related errors
| Error codes | Cause | Solutions |
|
|
|
| No internet connection. |
|
|
|
|
| 0x8007002C - 0x4001C. |
|
|
| 0x80070070 - 0x50011. | Lack of free hard disk space. | Free up space on your hard drive. |
| 0x80070103. | Trying to install an older driver. |
|
|
|
|
| Difficulty reading the package. |
|
| 0x800705b4. |
|
|
|
|
|
| 0x80072ee2. |
|
|
| 0x800F0922. |
|
|
| Incompatibility of the update with the installed software. |
|
|
|
|
| 0x80240017. | The update is not available for your system version. | Update Windows through the "Update Center". |
| 0x8024402f. | Time set incorrectly. |
|
| 0x80246017. | Lack of rights. |
|
| 0x80248007. |
|
|
| 0xC0000001. |
|
|
| 0xC000021A. | Sudden stop of an important process. | Install the KB969028 hotfix package (download from the official Microsoft website). |
| Rollback to a previous version of the system for one of the following reasons:
|
|
Complex solutions
Some of the methods listed in the table are complex. Let's take a look at those that might be difficult.
Reconnecting a problematic component
To disable, for example, a Wi-Fi module, it is not at all necessary to open the computer. Almost any component can be reconnected through the "Task Manager".
- Right-click on the Start Menu and select Device Manager. It can also be found through the search or in the "Control Panel".
Right click on the start menu and select "Device Manager"
- Right-click on the problematic component and select "Disable device".
Disable the problematic component
- Turn the device back on in the same way.
Turn on the problematic component
Clearing Scheduled Tasks and Startup Lists
If an unwanted process is included in the startup list, its presence may be equivalent to the presence of a virus on your computer. A scheduled task to start this process can have a similar effect.
Regular Windows 10 tools may be useless. It is better to immediately use the program CCleaner.
- Download, install and run CCleaner.
- Open the "Service" section and the "Startup" subsection.
Open the "Service" section and the "Startup" subsection
- Select all processes in the list (Ctrl + A) and disable them.
Select all processes in the list and disable them
- Go to the "Scheduled Tasks" tab and cancel them all in the same way. After restart your computer.
Select all tasks in the list and cancel them
Video: How to disable auto-start applications using CCleaner
Disabling the firewall
Windows Firewall - built-in system protection. It is not an antivirus, but it can prevent certain processes from accessing the Internet or restrict access to important files. Sometimes the firewall makes mistakes, as a result of which one of the system processes may be restricted.
- Open the "Control Panel", go to the "System and Security" category and open "Windows Firewall".
Open "Windows Firewall"
- In the left part of the window, click on the inscription "Enable and disable ...".
Click on the inscription "Turn on and off ..."
- Check both boxes "Disable ..." and click "OK".
Check both items "Disable ..." and click "OK"
Video: How to turn off the firewall in Windows 10
Restart "Update Center"
As a result of the operation of the "Update Center", critical errors may occur that will interfere with the main processes of this service. Restarting the system does not always help to solve a similar problem; restarting the Update Center itself will be more reliable.
- Press the Win + R keyboard shortcut to bring up the Run window, type services.msc and press Enter.
In the Run window, type the command to call the services and press Enter
- Scroll down the list and open the Windows Update service.
Click "Fix Marked"
Video: how to clean the registry manually and with CCleaner
Alternative ways to update
Due to various circumstances, updating Windows 10 in the usual way may not be possible. Among the ways that can help in such cases, two can be distinguished:

DNS check
The Internet connection is not always the cause of the Microsoft server connection problem. Sometimes the error lies in the flown DNS settings.
Select "Obtain DNS server address automatically" and click "OK"
Activation of the "Administrator" account
The "Administrator" account and an account with administrator rights are two different things. There is only one "administrator" on the computer and it has more possibilities than an account with administrator rights. The Administrator account is disabled by default.
- Open the Start menu, type lusrmgr.msc and press Enter.
Uncheck "Disable Account" and click "OK"
Video: How to activate an Administrator account in Windows 10
Windows 10 update stuck is a common event, but this problem is solved quite simply. Not all cases are unambiguous, but in extreme cases, everything can be fixed by simply removing updates.
Let's talk about what to do if Windows 10 won't boot. Most often, the problem manifests itself in the fact that the system won't load past the splash screen with the Microsoft logo or black screen is displayed. An important point: in this article we will consider options for solving a malfunction, implying that the problem is precisely in the software. Therefore, if you have suspicions that Windows 10 does not start due to a hardware malfunction, or some specific error is generated, you need to look for a solution by the name of the error or a specific symptom of a hardware malfunction.
Random startup crashes in Windows 10 and how to fix them
If Windows 10 won't boot, first we advise you to check the following couple of methods to solve boot problems. They are often associated with a temporary OS failure. These tips may seem strange to you, but these are the solutions most often described by users in the comments.
1. Turn off the Internet and restart your computer. Sometimes, when a black screen appears during boot, it helps to disconnect the patch cord from the network card, turn off the wifi on the laptop, or turn off the power of the router.
2. Press and hold the power button for more than 4 seconds to force the computer to shut down. After a few seconds, turn it back on and try to start Windows. It happens that the PC incorrectly (so to speak "not completely") left the hibernation mode.
Checking your computer for viruses
The reason that Windows 10 does not start may be viruses. Therefore, we advise you to create bootable media with DrWEB antivirus and check the system. How to do this is written in.
Checking free disk space

Check if there is enough space on the system drive (usually the C: drive). Due to its lack, problems often arise with starting the operating system. If necessary, clean up the space by moving some files from folders such as Downloads, Video or Images to another disk. You can clear the space by booting from any LiveCD - even from the same DrWEB LiveUSB, which we talked about in the previous paragraph.
Boot in safe mode and remove problematic software
So, boot into Safe Mode. The last section of the article describes step by step how to do this if Windows 10 does not start. If you succeeded in entering Safe Mode, then this fact in itself indicates that the malfunction probably at the program level (although there are exceptions).
Now, as mentioned above, you need to either uninstall the program, after which Windows 10 stopped loading, or the driver, depending on your case.
Removing an update:

Driver removal:

Rollback to a restore point
System Restore can be started either from safe mode, or booted from a Windows 10 installation flash drive. The second option is more reliable:
1. Create a bootable USB flash drive with Windows 10. How to do this is described in. It is important that when creating the media, you select the same edition, language, and bitness as the current OS that is not bootable.
3. Select language, input method and press Further:

4. In the next window, select System Restore:

5. Then Diagnostics → Extra options → System Restore. There is a caveat here: if the update was not enabled in advance, then restoring the system to an earlier state will not work. If there are points, try to roll back. If one doesn't work, try another. To learn how to try to roll back the system if the system does not start, read ours.
Reverting Windows 10 to its original state (reset)
If none of the above helps and you still do not start Windows 10, then to restore the computer to working capacity, it remains to do a reset. For this:
1. Boot again from the installation USB. Press any key when you see Press any key to boot from CD or DVD…
2. Choose a language
3. Select System Restore:
4. Select Diagnostics And Reset your computer:

- select delete everything,
- select your copy of Windows
- click Only the drive on which Windows is installed(in most cases yours will be C: drive),
- press Just delete my files.
Then press the button Return to original state:

The return procedure is not fast compared to the other methods described above. However, if your Windows 10 won't boot due to serious software problems, then this method often really helps to solve the problem.
The Windows 10 operating system from Microsoft is quite reliable and I don’t have any particular complaints - you still have to try to break it. However, the cases are different, and therefore today I want to talk about the main errors when loading Windows 10 and how to fix them. In more than half of the cases, it is quite possible to restore the system to boot and its normal operation - you just need to remain calm and correctly follow the instructions below.
Black screen on Windows startup
This is perhaps the most common Windows 10 boot error, which every third user has encountered at least once. A black screen with no signs of "life" of the operating system may be accompanied by the appearance of a cursor on the display or without it at all. Waiting for a successful system startup for longer than 15-20 minutes is pointless - the desktop will not appear. The reason is most often the failure of any drivers or their incorrect installation. At the same time, it is not at all necessary that you did the installation yourself - some programs, as well as the Update Center, can do this.
The solution in this case is to start the OS in Recovery mode by booting from the Windows installation flash drive. Opening the section Diagnostics, in the next window click on Extra options and then - System Restore.
After that, you will see a list of available restore points. Select the closest one in time and click the "Next" button.
Only here in the additional parameters we select the section "Recovery at boot".
If you cannot restore normal operation, then try the following advice.
"Computer did not start correctly" error
In this situation, Windows 10 cannot boot, but at least does not lose control of the computer and signals to the user that the computer did not start correctly.
You can, of course, click on the "Restart" button, but as a rule this does not give a result (if sometimes it loads normally, and sometimes it doesn't, check the hard drive).
To correct the situation, you need to click on "Advanced options", and then go to the section Troubleshooting > Extra options > Download Options and here click on the "Restart" button. After that, the following menu should appear:
Press key 6
or F6 to start Windows Safe Mode with command line support.
Your PC should restart again and boot into Safe Mode. In this case, the command line window should be on the screen. Enter the following commands one by one:
Sfc /scannow dism /Online /Cleanup-Image /RestoreHealth shutdown -r
The last command will again lead to a reboot and Windows should still start normally.
Operating system not found
This is the saddest option of all. The computer simply does not reach Windows loading and writes such errors on a black screen.
First: "Boot failure. Reboot and Select Proper Boot device or insert boot media in selected boot device."
Second: “An operating system wasn’t found. Try disconnecting any drives that don't contain an operating system. Press Ctrl+Alt+Del to restart".. In order to restore it, you will need the installation disk again. Go to bootrec /RebuildBcd bootrec /fixMbr bootrec /fixboot
This way we will overwrite the bootloader files. We restart the PC and check the operation of the system.
3. Hard disk hardware damage. Well, this is the saddest, and most importantly, an expensive option, since you have to buy a new hard drive.


Wargame: Red Dragon not starting?
Sad escobar "The face of the judicial system of Ukraine"
ROME Total War - how to unlock all factions?
How to turn off the TalkBack feature?
Overview of alternative firmware HTC Desire A8181 Bravo How to install the firmware file for HTC Desire