In this article, we'll show you how to disassemble and clean the MSI GT683 Gaming Laptop.
If your goal is to clean the laptop from dust, then it is enough to unscrew only one screw marked in red. After that, the fan can be easily removed, giving access to the radiators of the cooling system. If you want to go further and replace the thermal paste, then you should remove the heatsinks by unscrewing the screws marked in green, and if you need it completely, you will also need to unscrew the screws marked in yellow.
In our case, the cooling system was not very dirty, but it still does not hurt to clean it.
Next, remove the radiators and take out the HDD. To remove the hard drive, pull the strap from the end of the device. Next, remove the video card by unscrewing the screw holding it. 
For further disassembly, remove the keyboard, for this you need to squeeze the latches that hold it in the picture below, they are marked in green. Pull out the keyboard carefully so as not to deform it and damage the cable. Then you should remove the decorative panel, which contains the power button and touch buttons. To do this, press the latches on the underside of the laptop and remove the panel. The socket is held quite tightly, so you will need to apply force.
Next, unfasten all the marked cables and unscrew the 4 screws holding the matrix. Removing the matrix opens access to two screws holding the decorative panel under the matrix, unscrewing them the panel can be easily removed.
After dismantling the motherboard, we find that the motherboard is burned through under the power connector. This happened due to mechanical damage to the connector itself, apparently the owners of the laptop strongly pulled the power cord. The repair consisted of rebuilding the motherboard and soldering a new connector.
Be careful with the wires connected to your laptop, one wrong move and an expensive one awaits you. And don't forget to keep your device clean and it will serve you faithfully.
So we have: MSI VR601 laptop with a thundering cooling fan.
And for one thing you need to add RAM.
Everything is as usual, first we remove the largest cover (the one on the left). It should be noted that there is a bolt under the "Warranty Sticker". Speaking of this sticker. If your laptop is serviced in the Moscow service center "Serso" (and it seems like one is an authorized S / C), then you can safely tear off this sticker. There is an agreement with the service to install RAM on its own, and this operation cannot be done without damaging this sticker.

Next is a photo, from which you yourself can guess how to add RAM. Any so-DDR2 memory will do. You can score on two-channel (this is my deep conviction) and set standards from different manufacturers. The likelihood that it will work with errors is exactly the same as with modules from the same manufacturer. Judging by the memtest tests, Samsung and Transcend are working fine for me.

Next, we need to remove the cooling system. In order to do this, it is enough to unscrew the four bolts. I've marked them with red dots. Fun fact - the bolt locations are numbered for cross-tightening the screws. This is necessary in order not to damage the processor crystal.

After unscrewing, we remove the entire system at once:

That's all! It remains only to disconnect the cooler power cable and you can pull it out completely:

After we got everything out, we change the gray dried thermal paste (which is safe and convenient to scrape off with a credit card) to Alsil, blow through the radiator and lubricate the cooler.
After all this, we assemble in the reverse order.
MS 1356. How to disassemble the device, we will consider in detail below. After all, not every user has had to deal with this. Disassembling a laptop is required in various situations. For example, when a laptop starts to slow down or make a lot of noise, then it must be cleaned of dust. Also, disassembling a laptop is necessary to fix various problems. For example, if a laptop is broken, then it will definitely have to be disassembled for testing and troubleshooting.
MSI MS 1356: how to disassemble the device
The task is not the easiest one. However, if you want to carry out the disassembly process yourself, in this case, you should exercise maximum care, and also follow the instructions that we will now give.
Algorithm
So, let's give a detailed description of how to open MSI MS 1356 laptop. First thing you need to do is remove the battery. At the place where the battery was installed, you can find a sticker on which it is written that the laptop is running Windows 7 home operating system. Naturally, before disassembling the laptop, you will need to rewrite the key on this element just in case. Further, on the back of the device, you can find six screws, they, as you can already understand, you need to unscrew, after which it will be possible to remove the back cover. It must be lifted from the device very carefully. At the same time, you will need to make an effort, since it is holding tight enough. After the cover is removed, you need to turn your attention to further disassembly.
Conclusion

If you decide to simply clean the laptop from dust, then it will be enough for you to unscrew a few screws, after which you can make a complete "cleaning" in the device. The most important thing in this case for you is the ability to access the fan. To ensure it, you need to unscrew only one screw on the MSI MS 1356 case. How to disassemble the device completely is a more complicated question. In some cases, many want to completely clean the device. This requires a complete disassembly of the device, which requires not only maximum care, but also perseverance and accuracy. Currently, there are also special circuits that will contribute to the correct operation of the device in its open form. Now you know everything you need to know about the MSI MS 1356 laptop. We have described in detail above how to disassemble this laptop.
This article shows you how to completely disassemble MSI U90 laptop. The reasons for disassembly can be different, from adding a new RAM strip to replacing the laptop matrix.
And so, let's get started.
Here is the laptop itself:
First, remove the battery:

Next, you need to remove the keyboard, it is not at all difficult to remove it, first you need to press it forward (away from the keyboard) with something thin from above, in those places where it is shown, thereby freeing the upper part from the holders.


Then we carefully take it out, do not forget, there are also holders on the sides, and from the bottom you just need to pull it out.
After that, you will need to disconnect the keyboard cable from the motherboard. It can be pulled out very easily, you only need to lift the latch, it is circled in red in the photo:


After the back cover has been successfully removed, you need to unscrew the fan so that you can remove the heatsink from the processor and the north bridge.


After that, we unscrew the bolt that holds the hard drive in its place.

And we easily get it out by lifting and pulling.


We unscrew the uppermost bolts:

And we carefully pull out the motherboard, just not abruptly and not so far, because there is a cable that we did not disconnect from the motherboard, which goes to the touchpad.

Disconnect the touchpad cable from the motherboard:

The result is the following picture :)

Now we will disconnect the monitor, although it could have been disconnected before, but, for some reason, I decided to leave it for later, in short, as it is more convenient for anyone. We open the laptop, just be careful, the monitor is fastened to the iron case, and they are held by plastic stoppers, do not break them.


Prolongation of registration of participants in the "Living Classics" competition!
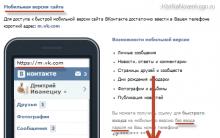
Who deleted me from friends on VKontakte All friends disappeared from the contact
Which operator was the best in Russia
Double cassette tape recorder
"VK" can be closed for a long time