Windows 7 does not natively support the ability to install third-party themes from other developers. But this problem can be solved in a very quick and easy way, and today we will teach you how to install themes for windows 7 with detailed instructions with screenshots. The whole process does not require any special PC skills from users.
System preparation
First, we need to prepare the Windows 7 system for installing third-party themes, namely, install 2 patches:Installation process (pictures are clickable):
In the archive there is a patch for x86 and x64 bit OS, select the one you need and run in administrator mode
At the initial stage of the installation process, you will have the opportunity to change the path for installing the patch 
Read the user agreement and agree with it, otherwise you can't =) 
Installation process started 
Congratulations! 
2. Universal Theme Patcher
Run the patch on behalf of the admin


In the next step, the installer displays us information about how many files need to be "disinfected"

Next, we need to click "Patch" in 3 places

The installer says that all patches have been installed successfully!


Installing the theme
1. Download any theme here, we will explain the installation process using a theme example2. All themes are packed in an archiver and after downloading, first of all, we extract the contents of the archive, for example, to the desktop
3. Place the contents of the "Theme" folder (1 file with the ".theme" extension and 1 folder of the same name with resources) in the C: / Windows / Resources / Themes directory.


4. After that, open the personalization panel and find our installed theme and click on it. After 1-2 seconds, the desktop design will change

5. The installation process of most themes ends here, but in some there are still unchanged graphic elements, in our case, these are the explorer navigation buttons and the design of the start button.

6. In this case, it is necessary to replace the system files
Replacing system files
Here are the main ones:
Explorer.exe(changes the appearance of the "Start" button) - location C: / Windows
ExplorerFrame.dll(changes the design of the explorer navigation button) - location C: / Windows / system32
Shell32.dll(changes the background on the left side in the control panel) - location C: / Windows / system32
1. First, in order to be able to change these system files, you need to get access rights to them. Read how to do it here.
2. Now you need to rename the "Explorer.exe" file to any other. (For example, in Explorer2.exe, Explorerorigin.exe, etc.)

3. Open our folder with the theme that you downloaded, copy the "Explorer.exe" file from there and paste it into the C: / Windows directory

4. We do the same with the other two files.
5. After all these actions, for the changes to take effect, we need to restart the explorer or the system
Rebooting Explorer
1. Open the task manager, go to the processes tab, find explorer.exe there, right-click on it and select end the processAt a certain stage of using a computer, the user often wants to change something, bring, so to speak, novelty to the monotony. Alternatively, you can change the default theme in the Windows 7 system or install it, but not everyone knows how to do this. But in fact, the process is very simple, and every user can implement it, even with a minimal level of computer knowledge.
Before I tell you about how to install a theme on Windows 7, I want to note that the initial setup will take you some time, but only because you have to patch the system and also learn how to install new themes. In the future, the whole process will be much faster.
How to patch the OS
So, as I said, first you must patch your operating system, and this is done with only one purpose: in order to be able to install themes that are not signed by Microsoft. To do this, download one program of your choice:
- UxStyle Core, which does not affect the original files in any way and runs as an add-on to the Windows Themes service;
- UXTheme Multi-Patcher, unlike the previous version, this application modifies the original files, and also makes a copy so that you can restore them later;
- VistaGlazz works the same as the previous program.
Download any of these programs and install it. You will then need to restart your computer for the changes to take effect. I want to note that you only need to perform such actions once. In order to change skins in the future, you will no longer need to reinstall patches.
How to install a theme
Next, let's move on to installing the theme. To do this, download the archive with the theme and unpack it, then go to the folder. The content of the archive with the theme will be different every time, because each has its own creator, keep this in mind. Next, we do this: in the folder you need to find a theme file in the .theme format and a folder with the same name. They need to be moved to C / Windows / Resources / Themes, because this is the folder that contains absolutely all the themes of your OS.
Now click on a free area on the desktop and select "Personalization", there find the category "Installed Themes" and select the one that you just moved to the folder with themes. That, in general, is all, you have successfully changed the theme to Windows 7. As you can see, the "Start" button remains the same, and the navigation buttons in Explorer have not changed either.

There is nothing difficult in installing a new skin in Windows 7. Do all the work described here once, and then you will be able to change themes much faster, literally in a few clicks!
Operating systems of the Windows family offer their users chic options for designing the appearance of the OS. At the service of users, various color schemes, styles, sets of buttons, options for windows and panels, as well as favorite themes have long been invented. Especially "on a large scale" it is implemented in the last two releases from Microsoft - "seven" and "eight".
Despite the fact that many things in Windows operating systems are learned almost on an intuitive level and are done quite simply, many users still face serious difficulties in how to do this or that thing. And, installing themes is no exception! Let's take a closer look at it.
Installing official themes in Windows 7
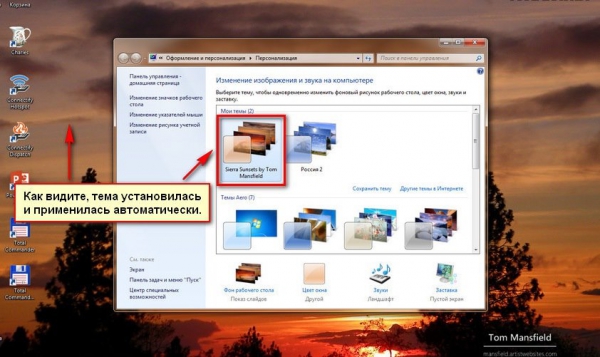
First, click on an empty / empty slave space. table right keyboard. mouse and call the option "Personalization".
This way you will instantly be taken to clearance service Windows. As you can see, there, in two sections, the system already offers a variety of topics to choose from, both in "aero" and in "basic" (simplified) versions. Select any of them by clicking on it with the mouse, and it will be installed automatically.


If you want something "new" or different, then to download additional official themes, use the option "Other Topics on the Internet".

By clicking on it, you will instantly be taken to official microsoft portal, where you can choose and download many beautiful themes for design. Take advantage of search bar and headings to quickly find something. The site also has the function of viewing each topic so that you can clearly see what you are going to download.

After you download the theme you like, find its file on your computer (by default it will be in the folder "Downloads") and run it by double-clicking it.

The theme will also be installed automatically and will appear in "Design and Personalization" In chapter "My Topics".

Installing third-party (unofficial) themes in Windows 7
It is difficult to disagree with the fact that today the internet is full of beautiful author's themes, which, unfortunately, cannot be installed in Windows in the usual way. You can solve this problem using special utilities, for example, VistaGlazz, which will patch the system files and, thereby, make it possible to install third-party themes.
First, download the latest VistaGlazz and install it on your PC. There is nothing super complicated here. Just run the installer from them. administrator and follow the further instructions of the installer.

After VG will be installed, run it from the "working" shortcut or from the menu "Start" and press the button "I agree" to start using it.

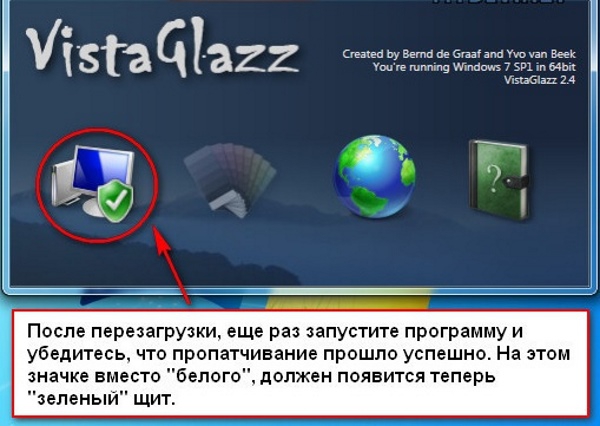
Click the icon "Computer with a white shield", then, on the button "Patch files" to start the process of patching system files.


When finished, click on "Reboot" to reboot the machine. Then all the changes made VistaGlazz will take effect.

After restarting the OS, run the program again and make sure everything went well. A green shield should appear on the "Computer" icon!

That's it, now you can start installing themes!

After that, open "Design and personalization" and see - the topic should be displayed there, in the section "My Topics".

That's all. Now you won't have any more problems with installing official and author's themes in Win7!
Automatically changing background pictures alone may not be enough to improve performance and efficiency. We need to change the entire style of displaying information on the screen. How to update the desktop theme in Windows 7 using special programs or manually, we will figure it out further.
Can I change the subject?
In most cases, when talking about Windows 7, we mean exactly "Windows 7 Ultimate". You can change the theme to this version. However, not everyone has the opportunity to use this particular version, and the options for home - "Windows 7 Home Basic" or "Windows 7 Home Starter" - are completely devoid of customization options: the "Personalization" item is simply absent in the context menu of the Desktop. So in the future, speaking about installing themes, we will focus on "Windows 7 Ultimate".Also, before starting the topic changing activity, you should make sure that your account has sufficient rights to perform such actions in the operating system. It is best if you are the Administrator on your PC. If this is not the case, most likely you will not be able to replace the sore subject. Try asking your system administrator or computer expert to expand your authority.
Themes installer for Windows 7
The global application brand, StarDock, has been releasing WindowBlinds, the most popular theme manipulation program for Windows, for many years.Download the program is offered on the official resource, which is located at https://www.stardock.com/products/windowblinds/

The following window will open:

After downloading and running the installer, the program will offer to use the paid version or the free one for trial, which is active for 30 days.
To start the program, you will need to enter an email address, after which an email will be sent to the mailbox with a link to activate:

After clicking on the button indicated in the letter, the “WindowBlinds” application will automatically activate and from this moment the trial period will start counting:

During the installation, you will be prompted to install another useful program from the same developer that changes the theme of the Desktop - "Fences". It will allow you to organize the icons on the desktop by sorting them into original folders. However, the folders themselves on the table will have the shape of rectangles of arbitrary sizes, which you can define yourself. In addition, you can "flip" additional screens to the right and left of the main one, as in a smartphone.
Installed WindowBlinds looks like this:

The app lets you choose from 15 styles. Each of them is similar and not like the others. Among such a variety, for sure, you will find something suitable for yourself. In addition to the style, you can immediately change the desktop wallpaper, as well as create your own unique and inimitable style in the "Modify style" tab.
How do I install the official theme?
The operating system offers its users several themes to choose from, which are installed according to the following instructions:

If you don't like the above options, you can download other official themes. To do this, we continue our actions:

How do I install a third-party theme?
Microsoft does not allow its users to arbitrarily set and change themes in the operating system. This is done to generally increase the stability of the OS and the safety of the users themselves. However, if the workplace is not too demanding, it is quite possible to allow yourself to experiment, choosing a topic that suits you individually. But for this you have to conjure up a little.The principle of installing a theme that is not signed by Microsoft is to download any program that allows you to patch system files, and then download and install the new theme itself.
The most recognized programs for our purposes are as follows:
- Universal Theme Patcher. It replaces some system files, and after that you can install any theme of any creator without restrictions. However, replacing system files can be negatively perceived by your antivirus. After replacing the files, you need to restart the PC.
- UxStyle Core. It differs from the previous one in that no system files are affected, and an additional background service Unsigned Themes is started. However, the application has a significant drawback: when trying to change the theme, sometimes the theme "flies" to the usual classic. In this case, uninstalling and reinstalling UxStyle Core helps, after which the desired theme can still be installed. Perhaps until the next replacement.
- VistaGlazz (VG). This application also affects system files, but it also has important additional features: automatic creation of initial copies of workable files with the possibility of automatic recovery if necessary; adding a "transparency" effect to windows (expanded folders, etc.).

Next, we proceed directly to downloading and installing a third-party theme.
One of the most popular and proven sites with a huge number of themes for every taste is at https://winzoro.net/themes/windows7_themes/
The themes themselves are downloaded to any folder on the PC, even on the Desktop itself. Most often, a downloaded theme is an archive in * .zip format, which can contain not only the files for the theme (Theme), but also thematic ones:
- wallpapers - background options for the theme;
- preview - screenshots to get an idea of the appearance of the theme;
- me - a file that describes the theme's capabilities, installation nuances and a little self-promotion of the creator;
- System Files is a subfolder with the contents of which you need to replace system files, but this is at your own peril and risk.


To fully comply with the creator's idea, you may need to install fonts, wallpapers and replace the "explorer.exe" file. It should be remembered that when changing the theme, the results of these manipulations will have to be canceled or restored. Therefore, it is better to copy the files to be replaced in advance to a backup folder on a PC or USB flash drive.
Tip: I would like to warn lovers of everything free from downloading themes and styles for Windows 7 in the "* .exe" -files format. Any of these files may contain a virus, and instead of updating the appearance of the Desktop, you may have to reinstall the entire Windows 7 (see). In this case, you can lose all your documents, settings for Word, Excel, other office or accounting programs. If, nevertheless, you download executable files from the Internet, then be sure to use an antivirus.
Video instruction
A short video walks you through the simple process of changing a theme in Windows 7 step-by-step and visually:Well, now, after reading our article, you can independently change themes and styles in your Windows 7. You can make your workplace less formal, more friendly and personal, in some ways even surprising you. Special programs and a huge number of themes for Windows 7 located on the Internet will help you with this. Good luck with your design search!
Some users carelessly refer to the choice of the theme of the interface of the operating system. And I must say that in vain, since its correct selection reduces the load on the eyes, helps to concentrate, which, in general, leads to an increase in efficiency. Therefore, if you spend a lot of time at the computer, using it for work, then experts advise you to choose background images with calm tones, in which there are no aggressive colors. Let's take a look at how to set a suitable skin on a Windows 7 computer.
The design of the interface can be divided into two main components: the background of the desktop (wallpaper) and the color of the windows. The wallpaper is directly the picture that the user sees when the desktop is displayed on the screen. Windows is the interface area of Windows Explorer or applications. By changing the theme, you can change the color of their borders. Now let's take a direct look at exactly how you can change the appearance.
Method 1: using built-in Windows themes
First of all, let's take a look at how to install the built-in Windows themes.
- Go to the desktop and right-click on it. In the launched list, select the position "Personalization".

You can also go to the desired section through the menu "Start"... Click on the button "Start" in the lower left corner of the screen. In the menu that opens, go to the item "Control Panel".

In the launched Control panels go to subsection "Change theme" in the block "Design and personalization".
- The tool that has the name "Changing the picture and sound on your computer"... The options presented in it are divided into two large groups of objects:
- Aero themes;
- Basic and high contrast themes.
Selecting a background from the Aero group allows you to make the interface design as presentable as possible, thanks to a complex combination of shades and the use of the semi-transparent window mode. But, at the same time, the use of wallpapers from this group creates a relatively high degree of load on computer resources. Therefore, it is not recommended to use this type of design on weak PCs. This group contains the following topics:
- Windows 7;
- Characters;
- Scenes;
- Nature;
- Landscapes;
- Architecture.
Each of them has the additional ability to select a desktop background from built-in pictures. We will discuss how to do this below.

Basic options are represented by a much simpler type of design with a high degree of contrast. They are not as visually appealing as the Aero themes, but they can save system computing resources. This group contains the following built-in themes:
- Windows 7 - simplified style;
- High contrast # 1;
- High contrast # 2;
- Contrast black;
- Contrast white;
- Classic.

So, choose any of the options you like from the Aero groups or basic themes. After that, we make a double click with the left mouse button on the selected element. If we select an element from the Aero group, the background of the desktop will be set to the picture that is the first in the icon of a particular theme. By default, it will change to the next one every 30 minutes, and so on in a circle. But for each basic theme, only one version of the desktop background is attached.


Method 2: choosing a topic on the Internet
If you are not satisfied with the set of 12 options that is presented by default in the operating system, then you can download additional design elements from the official Microsoft website. There is a selection divided into categories, many times exceeding the number of topics that are built into Windows.


In addition, many other topics can be found on third party sites. For example, the design in the style of the Mac OS operating system is especially popular.
Method 3: create your own theme
But often the built-in and downloaded from the Internet options do not satisfy users, and therefore they use additional settings related to changing the desktop picture and window colors that meet their personal preferences.
- If we want to change the background image on the desktop or the display order, then we should click on the name at the bottom of the window for changing images "Desktop background"... Above the specified name there is a preview picture of the currently set background.
- The window for selecting a background image is launched. These pictures are also called wallpaper. Their list is located in the central area. All pictures are divided into four groups, navigation between which can be done using the switch Image Locations:
- Windows desktop backgrounds(built-in pictures are located here, divided into groups of topics, which we considered above);
- Image library(all pictures located in the folder "Images" in user profile on disk C);
- Most Popular Photos(any pictures on the hard drive that the user most often accessed);
- Solid colors(a set of backgrounds in one solid color).

The user can check the boxes next to those pictures that he wants to alternate when changing the desktop background in the first three categories.


If the presented set of pictures does not contain the image that the user wants to set as the background of the desktop, but the desired picture is on the computer's hard disk, then click on the button "Overview…".

A small window opens, in which, using the hard disk navigation tools, you need to select the folder where the desired picture or pictures are stored.

After that, the selected folder will be added as a separate category to the wallpaper selection window. All image files located in it will now be available for selection.

In field "Image position" it is possible to set exactly how the background image will be positioned on the monitor screen:
- Filling(default);
- Stretch(the picture is stretched across the entire monitor screen);
- Center(the drawing is used in its full size, located in the center of the screen);
- Pave(the selected picture is presented in the form of small repeating squares all over the screen);
- To size.

In field "Change images every" you can set the time period for changing the selected patterns from 10 seconds to 1 day. A total of 16 different options for setting the period. The default is set to 30 minutes.

If you suddenly in the process of work, after setting the background, do not want to wait for the next background image to change, according to the set change period, then right-click on an empty area of the desktop. In the menu that opens, select the position "Next Desktop Background Image"... Then the picture on the desktop will immediately change to the next object, installed in the order of the active theme.

If you check the box next to the parameter "In random order", then the pictures will change not in the order in which they are presented in the central area of the window, but in a random order.

If you want to change between all the images located in the window for selecting a background image, then click on the button "Select all", which is located above the image preview area.

If, on the contrary, you do not want the background image to change at a given frequency, then click on the button "Clear all"... All objects will be unchecked.

And then check the box next to one of the images that you constantly want to see on your desktop. In this case, the field for setting the frequency of changing pictures will cease to be active.

After all the settings in the wallpaper selection window are completed, click on the button "Save changes".
- Automatically returns to the window for changing the image and sound on the computer. Now we need to move on to changing the color of the window. To do this, click on the item "Window color", which is located at the bottom of the window for changing the picture and sound on your computer.
- The window for changing the color of windows is launched. The settings located here are reflected in changing the shades of the borders of windows, menus "Start" and the taskbar. In the upper part of the window, you can choose one of 16 basic design colors. If they are not enough, and you want to make more detailed adjustments, then you should click on the item Show Color Adjustment.

This will open a set of additional color adjustments. Four sliders can be used to adjust the levels of intensity, hue, saturation, and brightness.

If you check the box next to the item "Turn on transparency", then the windows will become transparent. Using the slider Color Intensity you can adjust the transparency level.

After all the settings are done, click on the button "Save changes".
- After that, we again return to the window for changing the image and sound on the computer. As you can see, in the block "My themes", in which the themes created by the user are located, a new name has appeared "Unsaved topic"... If you leave it in this status, then with the next changes to the desktop background settings, the unsaved theme will be changed. If we want to leave the opportunity at any time to turn it on with the same set of settings that we set above, then this object must be saved. To do this, click on the inscription "Save Topic".
- After that, a small save window starts with an empty field "Topic name"... Here you need to enter the desired name. Then click on the button "Save".
- As you can see, the name that we assigned appeared in the block "My themes" windows to change the image on the computer. Now, at any time, it is enough to click on the specified name so that this particular design is displayed as the desktop screensaver. Even if in the future you will make manipulations in the section for selecting a background image, then these changes will not affect the saved object in any way, but will be used to form a new object.


Method 4: change wallpaper through the context menu
But the simplest way to change the wallpaper is to use the context menu. Of course, this option is not as functional as creating background objects through the window for changing the image, but at the same time, its simplicity and intuitive clarity attracts most users. In addition, for many of them, a simple change of the picture on the desktop without complicated settings is quite enough.
We go with the help Windows Explorer to the directory where the image that we want to make the background for the desktop is located. Click on the name of this picture with the right mouse button. In the context list, select the position Set as Desktop Background, after which the background picture will change to the selected picture.

In the window for changing the image and sound, this picture will be displayed as the current image for the desktop background and as an unsaved object. If desired, you can save it in the same way as we discussed in the example above.

As you can see, the Windows 7 operating system has in its arsenal a huge set for changing the interface design. At the same time, the user, depending on his needs, can choose one of 12 standard themes, download a ready-made version from the official Microsoft website or create it himself. The latter option assumes design settings that will most closely match the user's preferences. In this case, you can choose the pictures for the desktop background yourself, determine their position on it, the frequency of the change period, and also set the color of the window frames. Those users who do not want to bother with complex settings can simply set the wallpaper through the context menu Windows Explorer.


Prolongation of registration of participants in the "Living Classics" competition!
Who deleted me from friends on VKontakte All friends disappeared from the contact
Which operator was the best in Russia
Double cassette tape recorder
"VK" can be closed for a long time