If your Samsung Galaxy Gio s5660 phone is in trouble and any function, or the device software has stopped working, there is only one way out - update your phone firmware!
There are 2 ways to update in total:
- licensed program . But only licensed firmware can be updated with the application;
- via a computer using the special Odin application.
Preparation
For fast high-quality Galaxy Gio firmware, download the following programs and files:
- Odin Multi Downloader app version 4.42 or higher. Version One from the link will suit you;
- drivers for connecting a phone to a computer (they are installed together with Kies);
- the necessary firmware that can be downloaded from this resource;
- the file GIO_v1.0, which may already be contained in the archive.
Firmware stages
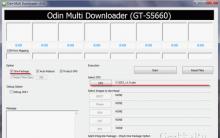
- In the Odin Multi Downloader application, put a checkmark in front of the One package button. Below is a screenshot of how the application window should look.

- Turn off your smartphone and put it into download mode. To do this, press the key combination "volume quieter", "center button", "power on". The message "Downloading" should appear on the phone screen.
- We connect the phone via USB cable to the computer. Make sure the Odin app recognizes the phone.
- We indicate the location of the phone using the One package button.
- Press the Start button and wait for the results.
Never disconnect your phone from your computer while updating the software. Wait for the message “Ready” to appear on the screen, which will mean that the Samsung Galaxy Gio firmware was successful.
Firmware Samsung Galaxy Gio s5660 Author DimkaVarlamov average rating 3.5 / 5 - 15 user ratings
This article will walk you through the process of flashing your phone step by step. Samsung Galaxy Gio S5660 based on Android OS. CyanogenMod was chosen as the firmware.
Preparing for firmware
Before proceeding directly to the process, you must do the following:
- Synchronize all contacts through your Google account, as after flashing all data will be deleted.
- Transfer all the other data you need from the phone memory (photos, documents, etc.) to the flash card, since the KIES program will not work with the firmware that we will be using.
- Charge your phone at least 50%, or better completely.
- Modified ClockWorkMod recovery (px_cwm_v2.zip);
- Directly the firmware file itself (in our case it is CyanogenMod cm-10.1.6-GT-S5660-gio.zip).
We copy all these files to the phone's SD card.
Phone firmware
1. Turn off the phone and boot into "recovery". To do this, hold down the power button and the central button for a few seconds (see photo)
2. In the menu that appears, select the item " Install zip from sdcard", Further " choose zip from sdcard". Install two files in turn. First, install the file “ px_cwm_v2.zip", Turn off the phone and boot into recovery again.
We clean up data from the phone by selecting the item " wipe data / factory reset", Further " delete all user data».
After that, install the file “ ext4_formatter.zip"And wait for the formatting of the phone partitions in Ext4 and perform the cleaning again, just like after installing the first file.

3. Preparation is completed, now there is the last file with the firmware itself. In point " Install zip from sdcard», « choose zip from sdcard", Select the firmware file (in our case it is cm-10.1.6-GT-S5660-gio). The installation process should take a few minutes and should be displayed on the phone screen as follows:

4. After installation, you must select the item " mounts and storage", And in it" mount / system". After clicking on it, it will change to " unmount / system". If this is already the case, you do not need to click on this item.

5. Restart the phone (item " reboot system now"). The first download can take up to 10 minutes.

6. If everything is done correctly and strictly according to the instructions, the phone will boot with the new firmware. All that remains is to customize it for yourself, synchronize contacts and install the necessary applications.

The developers of Android have taken their OS to such a level that in today’s world there is no one who dares to compete with them. One after another many of their new Android versions are releasing and ruling the entire market. From Android 1.5 Cup cake to the recently launched Android 4.4 KitKat, there has been a tremendous change in the performance, specs and many other aspects. From the day the new Android 4.4 KitKat is released, everyone is talking about this new firmware. But due to its much high hardware and RAM compatibility it is only available for flagship devices. The rest users need to rely on those ROMs so as to experience the same. A week ago, it was announced that this latest version is going to get available for mid range devices like Galaxy Ace, Fit, Mini and Gio. In this article we are going to discuss about the detailed procedure for updating Samsung Galaxy Gio S5660 to Android 4.4 KitKat through Cyanogenmod 11.
Samsung Galaxy Gio S5660 launched back in 2011 was a low budget device and had descent specs and features. That’s the reason it was not able to attract many users. It had Android 2.2 Froyo which was later upgraded to 2.3 Gingerbread, a 3.2 MP auto-focus camera, 16m color screen and was sold at the price of $ 160. The Gio users had no hope regarding the further official firmware releases for this device. But it was the third party Android developers who took keen interest in this device and with much hard work launched the next Android versions of course unofficially.
The much well known Cyanogenmod team took the initiative and launched their latest Cyanogenmod 11 ROM for S5660 users. So its now possible for the Gio users to enjoy and experience all those latest KitKat flavored features like refurnished Google home with new launcher, new phone dialer app, screen recording, security and system improvements, NFC emulation, Google wallet, new quick office, low memory management support, new gallery, battery saving tweaks, new keyboard and much more on your device. Along with that you’ll also be able to enjoy the Cyanogenmod features, thus having a dual features experience.

This is an experimental build and we should thank the xda community for that. But every good thing has it’s drawback. This ROM too have it. While using this CM 11 ROM you may come across some untested bugs and issues. This may ruin your entire mood, but hey don’t worry the CM team with their most recognized developers is working hard to fixed these bugs & to give you a pure stable Android 4.4 KitKat ROM. So if you are ready to install the latest Android 4.4 KitKat flavored CM 11 ROM on your Samsung Galaxy Gio GT-S5660 then proceed further for the step by step installation process.

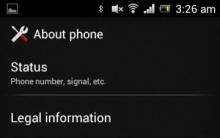
The given update of installing Android 4.4 KitKat via Cyanogenmod 11 ROM on your Samsung Galaxy Gio S5660 is too risky and may permanently damage your device, if not followed properly. For the advanced Android users who have a complete knowledge regarding this stuff and have gone through it before are free to proceed further. But the newbies, who are completely un-aware must stop right at this point. If in case your Galaxy Gio gets damaged or bricked by following this article then neither we nor the developers will be held liable for that. Even though the chances that your device will get damaged is least, but still I highly recommend you to follow all that is given below properly and without attempting anything by your own. Also you must note that this Android 4.4 KitKat ROM is only compatible for Samsung Galaxy Gio having the model number GT-S5660... Installing this on any other device or variant will result into unwanted outcomes or bricked device. So you must verify your device model number with the number given above from Homescreen–> Menu–> Settings -> About Phone.
Pre-Requisites:
- A proper battery backup is must before performing any flashing process. Lack of battery may increase the risk of interruption in the flashing process thus leading to further problems. So I highly recommend to charge the battery of your phone at least up to 80% .
- Using USB cable connect your Galaxy Gio to PC, enable USB debugging mode and take a backup of your entire SD card. Along with that you must also backup your contacts, messages, apn settings, call logs etc for safety. All these precautions are need to be taken as disaster can knock your door anytime without giving a sign. Also the last step of this flashing process involves wiping all your data and cache from your phones internal memory. That's why a backup is must.
- Make sure that Samsung device drivers are installed on your PC so as to recognize your device when connected to PC. You can install them by installing Kies or manually install them from the link given below:
- EFS folder present in your system directory must be backed up. This sensitive folder contains all your phones specific information such as the IMEI, wireless devices MAC addresses, product code, and much more. If by mistake the data in it gets wiped, then this will make your phone completely useless & will no longer be recognized by your carrier. Refer our article to backup and restore EFS / IMEI data:
- Make sure that your Galaxy Gio is rooted. If not, then follow our guide given below to do so.
- A custom recovery is must for flashing any custom ROM. So make sure that you have installed a recovery like Clockworkmod (CWM) or TWRP before proceeding further. For installing CWM you can refer our article from the link given above.
- (IMPORTANT!) For flashing Android 4.4 KitKat you need to have the latest Custom recovery like 6.0.4.7 installed on your Galaxy Gio. If you haven’t installed it yet, then don’t worry just follow this steps given below:
Step 1: Download the latest CWM 6.0.4.7 recovery package from.
Step 2: Connect your device to PC, enable USB debugging mode and transfer this recovery on your SD card.
Step 3: Now disconnect your Galaxy Gio and switch it off completely.
Step 4: You need to enter into recovery mode now. For doing so, keep holding home button and power button simultaneously until the recovery mode appears.
Step 5: In recovery mode, using volume keys navigate to the option named Install from SD card and select it using Home (middle) button to install this latest 6.0.4.7 recovery.
After successful flashing of the latest CWM 6.0.4.7 recovery, proceed further for the actual Android 4.4 KitKat ROM installation process.
Procedure to updateSamsung Galaxy Gio GT-S5660toCM11 :
Great! You have successfully flashed the new Cyanogenmod 11 ROM running on the latest Android 4.4 KitKat on your Samsung Galaxy Gio S5660. Enjoy the all new Kitkat flavored features on your Galaxy Gio with this ROM. I have made this article very simple so as to understand you properly, still if you come across any difficulty or have problem while going through the process given above then without hesitating drop your problem through the comments section below. We are always here to help you out. Till then Enjoy! 🙂
Samsung Galaxy Gio GT-S5660 is a branded smartphone running on Android 2.2. Here you will find out the characteristics, how to root or reset the settings, and you can also download firmware (for Odin, for example) and instructions for Samsung.
Root on Samsung Galaxy Gio GT-S5660
How to get the root for Samsung Galaxy Gio GT-S5660 see instructions below.
Below are the universal programs for obtaining root rights for devices on Qualcomm Snapdragon
- (PC needed)
- (Route using a PC)
- (popular)
- (root in one click)
If the superuser (root) rights could not be obtained or the program did not appear (you can install it yourself) - ask a question in the topic. You may need a custom kernel firmware.
Specifications
- Standard: GSM 900/1800/1900, 3G
- Type: Smartphone
- Operating system: Android 2.2
- Case type: classic
- Body material: plastic
- SIM card type: regular
- Number of SIM-cards: 1
- Weight: 102g
- Dimensions (WxHxT): 58x111x12 mm
- Screen type: color, 16.78 million colors, touch
- Touchscreen type: multitouch, capacitive
- Diagonal: 3.2 inches.
- Image size: 320x480
- Pixels Per Inch (PPI): 180
- Automatic screen rotation: yes
- Ringtone type: polyphonic, MP3 ringtones
- Vibration alert: yes
- Camera: 3.20 million pixels, 2048x1536
- Camera functions: autofocus
- Video recording: yes (MPEG4)
- Max. video frame rate: 15 frames / s
- Geo Tagging: yes
- Audio: MP3, AAC, WAV, FM radio
- Dictaphone: yes
- Games: yes
- Headphone jack: 3.5mm
- Interfaces: USB, Wi-Fi, Bluetooth 2.1
- Satellite Navigation: GPS
- A-GPS system: yes
- Internet access: GPRS, EDGE, HSDPA, email POP / SMTP, email IMAP4, HTML
- Synchronization with a computer: yes
- Processor: Qualcomm MSM7227, 800 MHz
- Number of processor cores: 1
- Video processor: Adreno 200
- Built-in memory: 158 MB
- RAM: 278 MB
- Support for memory cards: microSD (TransFlash), up to 32 GB
- Additional SMS functions: message templates
- MMS: yes
- Battery type: Li-Ion
- Battery capacity: 1350mAh
- Speakerphone (built-in speaker): yes
- Control: voice dialing, voice control
- A2DP profile: yes
- Book search: yes
- Exchange between SIM-card and internal memory: yes
- Organizer: alarm clock, calculator, task planner
- Features: TouchWiz UI interface; the ability to upgrade the operating system to Android 2.3
- Announced date (ym-d): 2011-01-26
Firmware for Samsung Galaxy Gio GT-S5660
Official firmware Android 2.2 [stock ROM file] -
Samsung Custom Firmware -
Samsung Galaxy Gio GT-S5660 firmware can be done in several ways. If the firmware file has not yet been uploaded here, then create a topic on the forum, in the section, specialists will help you and add the firmware. Do not forget to write a review of 4-10 lines about the smartphone in the subject line, this is important. The official Samsung website, unfortunately, will not help solve this problem, and we will solve it for free. This Samsung model has on board Qualcomm MSM7227, 800 MHz, respectively, there are such flashing methods:
- Recovery - flashing directly on the device
- A special utility from the manufacturer, or
Samsung Smartphone Problems and Disadvantages and How to Fix Them?
- If the Galaxy Gio GT-S5660 does not turn on, for example, you see a white screen, hangs on the splash screen, or the notification indicator only blinks (possibly after charging).
- If it freezes when updating / freezes when it is turned on (needs a flashing, 100%)
- Doesn't charge (usually iron problems)
- *#*#7780#*#*
- *#*#7378423#*#*
Hard Reset via Recovery
- Turn off the device-> go to Recovery
- "Wipe data / factory reset"
- "Yes - delete all user data" -> "Reboot System"
How to log into Recovery?
- hold down Vol (-) [volume down], or Vol (+) [volume up] and the power button
- a menu with the Android logo will appear. Everything, you are in Recovery!
Factory reset on Samsung Galaxy Gio GT-S5660 can be done in a very simple way:
- Settings-> Recovery and reset
- Reset settings (at the very bottom)
How to reset your pattern
How to reset your pattern if you have forgotten it and now you cannot unlock your Samsung smartphone. On Galaxy Gio GT-S5660, the key or PIN can be removed in several ways. You can also remove the lock through a factory reset, the lock code will be deleted and disabled.
- Reset graph. blocking -
- Password reset -
This article will walk you through the process of flashing your phone step by step. Samsung Galaxy Gio S5660 based on Android OS. CyanogenMod was chosen as the firmware.
Preparing for firmware
Before proceeding directly to the process, you must do the following:
- Synchronize all contacts through your Google account, as after flashing all data will be deleted.
- Transfer all the other data you need from the phone memory (photos, documents, etc.) to the flash card, since the KIES program will not work with the firmware that we will be using.
- Charge your phone at least 50%, or better completely.
- Modified ClockWorkMod recovery (px_cwm_v2.zip);
- Directly the firmware file itself (in our case it is CyanogenMod cm-10.1.6-GT-S5660-gio.zip).
We copy all these files to the phone's SD card.
Phone firmware
1. Turn off the phone and boot into "recovery". To do this, hold down the power button and the central button for a few seconds (see photo)
2. In the menu that appears, select the item " Install zip from sdcard", Further " choose zip from sdcard". Install two files in turn. First, install the file “ px_cwm_v2.zip", Turn off the phone and boot into recovery again.
We clean up data from the phone by selecting the item " wipe data / factory reset", Further " delete all user data».
After that, install the file “ ext4_formatter.zip"And wait for the formatting of the phone partitions in Ext4 and perform the cleaning again, just like after installing the first file.
3. Preparation is completed, now there is the last file with the firmware itself. In point " Install zip from sdcard», « choose zip from sdcard", Select the firmware file (in our case it is cm-10.1.6-GT-S5660-gio). The installation process should take a few minutes and should be displayed on the phone screen as follows:

4. After installation, you must select the item " mounts and storage", And in it" mount / system". After clicking on it, it will change to " unmount / system". If this is already the case, you do not need to click on this item.

5. Restart the phone (item " reboot system now"). The first download can take up to 10 minutes.

6. If everything is done correctly and strictly according to the instructions, the phone will boot with the new firmware. All that remains is to customize it for yourself, synchronize contacts and install the necessary applications.

My Samsung Galaxy Gio was in trouble - the camera suddenly stopped working. Rather, the application itself started perfectly and the image was displayed on the screen, but on trying to remove something, it received a complete ignore from the device. Reboot and complete shutdown, with removing the battery, did not bring success ...
I did not put up with this state of affairs and it was decided to alter the obstinate smartphone. (and for good reason ... how I needed this function the next day ...)
Let's get started ... there are two ways to flash a Samsung smartphone: through a proprietary program Samsung kies, which allows you to update exclusively the official firmware and through a special flasher program Odin.
To be honest, in total I was stitched twice and initially did it through Kies. No flashing through Kies has gone smoothly once. And if for the first time after the firmware, the phone was able to be revived using Kies, then in the case described above, a device that was not recognized by Kies was received, therefore it is completely not working. The situation was saved by the firmware via Odin.
First, let's decide what we need:
- Flasher: Odin Multi Downloader v4.42
- SAMSUNG USB Driver (included with Kies).
- The firmware itself. Available firmware, both official and not, can be found on the forum w3bsit3-dns.com
- File GIO_v1.0 (it can be archived with firmware files, but not always)
Firmware via Odin
In the task manager, you need to kill all processes that have kies ( KiesPDLR.exe, KiesTrayAgent.exe), it is also useful to disable the firewall and antivirus for the duration of the firmware.
In Windows Vista, Windows 7 - Odin must be run as or with administrator rights.

ATTENTION! The firmware process takes place with several overloads of the smartphone. You CANNOT turn off your smartphone at this time.
After the button appears on the phone screen Ready by pressing it, wait until the end of the firmware process (PASS in Odin).
Here's how to flash a Samsung S5660 Galaxy Gio smartphone. The editors have built an instruction with the safest way of flashing the Android system.
A warning! When flashing, it is recommended to use a laptop or computer connected to the source uninterruptible power supply, because in the event of a power outage, there is a possibility of damaging the smartphone, which cannot be restored at home.
Installing the firmware 1. Charge the flashing smartphone at least 80%. 2. We save from a flash drive, sim card and device memory (if the smartphone is working) - all data that cannot be lost. You can remove the SIM card and the USB flash drive. 3. Reset smartphone data. To do this, go to the settings on the tab Accounts to section Archiving and reset, select item Reset device and press the button Delete everything... The phone will restart. 4. Create folder on computer and download into it files from the list below. Let all files be in one folder.
5. On the computer, you must pause or disable the antivirus. If you have Kies for Samsung installed on your computer, uninstall it. 6. We will install programs for work on the computer. First, install the driver from the archive USB_Samsung_Driver_v1.5.45.0.rar... Now install Odin from the archive Odin3_v3.09.zip to the folder with the name Odin3_v3.09... Unpack the downloaded firmware archive into a separate folder. 7. Now let's turn to the smartphone. If the charging is within the normal range, then proceed. Let's translate it - into the firmware mode(Download Mode). On the switched off phone, not connected to the computer, we hold down the buttons Power + Volume Down + Home and keep them at the same time until a warning message appears.
  Agree to the warning by pressing the key - Volume up.
 The screen will display - on a blue or black background, this will confirm the correctness of the actions.
We leave the smartphone in this state. 8.
Run the Odin program on your computer. A program window should appear.
 We connect the smartphone to the computer. In the Odin program, the inscription should light up COM, that is, the phone successfully communicated with the PC. If for some reason the PC does not recognize the smartphone, try reinstalling the driver and / or trying other USB ports or changing the USB cable. Points Auto reboot and F.Reset Time must be activated and Re-Partition if active, it must be disabled. 9.
Now in the Odin program, click on AP button and select from the folder into which the firmware was repaired, Tar archive(AP ……… .tar.md5) firmware.
We connect the smartphone to the computer. In the Odin program, the inscription should light up COM, that is, the phone successfully communicated with the PC. If for some reason the PC does not recognize the smartphone, try reinstalling the driver and / or trying other USB ports or changing the USB cable. Points Auto reboot and F.Reset Time must be activated and Re-Partition if active, it must be disabled. 9.
Now in the Odin program, click on AP button and select from the folder into which the firmware was repaired, Tar archive(AP ……… .tar.md5) firmware.
If other files are given in the firmware archive, select them into the Odin program in the following order: Insert BL ……… .tar.md5 file into the BL button field AP file ……… .tar.md5 insert into the AP button field CP file …… … .Tar.md5 insert into the CP button field CSC file …… ..tar.md5 insert into the CSC button field
10. Press the button Start in the Odin program. The process of installing the firmware will begin. The progress of the firmware can be monitored in the logs window; in time, the firmware of the smartphone lasts from 3 to 15 minutes. 11.
At the end of the operation, if everything went well, the log window should display
The progress of the firmware can be monitored in the logs window; in time, the firmware of the smartphone lasts from 3 to 15 minutes. 11.
At the end of the operation, if everything went well, the log window should display inscription All threads completed. (succeed 1 / failed 0).
 The phone must be rebooted manually by holding down the button Nutrition until the screen turns off. The device may take up to 5 minutes to boot up for the first time.
  After booting up the phone, it will be completely ready to use. Forum about Samsung smartphones on Android Attention! Any actions you perform at your own risk. Do not reinstall your system - for no reason. If you have any questions, ask them -
Samsung Galaxy Gio GT-S5660 is a branded smartphone running on Android 2.2. Here you will find out the characteristics, how to root or reset the settings, and you can also download firmware (for Odin, for example) and instructions for Samsung.
Root on Samsung Galaxy Gio GT-S5660
How to get the root for Samsung Galaxy Gio GT-S5660 see instructions below.
Below are the universal programs for obtaining root rights for devices on Qualcomm Snapdragon
- (PC needed)
- (Route using a PC)
- (popular)
- (root in one click)
If the superuser (root) rights could not be obtained or the program did not appear (you can install it yourself) - ask a question in the topic. You may need a custom kernel firmware.
Specifications
- Standard: GSM 900/1800/1900, 3G
- Type: Smartphone
- Operating system: Android 2.2
- Case type: classic
- Body material: plastic
- SIM card type: regular
- Number of SIM-cards: 1
- Weight: 102g
- Dimensions (WxHxT): 58x111x12 mm
- Screen type: color, 16.78 million colors, touch
- Touchscreen type: multitouch, capacitive
- Diagonal: 3.2 inches.
- Image size: 320x480
- Pixels Per Inch (PPI): 180
- Automatic screen rotation: yes
- Ringtone type: polyphonic, MP3 ringtones
- Vibration alert: yes
- Camera: 3.20 million pixels, 2048x1536
- Camera functions: autofocus
- Video recording: yes (MPEG4)
- Max. video frame rate: 15 frames / s
- Geo Tagging: yes
- Audio: MP3, AAC, WAV, FM radio
- Dictaphone: yes
- Games: yes
- Headphone jack: 3.5mm
- Interfaces: USB, Wi-Fi, Bluetooth 2.1
- Satellite Navigation: GPS
- A-GPS system: yes
- Internet access: GPRS, EDGE, HSDPA, email POP / SMTP, email IMAP4, HTML
- Synchronization with a computer: yes
- Processor: Qualcomm MSM7227, 800 MHz
- Number of processor cores: 1
- Video processor: Adreno 200
- Built-in memory: 158 MB
- RAM: 278 MB
- Support for memory cards: microSD (TransFlash), up to 32 GB
- Additional SMS functions: message templates
- MMS: yes
- Battery type: Li-Ion
- Battery capacity: 1350mAh
- Speakerphone (built-in speaker): yes
- Control: voice dialing, voice control
- A2DP profile: yes
- Book search: yes
- Exchange between SIM-card and internal memory: yes
- Organizer: alarm clock, calculator, task planner
- Features: TouchWiz UI interface; the ability to upgrade the operating system to Android 2.3
- Announced date (ym-d): 2011-01-26
»
Firmware for Samsung Galaxy Gio GT-S5660
Official firmware Android 2.2 [stock ROM file] -
Samsung Custom Firmware -
Samsung Galaxy Gio GT-S5660 firmware can be done in several ways. If the firmware file has not yet been uploaded here, then create a topic on the forum, in the section, specialists will help you and add the firmware. Do not forget to write a review of 4-10 lines about the smartphone in the subject line, this is important. The official Samsung website, unfortunately, will not help solve this problem, and we will solve it for free. This Samsung model has on board Qualcomm MSM7227, 800 MHz, respectively, there are such flashing methods:
- Recovery - flashing directly on the device
- A special utility from the manufacturer, or
What custom firmwares are there?
- CM - CyanogenMod
- LineageOS
- Paranoid Android
- OmniROM
- Temasek's
- AICP (Android Ice Cold Project)
- RR (Resurrection Remix)
- MK (MoKee)
- FlymeOS
- Bliss
- crDroid
- Illusion ROMS
- Pacman ROM
Samsung Smartphone Problems and Disadvantages and How to Fix Them?
- If the Galaxy Gio GT-S5660 does not turn on, for example, you see a white screen, hangs on the splash screen, or the notification indicator only blinks (possibly after charging).
- If it freezes when updating / freezes when it is turned on (needs a flashing, 100%)
- Doesn't charge (usually iron problems)
- Doesn't see the SIM card (SIM card)
- The camera does not work (mostly hardware problems)
- Sensor does not work (depending on the situation)
Hard Reset for Samsung Galaxy Gio GT-S5660
Instructions on how to Hard Reset on Samsung Galaxy Gio GT-S5660 (factory reset). We recommend that you familiarize yourself with the visual guide, which is called on Android. ... 
Reset codes (open the dialer and enter them).
- *2767*3855#
- *#*#7780#*#*
- *#*#7378423#*#*
Hard Reset via Recovery
- Turn off the device-> go to Recovery
- "Wipe data / factory reset"
- "Yes - delete all user data" -> "Reboot System"
How to log into Recovery?
- hold down Vol (-) [volume down], or Vol (+) [volume up] and the power button
- a menu with the Android logo will appear. Everything, you are in Recovery!
Factory reset on Samsung Galaxy Gio GT-S5660 can be done in a very simple way:
- Settings-> Recovery and reset
- Reset settings (at the very bottom)
How to reset your pattern
How to reset your pattern if you have forgotten it and now you cannot unlock your Samsung smartphone. On Galaxy Gio GT-S5660, the key or PIN can be removed in several ways. You can also remove the lock through a factory reset, the lock code will be deleted and disabled.
- Reset graph. blocking -
- Password reset -


")

The value of avatars in psychology
The value of avatars in psychology
How to stress a letter in MS Word
What does it mean if a person's avatar
How to Create Your Own Twitter Moment