Installing the Printer Driver
To control the printer, as well as for any other "iron" device, you must install the program on a PC or a laptop, or rather to try the driver. For each printer model, you need your driver. True, Samsung and HP created a universal print driver for their own line of printers and MFPs.
So, in order to install the printer driver on a computer or laptop, you first need to download it from the manufacturer's website or download from the disk supplied with the printer.
The driver must be compatible with your printer or MFP and operating system. For example, the printer driver created under Windows XP x32 will not work running Windows XP x64. True there are both universal drivers that will be compatible and there.
There are several ways to install the driver. Consider them.
Atomic for Windows XP.
After downloading the driver on a PC, you run the executable file (setup.exe, autorun.exe) from the driver directory. Without connecting the printer to the PC. Next, follow the instructions of the installation wizard. At a certain stage, he will ask to connect the printer to the PC. The automatic search for Windows hardware installation devices will begin. In some cases, it is required to cancel that the driver program itself has completed the installation.
Manual mode for Windows XP
Press the start-up control panel - printers and faxes and press the printer setting
Follow the instructions of the installation wizard

At this stage, you need to abandon the automatic installation and set the selection to the "Installation of the specified place" item. 
Now you need to click on the "Overview" button and specify the place where you unpacked the archive and driver. Usually in this folder there should be a file with the "INF" extension 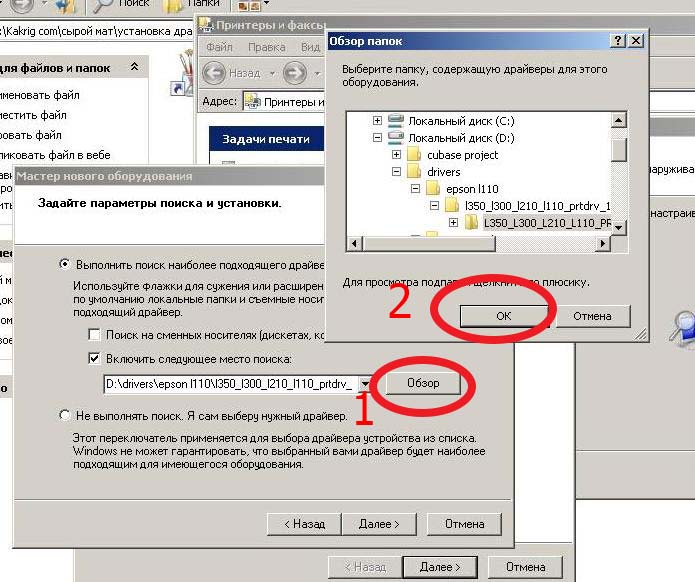
When the path to the driver file is specified, click "OK" and then "Next"  Next will be set by the driver. She will take some time. Wait.
Question from the user
Hello.
I have a relatively old printer and a new PC. For some reason, Windows 7 drivers for some reason automatically picked up for the printer. I found them (with difficulty) myself on the Internet, downloaded, but they pose an ordinary folder with files. How can I install them if there is no exe file ...
Good everyone!
Always a lot of questions on printers and scanners ... in general, modern Windows 10 increasingly finds and installs drivers automatically, and eliminates you from this problem. But unfortunately, even she decides not always the question (therefore, we will not recommend to upgrade to Windows 10).
In this article, I will consider a few questions: how to find a printer driver, how to remove the old driver (if there is. Just in some cases it interferes with the update), and, accordingly, how to install a new driver if there is no executable file.
And so, we jeep ...
Solving Printer Driver Problems
How and where to find and update the driver
Option number 1
The easiest and simple way to update the driver is to use a drive with drivers that walked to your printer. All you need is to insert it into the CD / DVD drive drive, and follow the instructions of the master (Usually click Next / Next / Next ...).
But most often (I speak from experience) several problems happen:
- either there is no longer a disk (lost for time limit);
- either there is a disk, but no CD / DVD drive, for reading it (which is no longer uncommon on new PCs, laptops).

Option number 2.
There are dozens and hundreds of special programs to update drivers on a PC. Using them you can find drivers for any equipment on your computer (not just for the printer)!
There are among programs like those who need an Internet connection and those that can work autonomously. In general, I have several articles on this blog, I recommend familiarizing yourself (links below) ...
Programs for working with drivers (update, backup, removal, etc.) -
Programs for updating drivers (in Russian, compatible with Windows 10) -
Option number 3.
Knowing the model and printer brand - you can easily find the driver on the official website of the device manufacturer (if, of course, you have a NO NAME Chinese manufacturer. The easiest way to find out the printer model is to inspect the device housing. It certainly has either stickers or inscriptions. Most often, they are on the front side (as in the example below).

Brand and printer model: Xerox Phaser 3155
It is also possible to find out information about the printer and help find a driver - can special. Utilities for viewing PC characteristics. One of these is, for example, AIDA 64. . To view all printers connected to a PC, simple open section "Devices / Printers" (as on the screen below. Link to the program - see just below).

Utilities for viewing the characteristics of the PC (including AIDA 64) -
- Epson -
- Canon -
- Samsung -
- Xerox -
Option number 4.
You can also update the printer driver through device Manager . To enter it, you need:
- press the keyboard key Win + R.;
- next, enter the command devmgmt.msc. And press ENTER.

In the Device Manager, find your printer: Open tabs other devices , print queues. Next click on an unknown device (on which an exclamation mark is on), and click "Update Drivers" As on the screen below.


Windows will begin searching for software on the network - if it is found, everything will pass automatically, and there is nothing more commenting here ...

If you are not installed by the driver, the system fails, an INF file error - read this article.:
Option number 5.
If the connected printer is not in the tabs "Other devices" and "Print Queue", you need to do the following:
- turn off and turn on the printer;
- next, click the Device Manager button. "Update Equipment Configuration" .


Separating devices Plug and Play
If the PC saw the printer - Windows will launch the search and installation of the driver ...

How to remove old driver
The old driver may need to be removed in cases when:
- the new driver is not installed, issuing all sorts of errors;
- you just want to disable the equipment so that it does not work (approx.: Not the best way);
- want to replace the driver who found Windows to the driver from some "craftsman" ...
In general, I already have an article on the blog dedicated to the topic of removal of drivers. The printer driver is deleted similarly! Below I give a link ...
How to delete a driver of any device (3 ways!) -
How to install a driver if there is no executable file
In general, this is a question from the past. Previously, most drivers had to be installed in the manual (as they say, from A to Z). It is now - everything is required by the user, it is to press 1-2 mouse buttons ...
Most often, such drivers such as the archive in which several files lie, go for old printers. Below I will consider the most common way to install such a driver in the modern Windows 7, 8.1, 10.
And so, installing the driver, without executable file.
First open device Manager . Next, click on the right mouse button on an unknown device (I mean, printer) and click the button "Update Drivers ..." .

Then click the button "Perform the search for drivers on this computer" .

The next step is to specify the folder in which the driver files are (if you have a ZIP archive, RAR - it must be previously removed).

Next step - specify that you install the device printer.
Well, the last step - the printer installation wizard will start, specify the model and install the driver. In general, a fairly simple procedure ...

Printer Installation Wizard
That's all. Good luck!
Read how to install a printer on Windows 7.8 and 10. All methods where you download drivers and the configuration process. Full instructions.
Each user thinks that it would be nice to have a printer at hand to print the desired files. This is one of the most important elements of your home office. Modern technique can work on the network and locally. In this regard, users have problems when it is installed. We'll figure it out how to install a printer on a Windows laptop with different versions of the operating system.
How to install a printer on windows 7
The local printer does not provide connectivity via the Internet. It is installed on one of the PC. In most cases, local printers are installed at home. The offices are more convenient to network options that all users have access to. They can send printed documents. The printer itself for network participation is more difficult - it leads statistics and distributes the load between users. We will deal with the installation of each of the options.
Installing a local printer
To install the printer, you will not need a lot of time. We recommend pre-read the instructions from the device. If you do not have it use the algorithm:
- Unpack and install the printer to a convenient place for you. Connect it with a PC cable via USB or LPT / COM port.
- In most cases, the computer independently identifies the device and holds it.
- If you have an internet connection, the driver will be installed automatically.
- After that, you can go to the detailed configuration of the device. Go to the "Control Panel", open the "Devices and Printers" tab, select your device and click "Properties".
- To other computers in your home network can use the printer. It is necessary to provide them with access. To do this, select the "Access" tab.
- Set markers in strings: "Sharing this printer", "drawing print jobs on client computers."
If the operating system could not install the driver independently, you will not be able to configure the printer in this case, you need to know how to install the printer driver on Windows 7. To do this, you can use multiple capabilities:
- download them from the official website of the manufacturer of the device;
- to install from the disk;
- take advantage of the driver search utilities.
The easiest way is to use the disk that went complete with the printer. If you purchased a print device from hand, then you will not have such an opportunity. Then go to the official website of the manufacturer and find the software in the "Users" or "Technical Support" section.
If you can not find the necessary files on the official website, download and install the utility to search for drivers. She scanning your computer and offer to install all the missing program files. One of the most effective applications is Driver Pack Solution. After installing the drivers, return to the printer setting. If you do not need common access, you can do without it. The device will start displaying in text editors.
Installing the Network Printer and Print Server
Network printers are connected via TCP / IP protocol. They have several features - the most important of which is the lack of drivers. Software files are stored in the device itself, you do not need to upload them. We'll figure it out how to install the Windows 7 network printer. For this, you just need to adhere to the instructions:
- Install and turn on the network device.
- Go through the control panel in the "Devices and Printers" tab.
- Select "Add New Printer". The system will offer you 2 options: Install the local equipment or network. Select the "Add Network, Wireless or Bluetooth -Printer" string.
- The system scans the network independently and detects the device, you will only have to confirm its choice.
Setting up such a printer is not required. The advantage of this option is that you can connect to the printing device from the tablet, a netbook or any other device.
How to install a printer on windows 10
The 10 version operating system is distinguished by additional settings, so the installation of devices will be slightly different for it. We'll figure it out how to install a printer on Windows 10. This operating system works with all modern devices, as well as with local options.
Installing a local printer
Old printers that do not have an interface for wireless connectivity will be connected to a PC using USB or LPT / COM. You need to connect the printer cable to your computer, and then install the device according to the instructions:
- Go to the "Start" menu, select the "Parameters" section from the list (Pictogram "Gears").
- In the "Parameters" window that opens, find the "Devices" section. Go to it.
- In the left side of the window that opens, find the "Printers" string. Click on it.
- In the right part of the window, a button with the inscription will appear: "Add printers and scanners".
- The system in automatic mode will start searching for connected devices. In the window that appears, there will be their names. Select the desired printer, click on the "Stop" button and click Next.
- The rest of the operating system will make for you - will load drivers and configures the device.
During the installation of a local printer, you may have a problem - if the automatic service is not able to determine it. In this case, in the parameters window, you will find a blue inscription "The required printer is missing in the list", and the "Update" button will be over it. Click on the inscription to go to manual configuration:
- In the "Find Printer For Other Parameters" window, select the first item "My printer is old, I need help to find it." Click "Next".
- After that, the system will set an auxiliary utility that will configure your printer to work and detect it.
If the following tips, how to install a local printer did not help, then you need to check the connection of technology, replace the wires to new ones. Then download the drivers from the official website and install them on your PC. Please note that some firms make special software for Windows 10. If there is such an option on the official site, use it.
Connecting a wireless printer
Modern managers are connected via Wi -fi, which significantly expands their functionality. To install them, you must configure the router and then PC. To start, check whether your WPS technology supports. If everything is fine, you can proceed to its setting:
- In the address bar of any browser, enter "192.168.1.1". In most cases, this will allow you to go to the settings menu. By default, login and password to enter this section - admin / admin. If this input data is not suitable, find the instructions from the router or the contract with your provider (if the router was provided to you from it).
- After you entered the menu, you need to find the WPS section and set it to Enable. To restrict access from third-party devices, you can set a PIN code.
- Now you need to turn on the printer itself and activate a wireless network on it. After the connection has happened successfully, you can move to the configuration of the computer.
- Open the Start menu and select the "Parameters" section. Go to the device management menu, select the "Printers" string. Click "Add Printer".
- Most often, the wireless device is not detected from the first time. Therefore, when the inscription "The required printer is missing in the list appears, click on it.
- From the proposed options, select "Add Wireless or Network Printer". After that, the system in automatic mode will begin searching for devices. Drivers will also be downloaded without your participation.
If it does not help, then you need to find information about the IP address of the technique (indicated in the technical documentation or is displayed in the router system menu). In this case, from the manual setting list, select "Add a printer to its TCP / IP". Enter the device name or address, check the marker next to the "Pass Printer and install the drivers automatically". Click "Next", the rest of the system will make for you.
Configuring general access to the printer online

If you failed to connect a network printer according to the instructions above, you can create a home network to turn on the device in it. In this case, several devices can interact with one printer, including smartphones and tablets. Install the default printer in Windows 10 for multiple devices simply:
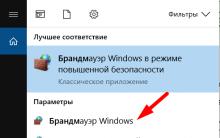
- Open the "OBJECT" folder in the Start menu, select the utility "" in it.
- Set the viewing mode in the window to the "Minor Icons" phrase. Almost at the very end of the list, find the "Network Management Center and Common Access Center". Open this section.
- In the window that opens, find "Change sharing parameters".
- In the list that appears, find the phrase "Sharing Files and Printers". Install the marker so to turn it on. Save the changes.
- Using the arrow, return to the previous window. In the lower left corner, find the inscription "Home Group". In the window that opens, click on the "Create Home Group" button.
- Choose which files will be provided with sharing. He is obligatory to printers. Click "Next".
- To connect devices, the system will generate a password that can be written or request each time in the main computer (for this it will be enough to open the "home group" again).
After you have created a homemade group, you can again install the printer and use it from any PC or laptop from your local network.
Now you know how to install a printer to the most popular versions of the Windows operating system. This is not a difficult procedure with which any user can cope. Share the received information with friends, leave comments. If you have difficulty when using printers or computers, we will be happy to find solutions.
Solving the task associated with how to configure a print printer from a computer is not so difficult, as it seems at first glance. Nevertheless, it is necessary to correctly and seriously, especially lovers to work in Word and other text editors, which you always need to have a print device under hand.
In order to answer the question of how to install a printer on a computer running Windows WINTOVS can be used in two ways. One of them is to connect the print device directly to the personal computer - the so-called. Local method. As for the second method, under its use, it is implied to install the printing device through the network - so-called. Network method. In general, both methods are relatively simple, but if you do not follow strictly instructions, then you can easily get confused, as a result of which the installation will have to start from the very beginning.
In addition, take into account that the local method makes it possible to use the office equipment only on one computer technology, and the network is immediately on several personal computers that are connected to one local network.
First method: local connection
To solve the task associated with how to configure a print printer from a computer, first you will need to establish a reliable and stable connection between a personal computer and a printer using a high-quality USB cable. After that, connect the device into the electrical network. Next, follow these steps:
- First, open the Start menu and click on the section with printing devices.
- In a new window, pay attention to the top panel, where you need to click on the tab, implying the installation of a new print device.
- Now you have to open the installation wizard window, where among the two options you need to click on the topmost: "Add local".
- In the next step by the wizard, you will be asked to decide on the optimal port. In general, everything can be left unchanged and click on the existing port: "LPT1". After that, click on the "Next" button.
By completing all the steps listed above, make it easier to configure the operation of the device connected to the PC. To begin with, you will need to install the appropriate software, i.e. Drivers. To solve this task, i.e. "How to install Drivers", use the CD with the installation file, which goes in one set with the office equipment you purchased.
It should be noted that the installation of MFP from the disk is a more convenient and preferred option.
If you use this method of installation, you do not have the opportunity, then to solve the type of type "How to install a printer driver", use the Windows Update Center, but your PC must be connected to the Internet at this moment. You can add that you can find the driver for the printer of your model on our website or the official website of its manufacturer.
The third method of installing firewood to the PC connected to the PC, the new printer is to use the equipment installation wizard, where you need to select the appropriate option for your printing device, then perform the following steps:
- After selecting the manufacturer of your device and its specific name in the Wizard wizard, click on the "Next" button.
- In the next step, the installation wizard will prompt you to decide on the name for your device. Enter it and click on "Next".
- Now you need to select the access parameters to the print device from other personal computers. In this case, you need to click either on "Allow overall access ...", or on "no shared access ...".
On this you can stop installing the device, because The task of how to configure the printer on the computer has already been solved. Now you have to check the print to make sure that the device configured on Windows 7 works correctly and your system is able to find it in the event of a print task.
To do this, you just need to click on the button that starts the test page of the page. It comes out, as a rule, at the last stage of the driver installation. Be sure to remember to put a tick on the default item. It should be added that you can also install the printer on Windows 8 by using the instruction described above.
Second method: Network connection
- To solve the task, which is related to how to connect a printer to a computer when organizing a local network, first of all you will have to go to the "Start" menu section, where the list of printing devices connected to the PC is displayed.
- In a new window, you should click on the "Installing Printer" item and choose the lower options, i.e. "Add network, wireless ...".
- After that, the Windows operating system will automatically search for all printing devices installed and connected to the local network. Thus, the task is solved, which is related to how to find a printer.
- As a result of this action, the PC will connect to the device and will automatically install the necessary software for it. Thanks to this, you will not need to spend time on the execution of this step "how to install drivers per printer." But sometimes the manual installation is required. In particular, in the installation wizard window, you can attach "Install Drivers". To solve the problem, simply take and click on this button.
- After that, a message will be released that you have successfully installed such a printer. Click on "Next".
Thus, answers to questions about how to add a printer and how to install the printer is found. In general, the driver to the printer is to be installed, so it is not easy to update and takes this task not so much time, the main thing at the end necessarily make a trial print.
But if the list sent to print is not printed, then you should make sure that adding a new device was performed without any restrictions for such a device. The following option is also possible: the equipment intended for printing is simply not connected to the main PC. In addition, try updating the installed drivers. To do this, open the properties of the device in the "Devices and Printers" section, after which you open the "Advanced" tab and click on the disarray of the device driver to "change". The update will then be installed on the PC automatically.
In general, competently and correctly installed the device should work in absolutely normal mode.
In the computer, read the instruction attached to it. Before connecting some printers, you need to install special software, the other printers can be connected immediately.
Turn on the computer and follow what is written in the instructions for your printer.
- If the printer refers to Plug-and-Play devices (connect and run), connect it and turn on the power. Windows will perform all necessary actions automatically.
- Insert the disk (or discs) included in the printer's delivery to the drive and follow the instructions on the screen.
- Follow the command Start\u003e Devices and Printers.
- If the wireless printer is connected, execute the command. Start\u003e Devices and Printers And in the window that appears, click on the link Installing printer. Select a parameter Add network, Wireless or Bluetooth printer and follow the instructions.
If the third option is selected, in the window that appears Devices and printers Click on the link Installing printerdisplayed in the top of the window.
In the Printer Installation Wizard window (Printer Setup dialog box), click on the Parameter Add local printer And on the button Further.

In the dialog box Select Printer Port, Click on the down arrow displayed to the right of the field. Use existing portand select Port. You can also leave the port recommended by Windows. Click on the button Further.

In the next window of the installation wizard - Installing the Printer Driver - Select the manufacturer and printer. The following features are available:

- If you have a disk from the printer's manufacturer, insert it into the appropriate drive for optical disks and click on the button Install from disk. Then click on the button Further.
- If there is no such disk, click on the button Windows Update CenterTo view a list of drivers that can be downloaded from the Microsoft website. Then click on the button Further.
- In the dialog box Enter the printer name, Enter the name of the printer. Click on the button Further.
- In the next dialog box, click on the button. ReadyTo complete the program of the Printer Installation Wizard program.
If the computer is connected to the network, the installer will display an additional dialog that allows you to open a common access to the printer over the network. Set the switch No general access to the printerTo prohibit other users access to this printer. If you want to allow access to this printer, set the switch Allow sharing printerso that others can use and in the field Resource name Enter the network name of the printer on the network. In this case, the printer will be able to use all network users.
Default printer definition
If two or more printers are installed in the system, you can define a default printer that will be used whenever you need to print the document. Follow the command Start\u003e Devices and Printers.
In the device and printers, the current printer specified by default is marked. Right-click on any default printer, and select the parameter in the context menu. Use default. Click on the button Close in the window Devices and printersAfter preserving new settings.

To change the properties of your printer model, such as print mode (rough or high quality, color or black and white), right-click on the printer in the window Devices and printers And in the context menu, select the parameter Printer properties. The Printer Properties dialog box appears on the screen.
Deleting printer
Over time, if you buy a new printer, then the old one can turn off the system. This may require the removal of the former printer driver to clean the window Devices and printers From the pictogram of the old printer, which you will most likely never use anymore. To delete the printer, execute the command. Start\u003e Devices and Printers.
In the window Devices and printers Right-click on the printer and select a parameter in the context menu. Delete device. (Note that you can also highlight the printer and click on the button Delete devicewhich is in the top of the window Devices and printers.)

In the dialog box Delete device Click on the Yes button. Window Devices and printers Close, and your printer will be deleted from the list of printers.
If you delete the printer, it will disappear from the list of installed printers, and if it was a default printer, another printer will select as such. You will not be able to print more on a printer remote from the system if you do not set it again.
Share.


Where iTunes store downloaded firmware
Connecting Apple Keyboard, Magic TrackPad and Magic Mouse to Windows PC
Hissing, noise, crackling and other extraneous sound in columns and headphones - how to find and eliminate the cause?
Laptop turns off after cleaning from dust
The processor is heated, what is the reason