Looking at Nokia N9 (and especially - Holding in Hands), who from Gajetomanians did not dream of dreaming: "Eh, there would be Android"? And, of course, such a project could not not appear. However, the content of Android on the Nokia device is a rather old story. Nit in the name of the project is decrypted as Nokia Internet Tablet, that is, it began with the N800 / 810, then it was transferred to the N900. Special popularity of firmware for these devices did not receive, because Before the stable working state, they could not be brought. On the N810, it is even easy to launch the desired Android managed not to everyone. Yes, and by performance, the N8x0 hardware platform (TI OMAP 400 MHz and 128 MB of RAM) lasted even from the cheapest Android smartphones. There is no special improvement on the N900. Whether the case is N9! The "iron" of this model is already quite productively, the chipset is standard for the "green robot", and even the absence of hardware control buttons successfully fits into the Ice Cream Sandwich concept. Well, let's see ...
Looking at Nokia N9 (and especially - Holding in Hands), who from Gajetomanians did not dream of dreaming: "Eh, there would be Android"? And, of course, such a project could not not appear. However, the content of Android on the Nokia device is a rather old story. Nit in the name of the project is decrypted as Nokia Internet Tablet, that is, it began with the N800 / 810, then it was transferred to the N900. Special popularity of firmware for these devices did not receive, because Before the stable working state, they could not be brought. On the N810, it is even easy to launch the desired Android managed not to everyone. Yes, and by performance, the N8x0 hardware platform (TI OMAP 400 MHz and 128 MB of RAM) lasted even from the cheapest Android smartphones. There is no special improvement on the N900. Whether the case is N9! The "iron" of this model is already quite productively, the chipset is standard for the "green robot", and even the absence of hardware control buttons successfully fits into the Ice Cream Sandwich concept. Well, let's see ... At the moment, NITDROID ALPHA 3 is available for the N9 and N950, based on the Android Open-Source Project (AOSP) V 4.0.4_R1.2 (IMM76I). Before complete use, as the main OS, it is still far away, however, you can test the system without much damage to the daily work of the phone, since nitdroid does not replace the native OS, and complements it. After the manipulation described below, the smartphone when loading offers to load an alternative OS, and if you ignore the invitation - the same MeeGo will be loaded. In the source system, all installed applications and user files will remain, only to sacrifice the phone and SIM card locks. You also need to delete all your accounts in social networks and web services during the installation of NITDROID, which can then be adjusted again. But let's in order.
Installation Instructions
Attention! Neither author nor edit gG. Nor the NITDROID project is responsible for any possible consequences of the following actions. All this you do at your own risk. Be sure to read the article to the end before you decide on the installation! Important! By the beginning of the experiment, the smartphone must have the original factory firmware and not have blockages under the operator (SimLock). The described version used a PC running Windows 7. Differences for other OS are described in the original English-language instructions on the NITDROID project forum. Preliminary steps- Turn on the developer mode if it is not turned on: Parameters - Security - Developer Mode. The system downloads and install the necessary system components and utilities (you need to connect to the Internet).
- Disable the device lock: Parameters - Security - Device Lock - Autoblock. You may have to first delete the mail-for-Exchange account, if it is configured.
- This also disable: Parameters - Device - SIM-card - PIN-code request.

Now we connect to the computer N9, select the synchronization mode. On the command line, we write: CD C: \\ Flasher Flasher -a dfl.bin -k zimage --Flash-only \u003d Kernel -f -r at the end of the firmware, the phone will reboot. Connect it again to the PC in the removable disk mode. Copying the system and boot menu Load the archive of nitdroid_n9_ics_alpha3.tar.bz2 on the PC, remove the NITDROID_N9_ICS_ALPHA3.TAR file from it and rename in 1.Tar. Load the archive SillyBoot_2.tar.bz2 on the PC, remove the SillyBoot_2.tar file from it and renamed 2.Tar. Copy 1.Tar and 2.tar files in the root folder connected as a removable smartphone disk, turn it off, run Terminal and execute commands (on behalf of the superuser): Devel-SU (on the password request, enter the rootme, the password is not displayed, this is normal) tar xvf /home/user/mydocs/1.tar -c / home / nitdroid tar xvf /home/user/mydocs/2.tar -c / Now turn off the phone.

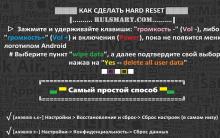
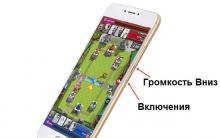
We turn on the phone, waiting for the appearance on the display of the "Press VoluP to Boot Alternative OS" display, press the volume button and ... after a couple of seconds we see the Android overflowing logo, and then the master's primary setup wizard.

Upon the next load in MeeGo (without clicking when loading) restore your accounts. Now on the smartphone 2 operating systems, one of which is Android 4.0.4.


Loves - does not like, it works - it does not work
Immediately several important comments.- Multi-loading kernel works in the so-called Open Mode, that is, both in MeeGo, and the phone and the SIM card will be inaccessible in Android.
- ATTENTION! Do not allow the battery discharge until the phone is completely turned off! If there is 5% of the charge, immediately put the phone for charging, and when it is impossible, turn off and try to charge as soon as possible. Otherwise, the charging process will look like this: connect the charger, the indicator lights up and in 15-30 seconds it goes out, then the charging does not go. We take out the cable from the phone, insert again, we wait until the indicator goes out, remove it again ... and so about 10-20 times, and even more (depending on how much the phone turned it off) until the indicator flashes and stops turning off. This is the problem of the multizrode kernel, so it does not matter in which the telephone has worked before shutting down. You can charge the battery both in the off state and during the operation of any of the OS.
- charging, charge indication, low charge warning, partially - full consumption statistics; Access to power consumption statistics from third-party applications
- multitouch Support Screen Sensor
- accelerometer, auto-rotation Display (2 horizontal positions and 1 vertical), drivers 3D, OpenGL, "Live" wallpaper
- hardware buttons (power, volume); QWERTY-Keyboard (N950)
- light indication; Keyboard backlight (N950)
- answer / Celebration Button on Garnity
- clock, alarm clock
- mYDOCS folder (root folder when connecting to PC) mounted as SDCard
- software decoding of basic video formats, including YouTube
- Flash in browser
- google Apps and Services, including Play Store, Data Synchronization and Application Update
- installing applications from APK files
- definition of wireless networks (operates in Yandex-maps, for example), use location data when searching
- the ability to manually position the location (FakeGPS)
- Wi-Fi and 3G network connection (including roaming)
- USSD requests, sending and receiving SMS (including Cyrillic), receiving incoming calls, set and call out from the connection setting, but without voice transmission
- sound recording from microphone in third-party applications, voice search and input
- play music on speaker and wired headset
- Bluetooth: Scanning, Conjugation of Devices, Challenges Management (HFP) and Player (AVRCP)
- receive / Transfer File Bluetooth
- uSB-NETWORK mode when connected to a PC
- root access


- speaker, microphone, wired and bluetooth headset in call / conversation mode (no matter, via GSM or Skype / GTalk)
- additional telephone features (call waiting, redirection, etc.)
- USB connection (SDK, MTP)
- satellite navigation (GPS / GLONASS)
- both cameras
- vibration and vibration
- sensors of approximation and illumination
- hardware decoding video
- modem and Access Points
- there is no "3G only" mode
- bluetooth A2DP stereo sound transmission (sound is displayed on the phone speaker)
- unavailable the entire volume of built-in memory

"What is useful to do?"
So, why can I use Android on Nokia N9? First of all, to study the system, its functionality, set of applications, and so on. Convenient, you do not need to buy a separate gadget.
Of course, for games, which are under Meego, to put it mildly, a little. Thanks to the support of 3D and OpenGL, any games are working, the phone correctly passes the main tests (Quadrant, Antutu, Neocore). The speed is true, approximately at the level of state employees like LG Optimus Hub (see test results at the end of the review). Angry Birds Space, Plants VS Zombies, Fruitninja, World of Goo and Shadowgun were tested - everything works, not so so that it is very tight, but quite playable.


Next, if you are not satisfied with the set of supported social networks in MeeGo or customer functionality - on Android a huge selection of such software. But there are nuances: Skype and Google Talk work only in text chat mode, and tweeter clients and Instagram do not have access to the camera, you can post only available photos (filmed in MeeGo, for example). From the browsers were tested by the regular and Opera Mobile, there were no complaints about functionality and stability, the surfing is as fully full as on other Android devices, all standard scripts and plugins are supported, including Flash. Normally running streaming audio and video.


There are actually no office packages in MeeEGO (the native application "Documents" is different as mockery cannot be called), under Android there are already dozens of them. Tested free Olive Office, however, did not cope with all the declared formats and buggy when scaling, but at least to view the files created in Word and Excel, with the preservation of formatting and image it turned out. Official Adobe Reader established and worked too without problems. The choice of Android readers is also much richer. Full (taking into account the specified hardware restrictions) all Google applications are running - YouTube, Gmail, GTalk, Google+, synchronize all services included in the account. The store works, but determines the device as Unknown Nokia N9, and many of my favorite applications turned out to be "incompatible with your device", I had to install them "manually".


Google cards in the NITDROID installation image are not included, and although they are available in the Play Store, instead, I installed favorite Yandex-cards. They work full, including routes, traffic jams and panorama, and the location of wireless networks is defined as well as possible in principle. That's just downloading cards for some reason for some reason.

Unlike the very limited number of codecs and permissions supported by the MEEGO video player, almost any format is played using a standard player and MX Player. FullHD video, naturally, slows down and loses the sound, files in 720p with a not too high bitrate are reproduced normally. In general, Android is quite expanding the functionality of Nokia N9, even despite the existing limitations and flaws. If you want to play, watch videos, including online, work with office documents, accept or send a Skype file, navigate on the area with Yandex Panorars, and just to reserve in a full-featured browser, and there is nothing at hand except N9 - Overload in Android and forward! For a direct purpose, however, the phone cannot be used, but at least you can see incoming calls and respond to them using SMS or contact this subscriber in another way (mail, messengers, social networks). The main thing is not to forget about the problem with the battery.
Impressions of use
Nitdroid - surprisingly stable assembly, given that this is not just a caste, but in general the "alien" system on this device, besides the alpha version. For all the time testing, there never had spontaneous shutdowns and reboots, started to slow down the game a couple of times, but it happens on other devices. There is an unpleasant, but not a critical defect to draw when scrolling desktops. With performance worse. According to the results of the tests N9 under Android, markedly behind Galaxy S, ahead of only very old or frank budget devices like Xperia X10. From well-known Android devices, the speed and smoothness of the interface can be compared with Optimus Hub or even One, and Galaxy Tab is certainly much faster and responsive. The reason is apparently in the absence of system optimization and drivers.


Another disadvantage - the touchscreen does not work very well. The sensitivity to the touch is normal, but the screen reacts badly on the gestures, often instead of scrolling it is pressed for a finger or link. After MeeGo, where everything is easy and smooth, you need to get used to it. Well, unfortunately, there is no disgusting quality of cellular network reception and Wi-Fi - branded "Fich" N9. There is no complaints to the NITDROID project - the radio is poorly working under MeeGo. At least when working with trimesob operators (including roaming in the network of Kyivstar) and Life :) N9 behaves worse than other modern smartphones - often loses the network and is looking for it, and even when the signal seems to eat, mobile Internet works not always. But in good conditions, the reception capacity of the cellular network is used as much as possible.

The autonomy of the smartphone running Android is surprisingly not bad, taking into account the not particularly capacious battery - about 5 hours of continuous bullying will endure not every top "robotphone".


Given all the above, the impressions turned out to be ambiguous. On the one hand, Android 4 works on N9 as a native, and for sure, with the factory installation and optimization, it would be quite good. On the other hand, even though the source system is saved, the bug with charging does not allow to keep Nitdroid on the smartphone constantly, running it occasionally if necessary and waiting for updates. Therefore, when he played, in the end, still you will have to reflash the device to return the normal loader.
Before producing various actions on their device, we recommend reading this article completely
Chinese phones are pretty in their relatively low prices and have almost all the functions present at their Euro-American analogues. The same applies to the Chinese version of Nokia N9, for which the firmware will use the FlashTool program (FlashTool version 3.1044.00).
What we need
- a computer;
- Nokia N9 Chinese production;
- FlashTool program (FlashTool version 3.1044.00);
- Firmware cable.
Operating procedure
1. Determine the version of the firmware program:
- We introduce the version code;
- Install the drivers for the cable, which usually comes in a set with drivers;
- Download, unpack and launch FlashTool;
- Device Manager will indicate where the driver is installed: 
- Press on Options. and choose COM port.
- Click on and choose Mtk_allinone_da.bin..
- To download the firmware, click on Scatter file. and from the wizard firmware choose :
- again enter Options and choose NFB., Pressing Operation Method.:
- Here you also choose the speed of the firmware: 
- Now turn off the phone and connect the firmware cable to it;
- Click the program to the tab Download, And then turn off the phone while holding off the shutdown button until the red strip is running on the screen (then blue, etc.). This will be read by phone data:

- Now it is necessary to wait for the end of the fill of the entire firmware to the phone. The end of the fill program will mark the OK icon;
- After the firmware is completed, disconnect the phone from the PC;
- Disconnect and connect the Nokia N9 battery. Perhaps that telephone will turn on not immediately, but after 10-60 secondsThe phone's power button must be kept until it starts to work;
- Let's go to the Nokia N9 settings and make a reset to the code specified by the factory settings. The firmware is completed.
Before starting the firmware, it is necessary save imei phonebecause He is also lost. It is also desirable to get all the SIM cards from the mobile. Before and after the firmware, it is desirable to format user memory, which will allow you to get rid of the wrong effects after the firmware.
Video instructions
Detailed video instructions for the firmware Nokia N9 using the WinFlasher GUI program
N9 Firmware through Phoenix Using Dead Mode
Step-by-step instruction:
1. We make a backup, save it to a computer.
2. Turn off the device.
3. Run the device manager to monitor the equipment (optional)
4. Start Phoenix, select the NO Connection connection.
Next, File - Open Product Choose RM-696 - "OK". Click Flashing - Frimware Update. Open Product Code, choose ok. Looking at Options To determine all the firmware files (there were no red files) - "OK". We put a tick on the "Dead Phone USB Flashing" and click "Referbish". We are waiting for PHoenix to offer a phone, press "OK" and connect the phone and immediately click the power button immediately. The computer will find another new equipment "N9 (UPDATE MODE)" and "Generic Phone" will establish it.
After that, it will tell once again to connect the cable and click the power button. I did not reconnect the cable, and immediately pressed "OK", because The phone did not turn on. Next, Phoenix will write in the log that do not turn off the cable, the firmware started. The PHOENIX indicator will stand still, and the firmware process indicator appears on the phone display. We are waiting for completion. At the end of the Phoenix firmware will make FactorySets, and TEST appears on the display. You can disconnect the cable and turn on the machine. On the video, I did not manage to make FactorySets Phoenix, I had to press cancel. The phone turned on the power button safely. Functions normally.
Hi, katana!
Today we will learn to establish the operating system Google Android 4.0.4. on the Nokia N9. (which initially Meego Harmattan 1.2 PR 1.2). Thanks to this, you will receive the machine, when you start the start of which you can choose the operating system to be loaded.
So. To begin with, we need:
- Fully charged Nokia N9 phone
So, step one, preparation.
We go to phone settings - Security - Lock and turn off the automatic lock if it is enabled. If off - rejoice and go further.
Step two - download firmware.
We download Navifirm (or run, if any) and there is a last firmware there for your phone. For my Russian N9 black with 16GB it is called
Step Third - Flasher and Zimage. 
We download the Flashcher link and set it out where it offers to install yourself - in Program Files on a disk with the system (most often "C"). If you are noob and does not know how to run shortcuts with keys, it is better to install it here. Next, open the folder with the flash drive and throw zimage into it and the file with the firmware.
From under the admin, we start the console (Win + R - CMD - OK or Start - All Programs - Standard - Command Line). Is black window opened? Excellent! Now prepare the phone - turn it off and connect the USB cable to the computer. The phone itself does not need to connect to the cable. It is advisable not to use the front ports of the computer and the ports on the keyboard / mouse / iron. Prepared?
Step fourth, firmware.  Drive in console cD C: \\ Program Files \\ Nokia \\ Flasher
Press ENTER. It is best to write with your hands, it is visible simply to copy the text to the buffer and paste it into the console simply by pressing the right button with the right button.
Then drive flasher -a dfl61_harmattan_30.2012.07-1_pr_legacy_001-OEM1-958_arm.bin -k zimage --Flash-only \u003d Kernel -f -r
Note - Name DFL61_HARMATTAN_30.2012.07-1_pr_legacy_001-OEM1-958_ARM.BIN. Must match the file that lies with you in the folder with the flash drive. Click ENTER, connect the phone to the computer, the Jem is a second second and see the firmware process. After a successful firmware, you will see a warning that you have modified software, and Passwords from Twitter, Facebook applications and other hats stopped persist. So it should be.
Pitch fifth, SillyBoot
Turn off the console, connect the phone to the computer in the drive mode and throw it to it SillyBoot.tar.bz2 or SillyBoot2_Graphics.tar.bz2 if you need a graphic bootloader. Turn off the device, turn on the developer's height, open the console and register
devel-Su.
You will be asked password. Default password - rootme
Now you execute teams from under the root. Unpack the bootloader
tar xjvf /home/user/mydocs/sillyboot2_graphics.tar.bz2 -c /
Excellent! Step Six, android Now we throw the firmware to the phone (you can also right in the root). Download both firmware at http://downloads.nitdroid.com/e-yes/n9/
First you need to install the first alpha version:
In the console, we also receive the root and execute the folder and unpacking command
devel-Su.
mKDIR / HOME / NITDROID
tar xjvf /path_to_rchive/nitdroid_n9_ics_alpha1.tar.bz2 -c / home / nitdroid /
Ways unpacking files. It will take about two or three minutes and should not give errors to work.
Excellent, now turn off the phone, turn on and rejoice - we have the opportunity to choose. We try to download Android (by pressing the VOLUME UP key).
Immediately after downloading android, go to the settings (Settings - Display - Sleep) and select "30 minutes"
Now you reboot the phone and go again in MeeGo - now you need to install the second firmware version.
devel-Su.
tar xjvf /path_to_rchive/nitdroid_n9_ics_alpha2.tar.bz2 -c / home / nitdroid /
That's all.
After installation, you will receive Android version 4.0.4 and you will be able to rap the owners of Samsung, LG, Motorola, HTC and Sotent, who still has not updated their smartphones before it.
A small video about speed and the fact that does not work yet (for some reason cut into the end, but not scary):


ICQ on the phone without registration
Proper shipment and acceptance of fax
Blocking Outlook Attachments: What is the essence of the problem and how to deal with it
File Server in Windows Server
Security of wireless networks