You can view the autorun of Windows 10 programs in the Task Manager on the Startup tab.
 To view the Windows 10 autorun programs, you need to open the Task Manager
 To add a program to Windows 10 startup, you need to add a shortcut to this program in a special folder located at: Local drive C: \ Users \ Your account name \ AppData \ Roaming \ Microsoft \ Windows \ Main menu \ Programs \ Startup.
 The folder where in Windows 10 the autorun of programs is located
 You can open startup programs on Windows 10, or rather a folder, using a special command. To do this, on the keyboard, simultaneously press two keys at once WIN + R... The Run window will open in which you enter the command shell: startup and click OK.
 The command with which it is easy to find startup programs in Windows 10
 When you open this special folder, you can use it to configure the autorun of programs in Windows 10. For example, to add a program to autorun Windows 10, you will need to copy the shortcut of any program and paste it into this folder. After that, you can immediately see that this program got into the autostart of Windows 10 applications, and therefore it will immediately appear in the task manager on the startup tab.
 How to make a program autostart in Windows 10 using Revo Uninstaller
 You can also configure startup programs for Windows 10 using special programs such as Revo Uninstaller. To add a shortcut to the Windows 10 startup, you need to run the Revo Uninstaller program and select Tools - Startup Manager or simultaneously press two keys on the keyboard at once ALT + A.
 Add autostart programs to Windows 10 when you turn on your computer
 The program will open the Startup Programs tab. On this tab, in the top menu, you need to click on the button Add.
 Configuring autostart of Windows 10 programs with Revo Uninstaller
 A window will open in which clicking on the button Overview and then you will need to find the shortcut that you want to add to autorun. Then, in this window, set the point at the point To the startup folder - every time you start Windows and click OK.
 How to enable autostart programs in Windows 10 with Revo Uninstaller
 After you manage to put the program in Windows 10 autostart, the added shortcut will immediately appear in the Startup Programs window, and now, every time the system is started, this program will automatically start.
When you connect removable media such as CD, DVD, Memory stick and USB stick to your computer, a pop-up window called "AutoPlay" appears, which automatically detects the type of removable device and offers you a few standard actions. If you find it annoying, you can always turn it off, for which I will give instructions in this article. And also how to enable or configure it in Windows 10.
How to enable or disable autoplay in Windows 10
I will show you three ways to do this in Windows 10. The first way is done through the menu Start> Settings> Devices... Select AutoPlay on the left side of the window, and you will see the "Use AutoPlay for all media and devices" radio button, which you can disable or enable if necessary.
In addition, in the same window there is a section "Selecting default parameters", where you can configure autorun separately for each type of device or a specific device (connected earlier). It can be a removable media (flash drive), memory card, or your smartphone, for which you can set the parameter from the following options:
- Take no action
- Open folder to view files (Explorer)
- Asking every time
- Configure this media for backup (File history)
- Configure storage options (Options)
This way you can disable the option for all media and devices (master switch), and at the same time configure so that it only works with a specific device or certain types.
You can also hold down the Shift key and connect the device to open the autorun window (regardless of the settings).

The second way is to take finer control over some types of media, such as CD, DVD. Blu-ray, etc. To do this, open the control panel. In the "view" option, select "large icons" and click Autoplay.
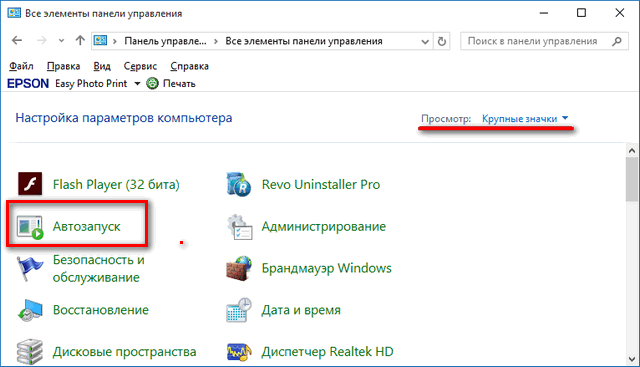
Check (or uncheck) the "Use autorun for all media and devices" checkbox to enable / disable the option. Scroll down, and just like in the previous part of the article, you can set the default action for each type of media and device. At the very bottom, after all the parameters and settings, you will see the "Restore defaults" button, by clicking on it, you will return all values to their original state.
The autorun settings windows are almost identical in Windows 7, 8 and 10. But unlike Windows 7, in Windows 8 and 10, a few more items have been added with settings for such types of media as camera memory and removable drives.
For most users, the 2 methods I mentioned above are quite sufficient to disable or configure autorun to suit their requirements. But if this is not enough for you, or you want to disable autorun for other users on the same computer, you can do it with.
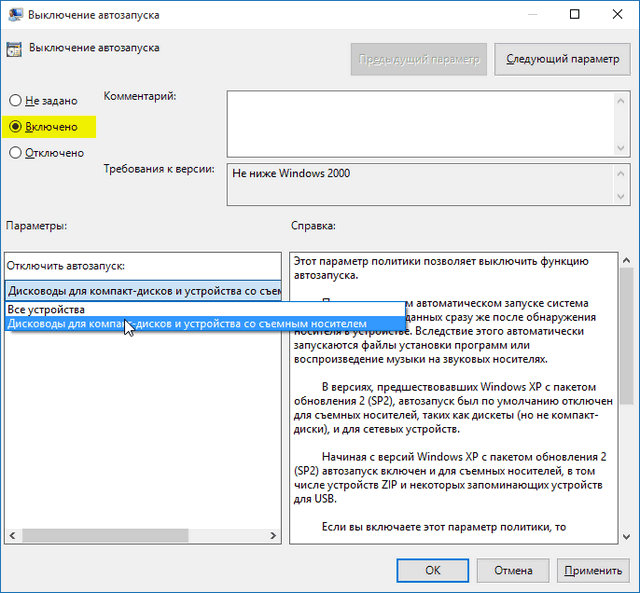
To do this, open the Run window (Win + R) and enter "gpedit.msc". Under Computer Configuration, select Administrative Templates> Windows Components> Autorun Policies.

In the right pane, find and click "Disable autorun", after which a window will open where you need to switch the "Not configured" option to "Enabled". Next, select "All devices" to disable autorun on all devices, or "Drives for CD-ROMs and devices with removable media", respectively.
As you can see, turning off autorun is quite easy, even for a novice user. However, it should be noted that the safest and most convenient option is "Ask every time" if you prefer to keep autoplay on. So that actions with connected media are not taken automatically.
- the property of the operating system (OS) to launch applications or programs immediately after turning on the computer. The startup contains programs necessary for stable operation of the OS or those that are installed by the user.When purchasing new equipment with Windows 10, you can note the fast boot speed of your computer. However, over time, it slows down. One of the reasons for this phenomenon is the presence of an excessive number of startup tasks that are active in the background. Some of them are not paramount for the OS. They take up memory on the PC and use up processor and disk resources to waste.
To avoid lagging device operation, it is important to keep track of the number of automatically started tasks. This can be done in several ways, which will be discussed in this article.
The first method is to uncheck the box next to the phrase "Load application on computer startup" when installing a new application. Very simple and effective.
The second way is configuring Windows 10 startup manually. To do this, you need to find the Startup folder, which contains the shortcuts for the downloaded programs. Remove unnecessary shortcuts and there will be no waste of PC resources. You can find the required folder by following this path:
C: \ ProgramData \ Microsoft \ Windows \ Main Menu \ Programs \ Startup - rus
C: \ ProgramData \ Microsoft \ Windows \ Start Menu \ Programs \ StartUp -if your interface language is English
The third is setting through the Task Manager. To do this, right-click on the Taskbar, in the menu that appears, select "Task Manager"> "Startup". A table opens showing the columns for Name, Publisher, Status, and Launch Impact. The "Status" parameter shows whether the task is currently active or not. The user needs to navigate in the names so as not to disable the programs necessary for the OS, it is better to look around for them on the Internet. In the "Status" column, select "Disable". Now the program will not automatically start when the OS is activated.

The fourth way is to remove the unnecessary program using one of the many free applications available. I have been using the proven CCleaner Free software for many years. The user needs to launch CCleaner Free, select the "Service" tab, in which the "Startup" item is selected. The window will display information about automatically launched programs, which will reflect their status (in the “Enabled” column there is a mark “Yes” or “No”). To turn it off, select the one we need, right-click, in the menu that appears, mark the "Turn off" item.

The fifth way is to directly get into the roots of the system through the registry. When working with the registry, remember that if you do not know exactly what you are doing, do not do it. This is one of the easiest ways to break everything. But sometimes it happens that there is no other way to fix the startup of programs. In this case, here's a quick guide: by pressing the Win + R keys and typing regedit in the Run box, press Enter. After that go to the section (folder) HKEY_CURRENT_USER \ SOFTWARE \ Microsoft \ Windows \ CurrentVersion \ Run. On the right side of the Registry Editor, you will see a list of programs that are launched for the current user when they log on. If there is a need to change startup for all computer users, go to the section: HKEY_LOCAL_MACHINE \ SOFTWARE \ Microsoft \ Windows \ CurrentVersion \ Run... You can change the list of programs in startup - delete or add a new one, to do this, click on an empty space on the right side of the editor with the right mouse button - create - string parameter. Give the parameter any desired name, then double-click on it and specify the path to the program executable file as a value.

You can optimize your computer to speed up the OS loading using the task scheduler, which carries out launch programs on schedule... The path for detecting the scheduler is as follows:
Start> Control Panel> Administrative Tools> Task Scheduler

To implement a delayed start in the "Task Scheduler" select the item "Create task". A new window appears, where we select the "General" tab and set the name. Go to the "Triggers" tab, click on the "Create" button, in the "Start task" item, mark "At startup". And in the "Additional parameters" we indicate "postpone the task for 15 minutes." and save. Next, in the "Action" tab, you need to set the "Run the program" parameter and in the "Program or script" line specify the path to the required file. Leave the recommended settings in the "Conditions" and "Parameters" tabs. Presses the "Save" button and that's it, the task is configured.
The ability to add and remove programs in Windows 10 startup will simplify the work with the device and help optimize the operating system. It is important to remember that there may be malicious programs in Startup, be careful.
After installing various kinds of programs, in most cases, they are added to the startup of Windows 10. In some of them, the user does not even agree to add programs to startup. And also there are malicious programs that are installed with the usual ones, and immediately go to the startup of the operating system.
This article will tell you how to open startup in Windows 10. Each user needs to know how to work with startup programs in the system. In general, disabling startup programs improves the performance of the operating system as a whole. We recommend that you simply remove the unnecessary from startup in Windows 10. If necessary, the user has the option to return.
Starting in Windows 10, version 1803, Autostart settings have been added to the new options. Here you can also disable and enable the startup of any application with just one click. Applications can be configured to launch at login. In most cases, they run minimized or start performing only a background task. To open startup, now you just need to:
Unlike Windows 7, in new versions of the Windows operating system, they decided to move the startup section to the task manager. Previously, a similar startup section was found in the classic system configuration application. Now after in the startup section, the user will see a link to go to the task manager.

Here we see all the programs that have been added to the system startup. And also right there you can turn off the startup of all programs on Windows 10. We would like to draw your attention to the column opposite the application impact on system startup Is the severity of the impact of CPU and disk activity, measured at boot time and updated on each reboot. We recommend disabling applications with a high impact on startup, as well as all unnecessary applications that are in startup.
The startup folder is also present on earlier versions of Windows, adding an application shortcut to it, its startup will be performed. Open the startup folder by running the command shell: startup in the window Win+ R... Well, or just go along the way: C: \ Users \ Username \ AppData \ Roaming \ Microsoft \ Windows \ Main Menu \ Programs \ Startup.


In order to add a program to Windows 10 startup, you need to create a string parameter. You can give the parameter any name. Double-clicking on this parameter, in the line Meaning You must specify the path to the executable file of the program. You can see an example of adding a parameter to the registry in the image above.
There are many programs that allow you to both add and remove programs from startup. CCleaner - a free program for cleaning garbage on your computer, allows you to control the startup of programs on Windows 10. You can download it without any problems on the official website of the program. 
Conclusion
Each user must be able to work with startup programs in the Windows 10 operating system. At least you need to know how to open, enable, disable startup programs. Since removing programs from startup improves the performance of the system as a whole.
Indeed, cleaning the startup in the operating system allows the user to save their own time. And also to improve performance, we recommend additionally.


Valle d'Aosta. Italy. Open the left menu Valle d'Aosta Heroes of the Vine
Electrical outlet types and voltages around the world
What are the voltage standards, frequencies and types of outlets in different countries of the world
How the demilitarized zone between North and South Korea has changed
Disable Automatic Updates in Windows