A printer is one of those devices that "accompanies" every computer device, and many users want to know how to connect the printer correctly to the computer, considering that it is quite difficult to do this. Some time ago, this procedure was really not the easiest, but today everything is different. And you yourself can easily cope with this task.
Connecting the printer to a PC: methods, features
Consider three ways in which you can produce connecting the printer to a PC, namely:
1) connection with a USB cable to install a local printer;
2) network connection of the printer by IP address;
3) connection to a printer installed on another PC.
Connecting a Printer Using a USB Cable
When you unpack and set up the printer next to your computer device, immediately connect the USB cable to it - the end where the plug looks like a simple USB input plugged into the computer. Connect the other end of the cable to your PC. Then proceed as follows.
1) Go to the "Control Panel" and select the "Devices and Printers" section there. You will see a list of all devices that are connected to your PC.
2) On the panel at the top, click on the line "Add printer". A window will open in which you need to select the type of printer you are connecting. Since this is a USB device in our case, select Local Printer.
3) Mark the point "Use the next port" with a dot and click on the field with the names of ports free for connection. Select the name "USB001" from the list that opens.
4) The next step is to select a driver for the connected device. In the list with the name "Publisher" find the name of the manufacturer (for example, Canon), and in the list "Printers" find the model itself (for example, Canon LBP5960).
If you cannot find the name of your device, you will need to download the driver and install it manually. Download the driver on the official website, then click on the line "Install from disk ...", specify the path of the downloaded driver and confirm the action by clicking on the "OK" button. Then check the box "Replace the existing (current) driver" and click on the "Next" button. Now do this:
1) Specify the name of your printer, after which its installation and configuration starts.
2) Pay attention to the item "Sharing settings for home PC": if you are at home, cancel sharing, if you work in the office - you can open it to be able to connect to printer and print to it from multiple PCs.
3) Check the "Use default printer" checkbox and click on the "Finish" button.
If you did everything correctly, then, looking in the "Device Panel", you will find your "freshly connected" printer there.
Connecting a network printer
To install network printer connected to the Internet, click the Add Printer button and select Local Printer. Only in this case, you need to check the "Create a new port" item, and then select its type - "Standart TCP / IP Port".
You will see two fields: in the first, specify the IP address of the printer, in the second - the name of the port so that it can be identified later.
Your further actions will be the same as in the first case, when the connection was made via a USB cable:
1) select the driver (or install it manually),
2) allow (or deny) general access,
3) mark the printer as primary,
4) close the window by clicking on the "Finish" button.
Connecting to the printer from another PC
It often happens that there are several computers and the user of each of them needs to print. Here is just one printer. How to proceed in this case? It's very simple - connect the printer from another PC over the network and send a print job to it from any network device. More precisely, the task will first go to the PC to which the printer is connected, and from there it will be sent to the device.
To print over a network, it is imperative that the printer be shared. To do this, go to the "Properties" of the printer, go to the "Access" item and there tick the box for opening access, specifying the network name (for example, it can be Xerox WC 5010). Click on "Apply" to save the settings.
Next, on all PCs that you want to connect, go to "Devices and Printers" and click on the line "Install a printer". Again, select "Local Printer" and create a new port - "Local Port".
A window will open in front of you where you will need to register the full path to the printer, that is, specify the name of the computer and the network name of the printer. It may look like this: \\ AndreyPB \ Xerox WC 5010. Here AndreyPB is the name of the PC to which you want to connect, and Xerox WC 5010 is the name of the printer (you specified it when you opened the general access). Then do the following:
1) click on "OK";
2) substitute your printer driver, for which: 1) click on the line "Install from disk"; 2) specify the path to the folder where the downloaded driver is located;
3) select the default printer;
4) close the installation window.
As you can see connect the printer to the computer not difficult at all, and you can easily handle it.
Having correctly configured the printer, you can get any text and graphic information on paper in a matter of seconds. This process will not take too much of your time.
Connection
In order to properly connect the printer to your computer, you will need to follow three simple steps:
- connect the device to the computer using a USB cable;
- connect it to the network;
- make the necessary settings.
Connection procedure
Everyone will probably be able to connect the device to the power supply, and this step should not cause absolutely any difficulties. A USB cable is usually included with the device, but it is also sold separately. The cable has two ends with different plugs on them. You need to connect a Type A plug to the computer.

Driver Installation
Most manufacturers pre-pack their equipment with CDs with the necessary drivers and software. As soon as you connected the equipment to the computer, you need to immediately insert this disc into the drive. Start the installation process and prompts with further actions and recommendations will appear on the screen.

Modern devices do not require additional installation, you just need to connect them to a computer and the installation will be performed automatically.
How to do without a driver disc
You can easily find a way out of this situation, but on condition that the Internet is turned on.
Algorithm of actions:

With these simple steps, you can install the necessary drivers and proceed to the next installation step.
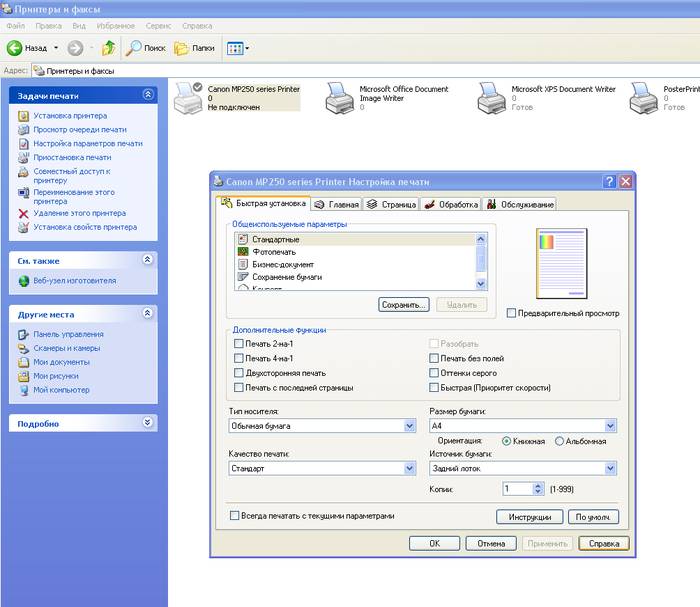
How to set up your printer for printing
Before you start printing, you need to set up your hardware correctly.
You can do this based on the instructions described below:

These settings may be different for each printer, but the standard ones are present for all.
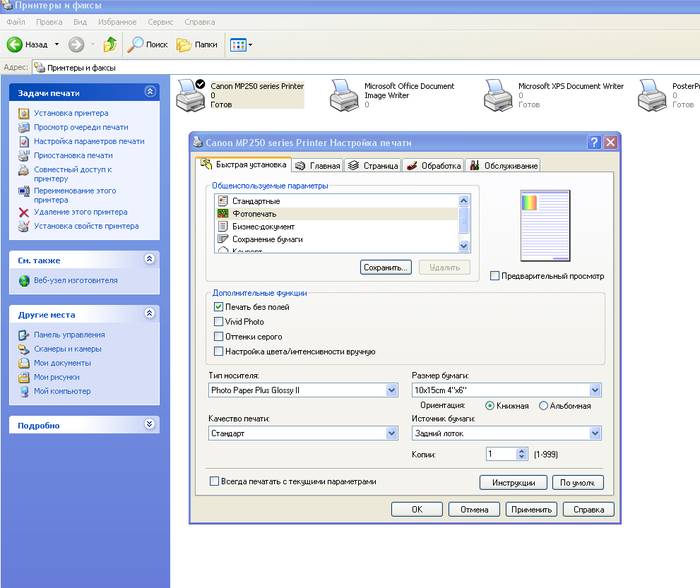
Select page layout, number of sheets, paper quality, print mode.
These are just a few of the features you need to select. They may differ depending on the model. Read carefully what is written there and choose the right one. As you can see, setting up a printer for printing is not so difficult, the main thing is not to rush.
Video: Printer - setup, photo printing on disk
Changing the default printer
Quite often, situations arise when several printers are connected to one computer at once. Of course, every time you print, you can choose the device you want, but this will have to do a few unnecessary steps.
For this problem, you can find a suitable solution - make the default printer:

Test page
After installation, you need to print the first test page. This allows you to check if everything is done correctly. The test page also allows you to check the print color. In addition, it will contain all the information about the driver version, as well as the printer model. This sheet must be saved, because if any problems arise, it will be useful.
You need to configure the ZYXEL KEENETIC LITE router. Details here.
We print the test page correctly:

After printing is finished, do not close the page, but evaluate the print quality of the test page.
Change settings
Some users have situations when they need to change the settings. They are usually set on the Ports tab in the printer properties window. It is here that you can change the type of printing (for landscape printing, etc.), the connection port to which the equipment is always connected. By the way, it is very convenient to print photographs for landscape printing, since this page format is more suitable for this.
As for other settings, for example, such as print mode, print queue, limited access time to the device, all this can also be changed in this dialog box.
Printing a Document
When creating this or that type of file, it does not matter if it is a document or a photograph, sooner or later you will need to print it on paper.
There are several different ways in which you can send a document for printing:

Anyone, even the most inexperienced user, can easily figure out these simple steps.
Job and print queue management
By managing print queues, the user has full control over all documents sent to the queue. You can view and resend print jobs at any time. But you can, for example, send a document to the favorites section, this will eliminate the need to perform operations to send the document for printing every time.

There are three main print queues:
- straight lines. They allow you to receive a printed document on a pre-assigned printer;
- safe. All print jobs will each be blocked until you are authenticated;
- general. Completely different users can perform the same tasks.
There are times when the document was not printed due to an error, and you already need to get the next one. But the printer will persistently print the first document. You just need to clear the print queue.
This is done simply:

Setting the print color
A color profile is a large collection of different commands for a printing device that are written as a file. Many of you have probably seen the print modes in the settings: matte paper, glossy. Each of these settings stores its own color profile.
As long as you use original cartridges, you won't have any printing problems. All documents and photographs will be of very good quality.
But since not everyone can afford it, you will have to look for an alternative. The color profile is built for a specific printer, paper and ink. This is a very important point that must not be forgotten. After all, color is an important point when printing documents and photos.
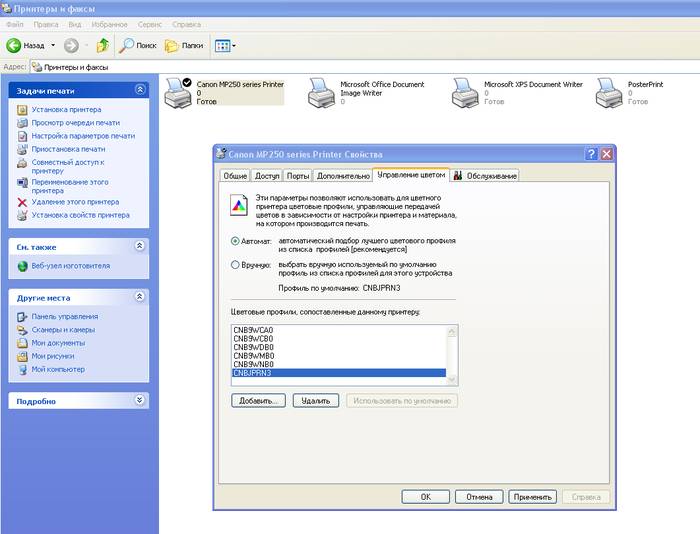
From the official site you need to download the Adobe Photoshop program and install it. Then find your printer, right click on it and select properties. A new window will appear in front of you, in which click on the color management item. Then choose your device and remember.

A window with settings will open again before you; they may differ on different computers. But in general, you just need to select the options you want and save them. And then just print a test page and see the result.
Installing and configuring the printer is fairly straightforward. Having previously studied the necessary information, you yourself, without the help of a specialist, will be able to perform all the above actions.
>It is impossible to imagine a modern office without a printer. Dozens of documents pass through the organization every day,“ life ”thanks to this printing device. With a properly working printer, you can print up to 1000 pages per day. The printer, like any other PC device, begins with its installation. It would seem, connect the cables to the computer and you're done! However, the installation process is more capacious than it seems at first glance. We will talk about how to set up a printer on a computer in this article.
Connection methods
Depending on the type of access to the printing device, the connection can be local or remote. When connected locally, the printer connects directly to the computer using USB cable ... A network connection involves connecting the printer to a PC using network cables. At the same time, there is no direct connection between the computer and the printing device. This type of connection is used in large companies that have up to several dozen computers at their disposal. They are connected to the same printer using network cables.
The advantage of this connection is that sharing a printing device eliminates the need for a company to purchase a printer for each PC. The local connection is intended for home use. It is faster and easier to set up and does not require additional hardware.
Below we describe the scheme for connecting the printer to the computer using the local option.
PC connection
First, we connect the printer to the computer using USB cable and connect it to the network. Next we press“ Start ”and go to the section“
At this stage, the system offers us to choose one of the two already mentioned ways of connecting the printing device to the PC. In our case, this is a local connection, so we choose“ Add a local printer ”.
The next step is choosing a port. A printer port is a type of connection that allows a computer to communicate with a printer. By default, the installation wizard will offer to use the existing LPT1 port. It fully complies with the installation requirements, so we leave everything as it is and move on to the next step.
The main component of printer setup is driver installation.
In fact, a driver is a program for connecting a printer to a computer, at the same time being an intermediary between them. It is she who is responsible for ensuring that the set of iron and plastic turns into a stable working printing apparatus.
The driver installation disc is always supplied with the printer. In order to install the driver, select “Install from disk” from the offered list. If you do not have this disk, then you can download the driver files from Windows Update or the Internet.

After the drivers are installed, the setup wizard will prompt us to give a working name to the printer. This can be a standard version using its brand (for example, HP Laser Jet 1010) or any name that the user likes.(for example, " Artyom's printer ") ... Choose a name, click" Further".
The next step is to configure access to the printer. In home use, this item loses its relevance, since there is no need for collective use of the printer. Shared access, as mentioned above, can be used where there are 2 or more computers on the network. Therefore, we activate the item“ This printer is not shared ”and click" Further".
This completes the printer setup. The system will give you a window informing you that the procedure has been successfully completed.
The final stage in setting up a printing device is checking its operation. At the end of the installation, the wizard prompts you to print a test page to verify that the printer is working properly or to obtain diagnostic information. Click on the "Print test page" button and click "Finish".
How to set up a tp link router is described in this article. - How to reset your computer to factory settings.

Connecting and configuring a printer open for public use is carried out in 3-4 simple steps ... According to the scheme already known to us, we open the menu“ Start ”and go to the section“ Devices and Printers ”. Install the printer, but this time select the item“ Add network, wireless or Bluetooth Printer ”.
Thus, we launch an automatic search for printing devices in our network. In less than a minute, the system will open a list of available printers. We select the one to which we want to connect and click on. The printer is connected, the drivers are installed.
After the installation is complete, the system will notify you with a corresponding notification. The installed network printer will be selected as the default printer. To deactivate this option, right-click on it and uncheck the box“ Use as default ”.
Second way
If at the stage of searching for network printers the printing device you need was not found, then you can get access to it by entering its network address. In the search results window, click on the link“ The printer that I want is not listed. " The setup wizard will open a window with a line where it will be necessary to register the address of the printer. It has the following format: "\computer_net_name\ network_printer_name". When connecting the printer to a Windows 7 computer, you will need to find out the name of the PC to which the printer is connected. This is done in the properties of the menu" My computer".

We write the format in the input field and click“ Further". The installation of the printer and drivers begins. Boththe above methodsare relevant for all types of devices running on Windows, so if you are wondering how to set up a printer on a laptop, then the answer is simple: use the installation instructions for a PC. Thus, the process of setting up a network printer will take no more than 5 minutes.
Usually, for the printer to work correctly, you need to load the driver from a special installation disk that comes with the printer itself. But if you need to connect a printer or MFP, this very installation disk may not be at hand. And it often happens that the driver was developed for Windows XP and it simply does not work on Windows 8.
If it is impossible to install the Canon 810 printer from the original disc, then you can always do it manually: this method is simple and accessible to everyone.
Method one
For Mac OS X, go to the Apple menu and click System Preferences. Select "Print & Fax" and click on the "+" icon. To start the installation process, select a new printer from the list.
- Next, the process of installing the printer begins. In the "Add Printer" window that opens, the system will display the printers available for installation.
For example:
- Canon mg2440
- Samsung scx 3400
- Canon lbp 810
- Epson l355
- Canon mf3010
- Canon lbp3010b

Next, you should find the printer by other parameters. For example, you can select a printer by name by manually entering the path to it. Either you need to add a network device by IP address, or connect an HP deskjet wireless connection over WiFi and Bluetuth. 

Method two
If the printer cannot be connected through the control panel of your computer, you can use an alternative method and download the driver from the printer manufacturer's online support page.
Before installing a printer without a disk, you need to find out the exact model of the device, as well as the version and bit depth (in bits) of the computer's operating system. The brand and model are indicated on the front of the printer itself, for example, Canon lbp 810 or Samsung scx 3400, etc.
We recognize the bit depth of the OS by clicking on the icon "This computer" with the right mouse button and selecting the item "Properties".

Having decided on the outgoing parameters, we are looking for drivers on the manufacturer's official website:
- for scx 3400 - http://www.samsung.com/ru/support/
- for lbp 810 and mf3010 - http://www.canon.ru/support/consumer_products/
- for l355 - http://support.epson.ru/
- for HP deskjet - http://support.hp.com/en-us/
It is also advantageous to download the driver to a computer from the official website because setting via the operating system provides only the basic functionality necessary for the printing process, while installing an extended version from the manufacturer makes it possible to correctly set up the scanning program as well.
On the printer manufacturer's website in the Support section, you need to find your specific HP deskjet or scx model and download the correct driver by clicking on the floppy disk. Usually, the driver is downloaded to the computer as an archive file, which must be unzipped before installation. Perhaps, after unzipping, several files of different types will appear in the folder. Among them, by name, you need to find exactly the driver that suits your operating system. Such a file will have the * .exe extension (for example, for the i-SENSYS MF3010 MFP, when installed on a computer with 32-bit Windows 8, the driver is called MF3010MFDriversV2095W32RU.exe).

After opening the required file, a window for installing the program on your computer will appear.
Some printer models may require you to disconnect the Samsung scx MFP from your computer during installation to properly configure the software. Then you can safely follow the prompts and, in a few minutes, the required driver will be installed.
Below is an informative video
So, half the battle is done. A brand new printer has already been purchased, the only thing left is to connect it to the computer. What could be simpler: connect it to a suitable connector, boot the computer, insert the driver disk into the floppy drive - and that's it ...
But no. You can connect the printer with your own hands, but here there are some subtleties. So let's start all over again.
Install from disk.
1. Take the printer out of the package, carefully detach all protective stickers. Insert the driver disc into the drive. In most cases, autorun will work, a window will appear prompting you to select a region of residence:

For the Canon printer - select the region of residence
(Picture 1)
2. Then the installation options will be offered:

(Figure 2)
If installing the printer is not your daily activity, select "Easy Installation" and move on.
3. We accept and agree to the license agreement:

Click - yes, accepting the license agreement. In some cases, you need to check the box confirming your choice and click - Next.
(Figure 3)
4. We are waiting until the installation program asks to connect the printer:

Printer connection - check if the printer is connected
(Figure 4)
5. Using a connecting cable (you may have to buy it separately - not all printer manufacturers complete their products with it, and not all printers accept cables.) Connect the printer to the computer as shown in the figure.
We are waiting for the end of the installation.
In my practice, there have been cases where it was not possible to install the printer driver from the CD. This usually happened for two reasons: the disc could not be read corny, or the drivers written on it did not fit the operating system installed on the computer. In this case, you had to download the necessary drivers from the Internet.
How to choose the right driver.
To select the correct driver, you need to know the name and model of your printer, and what operating system is installed on your computer.
1. Let's go to: Start / Control Panel / System and Security / System and see the name and type of the system:

(Figure 5)
2. Open the printer manufacturer's website and download the required driver.

(Figure 6)
3. Save it to your hard drive and proceed with installation.
3.1. Let's open the folder with the downloaded file. Click on the icon with the –exe extension, after which the Installation Wizard will start.
3.2. Further, the installation of the printer driver is practically the same as the above algorithm for installation from the CD.
Where can I download / find the drivers I need?
It is best to search for the necessary drivers on the website of the printer or MFP manufacturer. The fact is that there you can find later versions with already fixed errors of previous versions. For hp it is http://www8.hp.com/ru/ru/support-drivers.html, for Canon - http://software.canon-europe.com/. You can also visit the site Driver.ru (http://driver.ru/).
What should I do if I can't install the printer driver the first time?
In this case, the best advice is to disconnect the printer from the computer, uninstall the installed software, read the instructions carefully, find the missing step, and reinstall the printer driver.
Good luck!


Valle d'Aosta. Italy. Open the left menu Valle d'Aosta Heroes of the Vine
Electrical outlet types and voltages around the world
What are the voltage standards, frequencies and types of outlets in different countries of the world
How the demilitarized zone between North and South Korea has changed
Disable Automatic Updates in Windows