It's no secret that with prolonged use of Windows, the system starts to work more slowly, and even frankly lag. This may be due to the clogging of system directories and the registry with "garbage", the activity of viruses, and many other factors. In this case, it makes sense to reset the system parameters to their original state. Let's see how to restore factory settings on Windows 7.
There are several methods for resetting Windows settings to factory settings. First of all, you should decide how exactly you want to reset: restore the original settings only to the operating system, or, in addition, completely clear the computer of all installed programs. In the latter case, all data from the PC will be completely deleted.
Method 1: "Control Panel"
You can reset Windows settings by running the tool necessary for this procedure through "Control Panel". Before activating this process, be sure.
- click "Start". Go to "Control Panel".
- In the block "System and safety" choose an option "Computer Data Backup".
- In the window that appears, select the lowest item "Restore system settings".
- Next, follow the inscription "Advanced Recovery Methods".
- A window opens containing two options:
- "Use a system image";
- "Reinstall Windows" or .

Choose the last item. As you can see, it can have a different name on different PCs, depending on the parameters set by the computer manufacturer. If you have a title "Return the computer to the state specified by the manufacturer"(most often this option happens with laptops), then you just need to click on this inscription. If the user sees the item "Reinstall Windows", then before clicking on it, you need to insert the OS installation disk into the drive. It is worth noting that this must be exclusively the instance of Windows that is currently installed on the computer.
- Whatever the name of the above item is, after clicking on it, the computer restarts and the system is restored to factory settings. Do not be alarmed if the PC restarts several times. After the completion of the specified process, the system settings will be reset to the original ones, and all installed programs will be deleted. But if you wish, you can still return the previous settings, since the files deleted from the system will be transferred to a separate folder.


Method 2: Restore point
The second method involves using a system restore point. In this case, only system settings will be changed, and downloaded files and programs will remain intact. But the main problem is that if you want to reset the parameters to the factory settings, then in order to do this, you need to do this as soon as you have purchased a laptop or installed an OS on a PC. And not all users do this.
- So, if there is a restore point created before using the computer, then go to the menu "Start". choose "All programs".
- Next go to the catalog "Standard".
- Go to folder "Service".
- In the directory that appears, look for the position "System Restore" and click on it.
- The selected system utility is launched. The OS recovery window opens. Just click here "Further".
- Then a list of restore points opens. Be sure to check the box next to "Show other restore points". If there is more than one option, and you do not know which one to choose, although you are sure that you created a point with factory settings, then in this case, choose the item that is the earliest by date. Its value is displayed in the column "Date and time". With the relevant item highlighted, press "Further".
- In the next window, you just have to confirm that you want to roll back the OS to the selected restore point. If you are confident in your actions, then press "Ready".
- After that, the system reboots. Perhaps it will happen several times. After completing the procedure, you will receive a functioning OS on the computer with factory settings.


As you can see, there are two options to reset the state of the operating system to factory settings: by reinstalling the OS and returning the settings to a previously created restore point. In the first case, all installed programs will be removed, and in the second case, only system parameters will be changed. Which method to use depends on a number of reasons. For example, if you did not create a restore point immediately after installing the OS, then you only have the option that was described in the first method of this guide. In addition, if you want to clean your computer from viruses, then only this method is also suitable. If the user does not want to reinstall all the programs that are on the PC, then you need to act in the second way.
Learning how to factory reset your computer will help you keep your PC running like new. This process will wipe out any existing data and programs you have installed on your hard drive and reinstall Windows to reset your computer to the state it was in when you first opened the window (and sometimes even better as it won't include all unwanted programs are crapware - this may come with most new PCs). Some people choose to restart their computer regularly to keep it on top of the form. Most often, this procedure is performed when a problem occurs that cannot be easily repaired with traditional methods.
How it came from the factory recently your PC differs depending on the version of Windows you are running and your PC manufacturer.
IMPORTANT: Data backup
Before you learn how to factory reset your computer, it's wise to back up any important files you may have.
If you are using Windows XP, you must first install the backup utility from the Windows XP installation disc.
To back up data in Windows XP:
- Insert the Windows XP disc into the CD-ROM drive
- On the CD, navigate to X:\ValueAdd\Msft\Ntbackup (X is your drive letter)
- Click Ntbackup.msi and run the wizard as instructed
- Once the utility is installed, click the Start button and select Run.
- Type ntbackup.exe and press Enter.
The backup process is much easier in Windows Vista and 7. To back up files:
- Click the button Start" and select " Control Panel"
- Select system and service
- Click " Backup and Recovery Center"
- Select SetUp Backup
- Follow the on-screen instructions to save the data you want to keep (Note: You will need some kind of media to store the backup. External hard drive, CD, DVD, USB stick, etc.).
"Windows Backup in Microsoft Windows 7"
Windows Backup in Windows 8
Windows 8 has several options for backing up your files. The first option is called Windows 8 File Recovery. This option allows you to backup your entire system. To use this first option:
- Switch to home screen
- Type Windows 7 recovery
- Click " Settings" below the text field
- Press Enter
- Follow the onscreen instructions to save the data you want to keep. (Note: You will need some form of media to store your backup. External hard drive, CD, DVD, USB stick, etc.)

"Windows 7 Revovery in the new Microsoft Windows 8"
A newer option in Windows 8 allows you more flexibility in the files you choose to back up rather than backing up your entire system. This new variant is called Windows 8 File History .
To back up important files using this option:
- Switch to home screen
- Enter file history
- Click " Settings" below the text field
- Press Enter
- Choose the location where you want to save your files. (Note: You will need some form of media to store your backup. External hard drive, CD, DVD, USB stick, etc.)
- Inclusion
Your PC is now set up to back up your files. You can choose which files you don't want to save using the " Exclude Folders" left.

"File History in the New Microsoft Windows 8"
Reset PC settings to factory settings
Now that you have all your important files, it's time to go ahead and reset your computer to factory settings. This process depends on several factors. Traditionally, PC manufacturers shipped their PCs with a recovery disc containing a copy of Windows, the necessary drivers, and other software specific to your PC. If you have an older computer, you will most likely have a recovery CD or DVD needed to restart your computer.
To restore your PC to factory settings using a recovery disc:
- Insert disc into your computer
- Restart your computer
- Enter the BIOS menu (press the button when prompted to restart)
- Find the boot order for your PC and move the CD/DVD drive to the top
- Save changes and restart
- Your computer will boot to your recovery drive and present you with a recovery wizard
- Follow the on-screen instructions to restore your PC.
New PCs do not come with a recovery disc. Instead, these computers come with a recovery partition. This is a specially dedicated part of your hard drive, designed to store all the data of a traditional recovery drive.
To factory reset your PC using the recovery partition:
- Restart your computer
- When prompted, click on the specified key to enter the recovery partition
- When presented with the recovery wizard, follow the instructions on the screen
Once the recovery wizard has completed, you will be prompted to run the initial Windows setup. Enter the relevant information and soon your computer will work as it did the day you bought it.
Learning how to factory reset your computer will help you keep your PC running like new. This process will wipe out any existing data and programs you have installed on your hard drive and reinstall Windows to reset your computer to the state it was in when you first opened the window (and sometimes even better as it won't include all unwanted programs are crapware - this may come with most new PCs). Some people choose to restart their computer regularly to keep it on top of the form. Most often, this procedure is performed when a problem occurs that cannot be easily repaired with traditional methods.
How it came from the factory recently your PC differs depending on the version of Windows you are running and your PC manufacturer.
IMPORTANT: Data backup
Before you learn how to factory reset your computer, it's wise to back up any important files you may have.
If you are using Windows XP, you must first install the backup utility from the Windows XP installation disc.
To back up data in Windows XP:
- Insert the Windows XP disc into the CD-ROM drive
- On the CD, navigate to X:\ValueAdd\Msft\Ntbackup (X is your drive letter)
- Click Ntbackup.msi and run the wizard as instructed
- Once the utility is installed, click the Start button and select Run.
- Type ntbackup.exe and press Enter.
The backup process is much easier in Windows Vista and 7. To back up files:
- Click the button Start" and select " Control Panel"
- Select system and service
- Click " Backup and Recovery Center"
- Select SetUp Backup
- Follow the on-screen instructions to save the data you want to keep (Note: You will need some kind of media to store the backup. External hard drive, CD, DVD, USB stick, etc.).
"Windows Backup in Microsoft Windows 7"
Windows Backup in Windows 8
Windows 8 has several options for backing up your files. The first option is called Windows 8 File Recovery. This option allows you to backup your entire system. To use this first option:
- Switch to home screen
- Type Windows 7 recovery
- Click " Settings" below the text field
- Press Enter
- Follow the onscreen instructions to save the data you want to keep. (Note: You will need some form of media to store your backup. External hard drive, CD, DVD, USB stick, etc.)
"Windows 7 Revovery in the new Microsoft Windows 8"
A newer option in Windows 8 allows you more flexibility in the files you choose to back up rather than backing up your entire system. This new variant is called Windows 8 File History .
To back up important files using this option:
- Switch to home screen
- Enter file history
- Click " Settings" below the text field
- Press Enter
- Choose the location where you want to save your files. (Note: You will need some form of media to store your backup. External hard drive, CD, DVD, USB stick, etc.)
- Inclusion
Your PC is now set up to back up your files. You can choose which files you don't want to save using the " Exclude Folders" left.
"File History in the New Microsoft Windows 8"
Reset PC settings to factory settings
Now that you have all your important files, it's time to go ahead and reset your computer to factory settings. This process depends on several factors. Traditionally, PC manufacturers shipped their PCs with a recovery disc containing a copy of Windows, the necessary drivers, and other software specific to your PC. If you have an older computer, you will most likely have a recovery CD or DVD needed to restart your computer.
To restore your PC to factory settings using a recovery disc:
- Insert disc into your computer
- Restart your computer
- Enter the BIOS menu (press the button when prompted to restart)
- Find the boot order for your PC and move the CD/DVD drive to the top
- Save changes and restart
- Your computer will boot to your recovery drive and present you with a recovery wizard
- Follow the on-screen instructions to restore your PC.
New PCs do not come with a recovery disc. Instead, these computers come with a recovery partition. This is a specially dedicated part of your hard drive, designed to store all the data of a traditional recovery drive.
To factory reset your PC using the recovery partition:
- Restart your computer
- When prompted, click on the specified key to enter the recovery partition
- When presented with the recovery wizard, follow the instructions on the screen
Once the recovery wizard has completed, you will be prompted to run the initial Windows setup. Enter the relevant information and soon your computer will work as it did the day you bought it.
Hello friends, in this article we decided to tell you how to factory reset laptop. Let's start with the manufacturer Toshiba (for those who are interested, you can read a separate article -), the second is the Sony laptop, the third HP pavilion. Separate articles are written for laptops, and,. Well, then we will try to supplement the article with information on products from other manufacturers, judging by your letters, this topic is interesting to many of our readers.
- Good day, I wanted to ask you how to restore a laptop to its original factory settings? I know that these settings are in a hidden section of the hard drive, but I inadvertently deleted this section and now I get an error when I try to roll back to the factory settings. I did not create DVD recovery discs, and in general, I have never had a chance to restore a laptop to factory settings. What is the way out of my situation?
- Hello admin, please explain how to me. Toshiba laptop, it has a hidden partition, another C: drive and a D: drive. I didn’t touch the hidden partition, but on drive D: I deleted everything, and now I can’t roll back to the factory settings, they say Toshiba laptops use a hidden partition to restore factory settings and some other HDD RECOVERY folder, which is located just on the disk D:. What should I do now?
- I bought a Toshiba laptop, the instructions for the laptop say, if you want to roll back to the factory settings, press the F8 key, the recovery program will start. I pressed it, but Additional download options are launched and that's it ... And then, what should I do? And another question, at the first start, a message appeared - We recommend that you create a rescue media on a USB flash drive or DVDs, using the Recovery program, it will help you restore the contents of the computer to its original factory state, even in case of serious damage to the computer. Explain how to use this recovery media in case of problems?
- Hello, tell me how to restore the factory settings of a Hewlett-Packard (HP) laptop if the beech does not boot at all. When loading Windows exits with an error.
- Admin, please answer this question. All laptop manufacturers equip them with a special RECOVERY program, located in a hidden section, using this program, you can roll back the laptop to factory settings in case of serious problems with the operating system. Question - Is there any alternative to this program?
How to factory reset a laptop
When does it occur to us to restore our laptop to factory settings? That's right, when we no longer understand what is happening to it, and most importantly, the laptop itself does not understand what is happening to it, because of dozens of unnecessary partitions created on it, four installed operating systems, thousands of different programs and three antiviruses.
- Note: Before a factory reset, you can copy all data from the C: drive and the desktop using .
Many users may notice that in such a situation, you can reinstall Windows with all programs, drivers, and that's it. But I, in turn, will notice restore laptop to factory settings, for an inexperienced user, much easier. You won’t have to worry about finding and installing drivers for all devices later, you just need to reinstall the necessary programs and that’s it. The only thing that confuses many in this situation is that many have never in their lives run this same laptop restore to factory settings. To acquaint you with this restoration and the purpose of our article, I hope after reading it, you will better understand how this can be done.
I have to restore factory settings on various laptops quite often and I want to say that the recovery mechanism itself is almost the same on all laptops, but of course there are always nuances that are better known in advance.
First rule. During a factory reset, the AC adapter must be permanently connected to the laptop.
You reboot the laptop and press a certain key on the keyboard when loading, then the factory reset program starts, here you need to be careful. The factory reset program may offer you to restore only the C: drive or restore the entire hard drive. If you select the C: drive, then only it will be restored to factory settings, and the rest of the partitions with your data will remain untouched. If you choose to restore the entire hard drive to factory settings, then all the partitions you created, with all your files, will be deleted and your laptop will be in the same condition as at the time of purchase.
Where is the laptop factory settings program located?
Usually in a hidden section of a laptop, which is called the "Recovery Partition", the volume is up to more than 20 gigabytes. You can see it if you go to Computer Management->Disk Management. It is advisable not to delete this section, otherwise you will not be able to restore the laptop to factory settings.
Toshiba laptop owners need to know that in addition to the hidden RECOVERY partition, they also have the HDD RECOVERY folder located on the D: drive, which cannot be deleted either.
Note: Friends, if the hidden partitions on your laptop have not been deleted, but the factory restore program does not work, read our article -.
Why create laptop recovery DVDs?
As soon as we bought a laptop and turned it on, on the screen, immediately after the appearance of the Windows desktop, the laptop manufacturer's service window appears with a suggestion to create laptop recovery DVDs. That is, we will create the same hidden partition with factory settings, but on DVDs. This is done in case the hidden section of the laptop, for some reason (usually the fault of the user) is damaged or removed completely.
To create recovery DVDs, you usually need 3 blank CDs. In case of serious problems with the laptop, for example, you cannot boot the operating system at all, and the hidden partition is deleted, we can restore the laptop to the factory state using the recovery DVDs we created earlier.
Hotkeys for Restoring Laptops to Factory Settings
ASUS - When the ASUS splash screen appears, press F9
Acer-Alt+F10
HP pavilion - when you turn on the laptop, press the esc key. Enter the startup menu, then press the F11 key
Samsung-F4
Sony vaio-F10. New Sony VAIO laptops use a dedicated button Assist, try clicking it on boot. Loading VAIO Care, select from the menu Start Troubleshooting (Recovery) -> Select keyboard layout English -> Diagnostics -> VAIO Recovery Tools -> Windows 8 -> Start Recovery Wizard(System Restore step by step).

Toshiba - F8 or on latest models 0 or even need to press fn+0
Packard Bell-F10
Dell inspiron - press Ctrl+F11 when the dell splash screen appears
Fujitsu-Siemens-F8
LG-F11
Lenovo-F11
So, first we restore the Toshiba laptop to factory settings, press F8 when loading, (if you have one of the latest Toshiba laptop models, then immediately when you turn on the laptop, press and hold 0), a window appears Additional download options. Choose Troubleshooting your computer and press Enter.

Selecting language settings.


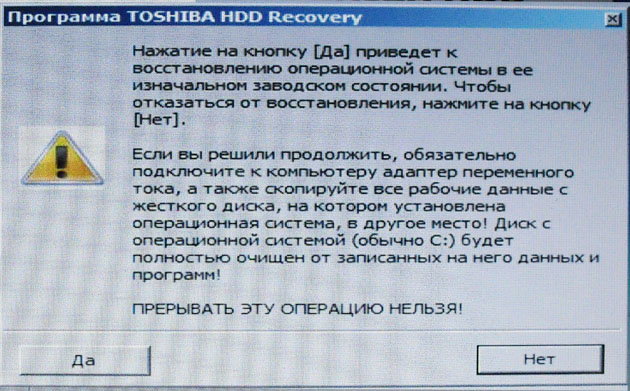
We select the Toshiba HDD RECOVERY recovery tool or it may be called Toshiba Recovery Wizard.

In the next window, we are warned that drive C: will be restored to its original state, that is, everything will be deleted from it and its state will be given at the time of purchase of the laptop, drive D: will remain untouched.


You cannot interrupt the operation, so make sure that the AC adapter is connected to the laptop. Click Yes and start the process of restoring the laptop to its original factory state.
Factory reset in progress


The software and drivers are being installed.


Choose a username and password for your account. We set the date, time, they are usually correct by default. If you wish, you can register your laptop for a warranty extension.

First start of Windows. That's all
How to Factory Reset a Sony Laptop
We press the F10 key at boot and enter the Windows Boot Manager, select using the keyboard Launching the VAIO Recovery Center.


A window appears in front of us, in which we can familiarize ourselves with the recovery options.
For example, choose Repair drive C: and in the next window we read information about what will be restored.


The C drive is restored: to the factory state, all the software is reinstalled, but not the software installed after the purchase of the computer, it will have to be installed again. This program deletes all files on the C: drive, but does not affect files on other partitions.

If we choose Complete system restore, then everything on the C: drive and all other partitions will be deleted. After recovery, all disk space will be occupied by drive C:


How to factory reset an HP laptop
If the laptop does not boot at all due to system errors and you want to restore its original settings, then in order not to lose your data, you can boot it from any Live CD, then transfer important files to a portable hard drive, then restore the factory settings, since Restoring the factory settings will delete all your data from the laptop.
Press the key when turning on the laptop E sc.

We enter the boot menu, as we see, the F11 key is responsible for restoring the factory settings - System Recovery. Press the F11 key.

A window appears HP Recovery Manager. Here we need the item " Restoring the system to its original state when shipped from the manufacturer».

We click on " Restore without creating a backup files" and click Next.

Now you need to turn off all external devices: printer, scanner, mouse, click Next and the process of restoring the factory settings of the HP laptop will begin.
Is there an alternative to the factory reset program built into the laptop? Yes, they are programs. and and they have a lot more opportunities.
If for some reason your computer has become slow, buggy, or has stopped loading altogether, resetting Windows 10 to factory settings can help. This option allows you to automatically (sometimes semi-automatically) restore the system without losing important files. We will look at all the methods for such a reset and point out possible problems and errors.
When you might need to reset Windows 10 to factory settings
An OS reset may be needed in the following cases:

In previous versions of Windows (7 and 8), it was much more difficult to reset the system than in the new 10. Now, virtually any problem can be tried to be solved with a reset. It definitely won’t hurt, because as a result, only programs will be deleted, your personal files will remain untouched.
How to reset Windows 10 to factory settings
There are several ways to reset Windows 10 to factory settings. We will consider each of them in order of complexity of operations. If the next reset method did not help solve the problem, or it did not work out, try the next one.
Quick system rollback
If an older version of Windows (8.1 or older) has recently been upgraded to Windows 10, then there is an option to roll back to the previous OS. The user is given a 30-day period to "test" Windows 10, after which the rollback files are deleted (how to prevent this, we will consider below). To revert to a previous version of Windows, do the following:

By default, the OS will delete recovery files after a month of using Windows 10. However, you can prevent them from being deleted. To do this, simply rename the recovery folders or reset them to a USB flash drive / hard drive:

Please note that you cannot use other people's reset folders in this way. They contain unique information about the system version and product key.
Video: how to roll back from Windows 10 to a previous version of the system
Reset the system through the Windows 10 interface
If the OS has not stopped loading, you can reset it directly in the Windows interface:
- Enter "Settings".
- Go to Update/Security, select Recovery.
Click on the "Start" button
- Click on "Get Started" under "Reset PC".
- Windows will offer to keep the user's personal files or delete them. Choose the appropriate option.
Specify what to do with the user's personal files
- If you choose to delete, the system will also offer to completely format the hard drive. This will delete absolutely all files from the computer.
- Press the "Reset" button when the system indicates that everything is ready to be reset.
Click "Reset" to start the system reset to factory settings
During the reset process, the computer will restart several times. If you encounter any errors at any stage, move on to the next option.
Video: how to reset Windows 10 to factory settings through the OS interface
Using the Refresh Windows Tool
Microsoft is aware that a standard system reset does not always work. Therefore, in 2016, a utility was released that allows you to reset the system if the standard method did not work. To reset the system using the Refresh Windows Tool:
- Open the Recovery tab through Windows Options.
- Find the link "Learn how to start over..."
- The Microsoft official website page will open in your default browser. Read the information provided and click Download Tool Now.
Read the information about the utility and download it
- Run the downloaded program.
- Follow the instructions.
Choose what to do with the user's personal files and click "Get Started"
- The automatic reset process will begin, which can take quite a long time. As a result, you will get a "clean" system.

Recovery data can take up to 20 GB of free space, which can be used for other purposes.
Resetting Windows 10 if the system won't start
If, due to some problems, you are unable to log in to perform an automatic reset, please use the methods below.
Reset laptop to factory settings
Users of laptops from any manufacturer can perform a full system reset through the BIOS. This feature is built into all laptops by default. However, it will only work if you have a licensed version of Windows 10 installed.
Before you start resetting your laptop, disable the "Quick Startup" option. To do this, enter the BIOS (by pressing the appropriate key for your device when turning on the computer, usually F2 or Del) and find the Boot Booster option in the Boot section. Set the value to Disabled and restart the computer saving the settings.
Disable the Boot Booster option through the BIOS menu
Depending on the laptop model, press the following keyboard shortcuts when restarting:
- for ASUS models - F9;
- for HP - F11;
- for Acer - Alt + F10;
- for Samsung - F4.
This action will open the reset program. Follow the instructions and it will eventually reset all settings automatically. Data from drive C will be completely deleted.
By pressing the F4 key on a Samsung laptop when rebooting, you can call the reset program
Video: how to reset an Acer laptop
Reset Windows 10 using a flash drive / disk
You can reset the system using a flash drive / recovery disk (how to create it on another working computer with the same OS is described below):
- Go into the BIOS and select the desired boot option (from a USB flash drive or disk).
Select your recovery flash drive from the BIOS boot menu
- After the reboot, the recovery program will open. Enter Troubleshooting.
Click on "Troubleshooting" when the recovery program asks you to select an action
- Select Revert to original state.
Click on "Reset this PC"
After that, the system will be reset to its original form. If you choose to keep your personal files, they will be in the Windows.old folder.
Create a reset disk on a flash drive
To create a reset disk on a flash drive, do the following:
- Log in to Control Panel. Turn on showing icons, not categories. Find the "Recovery" item.
Click on "Recovery" in "Control Panel"
- Select "Create a recovery drive".
Click on "Create a recovery drive"
- In the window that opens, you can select the backup option. Then about 8 GB of memory on the flash drive will be occupied, but restoring the system will be much easier and faster.
Back up your system files to speed up the system restore process in the future
- Select the flash drive on which the recovery disk will be created. It will be automatically formatted.
Wait until the end of the process.
Now the flash drive can be used to reset the Windows 10 system.
Please note that you can use the free space on the flash drive for your own needs. This will not harm the recovery program.
Video: how to create a Windows 10 recovery image on a flash drive and restore the system from the image
Creating a reset disc on CD/DVD
Before proceeding directly to the reset, consider creating a recovery disc on CD / DVD:
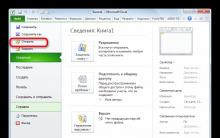
- Open Control Panel and go to Backup and Restore.
Click on the "Create System Recovery Disc" button
- Select the drive with the inserted disc in the window that opens and click "Create Disc".
Click "Create Disc"
You can now use this disk to reset Windows 10.
Video: How to create a Windows 10 recovery disc without using additional media
Possible problems resetting Windows 10
Even though the Windows 10 reset procedure looks pretty simple, there are still chances of errors appearing. Consider the most common of them:
- Resetting problem. If the message "Problem to reset" appears on the screen during a system reset, the recovery files are most likely corrupted. In this case, you can try to start the reset again, as the error may be accidental. If this does not help, you need to reinstall Windows. Please note that even when you reinstall the system, you can keep your personal files.
"Problem resetting PC" error occurs due to corrupted recovery files
You need a recovery disk. If the system displayed a similar message during the reset process, it may be missing some recovery files or libraries. Insert a recovery disk/flash drive or use the Refresh Windows Tool to solve this problem.
Insert the recovery disc or installation media to resolve the error
If you encounter other problems during the Windows 10 reset process, proceed to the next method from the above. If none of them helped, you will have to reinstall the operating system.
Resetting Windows 10 to factory settings is easy. In most situations, the programs and utilities offered by Microsoft do an excellent job of this task. If not, you can use the recovery disk/flash drive. One way or another, you can reinstall the OS, after saving your personal data.


 from your photo How can I change the shortcut icon")


What is a file, folder and shortcut?
How to add an item to the Windows context menu Set the system attribute from the context menu
how to put password on excel file how to encode excel file
Free online PDF assembler, parser and compressor
What is the Gmail service on the phone