Configuring the HP printer when connected via USB cable to a Windows computer. To maximize the supported printer functions connected via USB, install a full-featured HP driver.
Step 1. Prepare the printer setting
Check out the requirements and delete any previously installed versions of the printer in Windows to prepare for setting up USB connection and installation of drivers.

Step 2. Installing Driver and Connection Setup
Download and install the most optimal of the available print drivers to complete the USB connection.
Can I install from a disk from the printer's delivery kit?
Yes, but the driver version can be outdated or incompatible with new operating systems. A driver version is installed from the disk, which is initially supplied with the printer.
Make sure that the disk drivers compatible with your OS, especially if the computer is updated. Otherwise, the installation may be completed.
What are the types of drivers in the "Loading and HP Drivers" section?
In chapter . More than one type of driver for your printer can be available. This manual will help determine which driver should be downloaded.
Note.Depending on the printer and the version of the operating system, it may not be available for downloading the driver in the HP boot section. If item Installing the Printer Driver using Built-in Windows Solution Displayed in the section Driver / Product Installation Software Without boot button, click Read more to install drivers provided via Windows.
|
Type Driver | |
|
Full-featured driver or driver from a comprehensive solution Install a full-featured driver or driver from a comprehensive solution if available to use all the printer features as efficiently as possible. |
Hewlett-Packard is one of the world's leading printer manufacturers. She won his place on the market not only due to high-quality peripheral devices for the output of text and graphic information on printing, but also thanks to convenient software solutions. Let's look at some popular HP printers and determine their features.
One of the most famous applications from Hewlett-Packard to edit and managing images in digital formats is Image Zone Photo. This tool interacts perfectly with printers of the specified company, since it can easily send images to print. But its main function is still the processing of photographs themselves.

You can manage and view pictures in various modes (full-screen, single, slideshows) in this program using a convenient file manager, and you can use them by the built-in editor. It is possible to rotate the photo, change the contrast, trim, remove the effect of red eyes, apply the filter. The mansion is the possibility of creating and printing albums by distributing photos to embedded layouts.
At the same time, it should be noted that in comparison with full-fledged graphic editors and modern photographs of photographs IAJJ zones photos are significantly losing the functionality. This program does not have a Russian-speaking interface, and it has long been considered to be morally outdated and not supported by manufacturers.
Digital Sending.
For the distribution network of digitized information received from the Hewlett-Packard devices, the Digital Sending application is best suited. With it, it is possible to digitize materials on paper on a number of popular formats (JPEG, PDF, TIFF, etc.), and then send the received information on the local network, to e-mail, to fax, via Microsoft SharePoint or upload to the site FTP connection. All sent data is protected by SSL / TLS protocol. In addition, this tool has a number of additional functions, such as analysis of operations and backups.
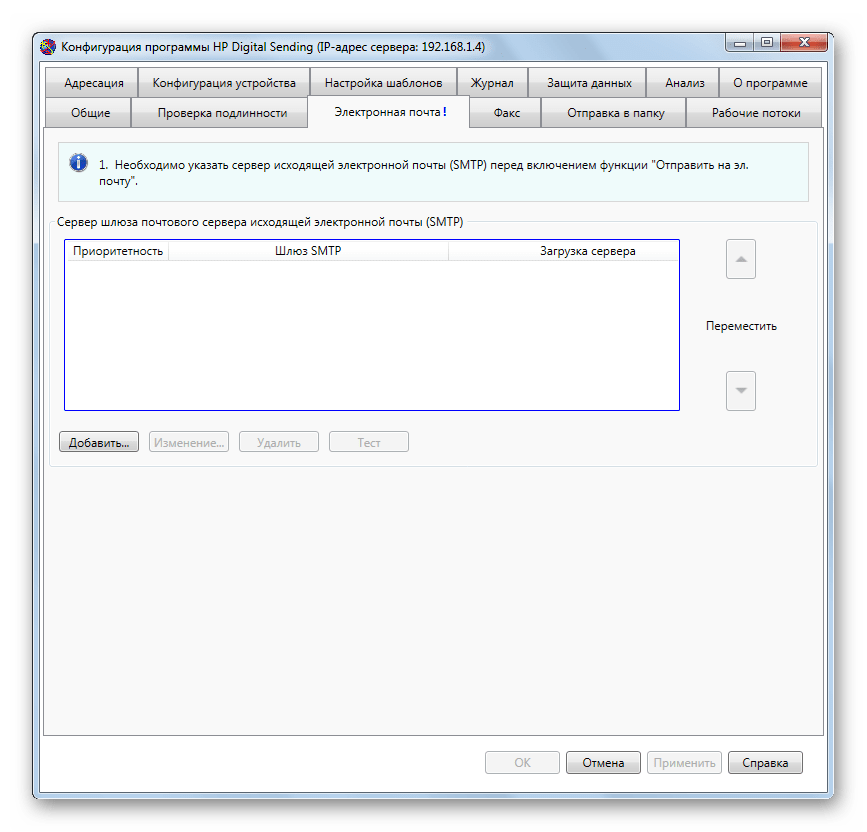
But this convenient application is optimized only to work with the devices from Hewlett-Packard, and when interacting with printers and scanners of other manufacturers there may be problems. In addition, for each connected device, users have to acquire a license.
Web Jetadmin.
Another program to control peripheral devices from Hewlett-Packard is Web Jetadmin. With the help of the specified tool, you can search and group all the devices connected to the local network connected to the local network, update their software, configure various parameters, to identify malfunctions in time, as well as perform some preventive fault prevention activities.

In addition, the user gets the ability to analyze the work done by collecting data and creating reports. Through the interface of the named software product, you can create user profiles and assign them certain roles. One of the main functions of the web jeptadmin is to control the seal, which is very convenient if there are large queues.
The disadvantages can be attributed to the disadvantages to understand the work of the program interface. At the moment there is only a version that works exclusively on 64-bit operating systems. In addition, to download this application, as well as most of the other Hewlett-Packard products, it will be necessary to produce a registration procedure on the official website.
There are quite a lot of applications for managing Hewlett-Packard printers. We only described the small part of the most popular of them. Such a variety is due to the fact that these applications also interact with the same type of devices, but at the same time perform various functions. Therefore, when choosing a specific tool, it is important to clearly understand what it will be needed for you.
In this article we will deal with how to install the printer without the installation disk.
There are two options:
Windows Update;
Download driver yourself.
Windows Update Sets the basic drivers. They only allow you to print and / or scan. Additional features, such as image processing before printing, setting up colors and others - will be unavailable.
The advantages of the second way are that we download the most freshest software for the device and all specific functions will be available.
Windows Update.
Under Windows, there is a huge base of software for almost all peripheral devices, including printing. We use it.
Connect the printer or MFP to the computer and wait a couple of minutes. It will be identified or defining the device and Windows will try to install the driver. Since you read this article, most likely, this method has not worked. Run the update manually.
We go along the way:
Control Panel\u003e Hardware and Sound\u003e Devices and Printer
or
Control Panel\u003e Equipment and Sound\u003e Devices and Printers
Click on the computer icon right mouse button and choose - Windows Update.
In the window that opens, click "Check for Updates" (update check).

Software search for your devices. If something is found, it is either downloaded and installed automatically, or you will need to give permission. In my case, everything is done on the machine.

You may need to restart the computer. Perform and see if the printer installed. If the device is set, but does not print, then I would connect it to another USB port.
In order for the operating system to always automatically load drivers and pictures for connected devices, you can do the following.
Call the context menu by right-click on the computer icon and select Device Installation Settings.


Now, when connecting a new Windows device, Windows will automatically search for a driver in its database.
How to install a driver from the update center (for example, HP 1015)
1. Disconnect HP 1015 from the computer.
2. Menu "Start"\u003e "Devices and Printers".
3. "Installing the Printer".

4. "Add Local Printer"


6. Windows Update Center

7. We are waiting for downloading the list of available drivers.
8. Select HP\u003e HP LaserJet 1015\u003e Click "Next".


12. HP 1015 installed.

13. Delete the installed device

We do not need the printer itself. We need software that is installed with it.
14. We connect HP 1015 to the computer and wait until the unit "grab" the driver has already installed.
Download and install manually
Take for example HP Deskjet F380. If you do not know the model of your printer or MFP, then carefully examine the identification inscriptions on the housing. Also find the model can be on the sticker behind or below the device.
Open your browser and Google or Yandex write "HP Deskjet F380 Driver". You substitute your model.
In most cases, in the first place, or on the first issue of issuing, there will be a link to the equipment support page on the official website of the manufacturer.

It is possible to understand that this official site is possible at the address.
Swing from the official site more convenient for two reasons:
- No malicious code;
- There is freshly fresh.
If there was no reference to the official website on the first issue of issuing, you can find it yourself. We specify "HP" and select the "Driver" or "Support and Drivers" immediately.

In the "Drivers and Materials for Loading" section, we specify your model (for example, "F380") and click "Go".
Or, you can on the right in the "Determine Product" section, click "Find Now" and follow the instructions of the wizard. (This option is still available for Windows XP / VISTA / 7 with browsers: Internet Explorer (IE) 6.0+; Firefox 3.6.x, 12.0+; Google Chrome).

Select our device from the search results.

From the drop-down list, select your operating system and click "Send".

In the "Driver" section, click "Download".

There may be several software options. For example, a full-featured software and a basic driver. If you need advanced features of the device and image processing - download full-featured software.
Run the downloaded file.


There will be unpacking files and the installation wizard will start. We click "Install" and follow further instructions.

For the full operation of the printer, you need to install additional software - drivers. Usually, they are included with the device, on a special boot disk. Without them, the computer will not detect the connected device. Of course, we are not talking about devices that are automatically recognized by the system. Immediately I would like to note that you need to read the article completely, since there are complex and simpler methods for installing drivers and therefore you need to read the article to the end. Almost at the very end of the article there is information how to install the driver for the printer automatically, have it insert. When the question arises how to install a printer without a disk, the inexperienced users think that it is very difficult. But in fact, this procedure can be mastered in 15-30 minutes. Let's check if it is.
There are two main ways to install a printer without a boot disk, namely, download the necessary drivers from the Internet
- Using the basic tools of Windows Update;
- Alone, knowing the device identification code or using the printer model.
The first method is perfect for simple models of printers (only printing and scanning documents, without additional parameter details), because Windows Update sets the basic driver package.
The second method allows you to download the latest version of software, so after their installation, the user will be available absolutely all the printer functions, including more "advanced".
In addition, the reason for installing the drivers may not only be their complete absence, but also the malfunction of the device itself. Sometimes using one or another printer driver refuses to print documents, and all because the driver you installed did not fit for your device. This is of course one of the reasons why the printer may incorrectly work, but as you understand, we are not in vain about it now. After all, then we will tell you how to download your driver to a computer, but if you hurry, you may have difficulty. Therefore, act in stages.
If you have previously studied this issue somewhere and not one of the ways, it was not crowned with success, you can try to update the drivers. This article is universal - here we will tell how to do in different versions of Windows.
Therefore, before installing a printer without a disc, it is necessary:
1. Disconnect the device connected to the computer;
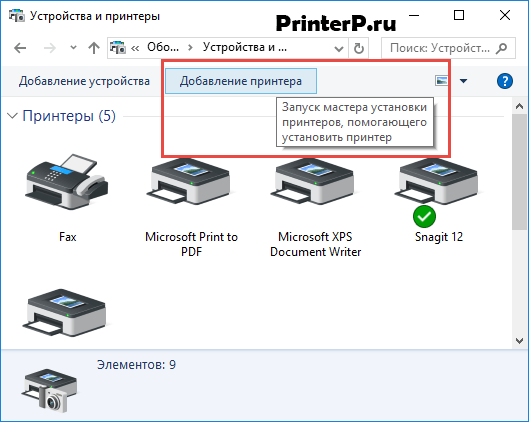
2. Go to the Start menu - "Control Panel" - "Devices and Printers" or "View Devices and Printers";
3. Here it will be necessary to find the "Installing Printer" or "Adding Printer" in the top panel;
 4. The printer installation wizard opens, from the proposed options, select "Add Local Printer" and click "Next" (for Windows 7). If you have Windows 8 or 10, then at the bottom, click "The required printer is missing in the list" - and then select "Add a local or network printer with manually settings" and click "Next".

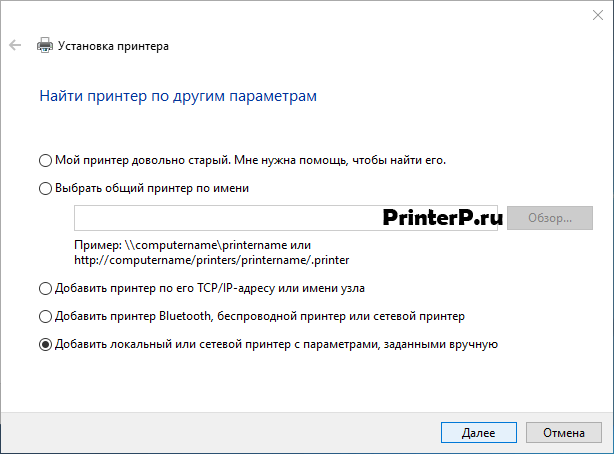 5. Wizard installation of printers and other equipment will offer to select the port, leave the default settings (LPT1) and go to the next step;
 6. Click on the Windows Update Center button and wait for the available drivers available;
 7. A list of printer-manufacturers and basic models will be loaded. May take from 5 to 30 minutes. On the left, find the manufacturer, and right specify the printer model. Then click "Next". In this case, we chose the HP brand, and the LaserJet 1022 model.
 8. The installation wizard will offer to come up with a name for the device (leave the default name or come up with your own), click "Next";

9. Wait for the installation to be completed;
 10. The "Use of General Parameters" window will open, here you need to select the "No sharing to this printer" parameter and click "Next" (window will appear if Windows 7 is installed). If you have Windows 10, then you will display the window where you want to click "Finish" (the same window will appear later in Windows 7).

The next thing to do is to delete the device just installed. To do this, click on the printer icon with the right mouse button and in the context menu, select "Delete the device" (while the installed drivers will remain).

After the proceeds have done, you can connect the printer to the computer. When connecting the printer, you need to wait a bit to make the computer automatically recognize the printer and installed. Then you can print any document to make sure the driver is installed.
How to do it in Windows 7:
Official sites
If you do not have a drive with drivers for the printer, you can download them from the manufacturer's official website. For this, it is enough to know the company and the model of the printer. You can find them in the documentation, on the housing or rear of the device. If you do not understand the instructions below, you can download the desired driver on our website without any fears (all drivers without viruses).
Open any browser and in the search bar, enter: "HP LaserJet P1102 Printer Driver Download". In this article I will search for the drivers for the above device, you also need to specify your model.

As a rule, the reference to the official website of the developer will be on the first search page, in the top. But it does not always happen and therefore it is necessary to be attentive. In order not to download malware instead of drivers, make sure you really went to the official developer website. To do this, pay attention to the site link in the search engine. There should be nothing "superfluous" (the address will be approximately: "hp.com" or "samsung.com", etc.
If you doubt the authenticity of the site you found, you can only enter the name of the printer without a model and other information. And from the main page, go to the "Drivers and Other PO" section.

Advantages of downloading drivers from the official site:
- Security (availability of digital signatures for drivers, lack of built-in malicious code);
- The developer places on the site only the last, "Fresh" versions of the drivers.
As soon as you get to the desired page ("Drivers and other files", "software", "software", "download", as well as "Drivers" on the English version of the site), you will remain to enter the model of your printer and search.

In addition, some sites allow you to automatically determine the device model and the necessary drivers, for example, can be the "Define Product" button. So, if we are on the HP website, click "Search for Product" and in our case there are varieties of this model. We need to choose the desired model by pressing the left mouse button.

After you have the necessary drivers, you will need to specify information about the version of your operating system, the system's discharge. If this window does not appear, then simply click on the link or the button for downloading drivers.

There may be such a situation that the site will offer to download the version of the drivers to choose from:
- Basic - to access the main possibilities of the device;
- Extended - to access additional features.
You do not need to experience what version you download, the main thing is to specify the correctness of your system (discussed above).

At the end of the download, you need to run the downloaded file and follow the instructions of the installation wizard.
Windows Update.
The Windows operating system by default contains all the main drivers for the most popular peripheral devices. Including printers and scanners. To do this, connect the device to the computer and wait a few minutes. If an attempt to automatically install the printer is not positive, you must do the following:
1. Open the control panel;
2. Find "Equipment and Sound";
 3. Click the left mouse button on "Devices and Printers";
 4. A new window will appear with icons connected. Find the image of the computer or laptop (in my case it is a laptop) and click on it with the right mouse button. In the context menu that opens, click on the window "Windows Update".

5. After that, a window will open, where in the right menu you must click "Checking the availability of updates". There should be automatic search for available updates for all your devices. We must tell you that it is desirable to have a quick Internet, as this procedure can take 10-30 minutes.
 6. Now you have to wait, when Windows is downloaded by the found updates in automatic mode;
 7. After the search is completed and all the updates found will be downloaded and installed on your computer or laptop, you must restart the device.
After rebooting the computer, the printer must work. If, after rebooting the computer still does not see the device, perhaps the root of the problem is not in the drivers. Try connecting the printer to another USB input.
Definition of printer ID
Each device that connects to a computer belongs to a unique identification code. If you know the equipment ID, then you download the driver you need without any problems. If the instructions described above did not help you, and you did not figure it out, how to install a printer without a disk, It is necessary to know its identification code. I recommend this option to use in the most extreme cases, and if you downloaded the drivers from the official site, you can skip this option.
So, to learn ID:
1. Right-click on the computer and select "Properties", following the left, press "Device Manager";

 2. In the window that opens, find your printer. Right-click on the desired row and in the menu that appears, click on "Properties";
 3. A dialog box opens where you need to go to the "Details" tab. Next, in the "Property" line, select "EU ID".
 4. The window below will appear, which will be the identification code of the printer (if there are several values, then select the first one);
5. Copy the identifier. Go to the official website of the manufacturer of your printer and enter a copied identification number to the search. You can also use the search engines to find the driver you need using the equipment ID. But does not forget that on our site there are all drivers for existing printers. It remains only to download the driver found.
Remember that downloading drivers only with official resources. This is absolutely free and most securely as possible.
Install drivers automatically
That this problem never bothered and drivers for any external devices installed automatically, it suffices to change the basic Windows settings. For this:
1. Go back to the "Devices and Printers" menu (described above, how to log in here) via the control panel. Right-click on the "Computer" icon and in the context menu that appears, select "Device Settings";
 2. The dialog box opens where you need to select "Yes (recommended)" (recommended default parameters) and click "Save";

Now, after connecting the new Windows device, you will automatically search and install the necessary drivers from your own database or using the Internet connection.
As a rule, the equipment connected to the PC or the laptop is a drive with utilities for the device operation. If the installation and configuration are produced in the service center or at the point of purchase, it does not arise problems, but if there is a need for operation, install the drivers for equipment yourself, some difficulties may arise.
Multifunctional device (MFP)
For multifunctional devices (MFP), as well as for other equipment connected to personal computers, the utility is required for work. What kind of in need, will be created from several factors, namely, the models of the equipment and the operating system installed on your PC.
What will we talk about:
If you have a disk with "firewood" for your MFP, here you will need to just install the utilities from the disk, what we will talk to a little later. If you cannot install utilities from the drive, it is possible, in view of any reasons, then the Internet comes to the aid, where you can find software for any equipment.

When searching for the driver on the Internet through any search engine in the results you will see many different sites offered to download the necessary programs on their resource. Specialists categorically do not advise using utilities downloaded from third-party resources. Even if the software applies for free, there are other risks:
- the program may not be a working and you will only lose force and time;
- using this software can lead to incorrect equipment;
- there is a risk of infecting your system with a virus, probably contained in such a utility.
To avoid such problems, a program for the HP printer is used. Find such software should be on the website of the manufacturer of HP printers. This will protect you and your laptop, and also guarantees a reliable and uninterrupted operation of the device, for downloading this software you do not need to pay, it is provided free of charge.

Install drivers from installation disk
To install the software and utilities from the drive, you must insert the disk in the CD-ROM, wait until the autorun is started and follow the instructions of the installer. Below we will look at the problems arising when installing software from the drive and possible options for solving them.
Auto start does not start
Such a problem may be caused by several reasons: incorrect autorun settings, damaged drive or faulty drive. In order to check the autorun settings in Windows 7 (for other operating systems, the autorun configuration may differ) Go through the Start - Control Panel - Autorun and put a tick as shown in the photo:

After that, you must try to start the drive again. If the disc is not started automatically see items below.
- Try manually run the SETUP file on the disk and follow the installation program instructions. If the drive does not open or when loading knocks out the error, see the items below.
- Inspect the visual disk for cracks, scratches and other damage indicating a malfunction of the drive. When the disk is contaminated, it will be advisable to use the tools for cleaning the optical disks, which you can in specialized stores. If the drive turned out to be unsuitable, you can download the necessary software on the company's website, or there, to order by mail the drive with utilities on your model MFP.
- To check the drive performance, you should try to play other optical discs if the CD-ROM "does not read" and other drives, most likely the problem lies in it. To eliminate this problem, contact the CD drive service center.
Installation of downloaded drivers for HP printers
If the installation disk has become unusable or installed in this way, it does not work for other reasons, you need to download software from the Internet with the subsequent installation.

Driver installation process for the HP LaserJet printer:
- Download the installation file for your model of a printed device, with exe extension.
- Save programs for the HP LaserJet printer on the hard disk.
- Run the file and follow the installer indication.
Installing Drivers and Configuring Work Device in Wireless Network
Consider setting up the printer to work in the wireless network. As an example, we will serve as a program for HP Deskjet 3525 printers. To connect to the Wi-Fi network you need to install the software that is convenient for you, and then configure the connection to the printer through the wireless network. To configure, we need:
- Network Name - SSID.
- Password for connecting to this network.
- USB cable for connecting the device (the installer will ask you to connect the cable to the printing machine).
- MFP with wireless support.
- An Internet connection is recommended, to quickly solve problems that occur during the configuration.

MFP connection process:
- Make sure all the elements are performed and correctly connected: PC, router and printing devices.
- Computer and MFPs must be connected to one wireless network.
- Install the driver and in the settings, in the "Connection Method" item, you must select - Wireless Connection, as shown in the photo.
- Connect the printer to the PC using a USB cable to synchronize devices and transmitting the Wi-Fi network to the device.
- Follow the instructions in the installer and after installing the drivers, register your device on the official HP website.
Update Utilities and Drivers for HP Printers
For updating, specialists recommend using the HP LaserJet P1102 program (Pro P1100). This utility will allow you to quickly and efficiently check the urgency of the installed software, as well as protect your device from garbage files and unnecessary additions to maximize the speed of your device.


Instructions for using JSQL Injection - Multifunction tool for searching and operating SQL injections in Kali Linux gr
ShoppingGid: How to remove annoying spam?
How to send a message to all friends VKontakte
How to buy hacker skills
Best Tools for Craw Marketing